How to tie the cord on scabbard

Firma Knsultingowo-Usługowo-Handlowa | Serwis Informatyczny-Doradztwo komputerowe Serwis sprzętu i oprogramowania komputerowego | Pomoc komputerowa Warszawa telefon kom: +48 604 606 406 | mail: Firma@mb4.pl
Request.ServerVariables (server_variable)
| Variable | Description |
|---|---|
| ALL_HTTP | Returns all HTTP headers sent by the client. Always prefixed with HTTP_ and capitalized |
| ALL_RAW | Returns all headers in raw form |
| APPL_MD_PATH | Returns the meta base path for the application for the ISAPI DLL |
| APPL_PHYSICAL_PATH | Returns the physical path corresponding to the meta base path |
| AUTH_PASSWORD | Returns the value entered in the client’s authentication dialog |
| AUTH_TYPE | The authentication method that the server uses to validate users |
| AUTH_USER | Returns the raw authenticated user name |
| CERT_COOKIE | Returns the unique ID for client certificate as a string |
| CERT_FLAGS | bit0 is set to 1 if the client certificate is present and bit1 is set to 1 if the cCertification authority of the client certificate is not valid |
| CERT_ISSUER | Returns the issuer field of the client certificate |
| CERT_KEYSIZE | Returns the number of bits in Secure Sockets Layer connection key size |
| CERT_SECRETKEYSIZE | Returns the number of bits in server certificate private key |
| CERT_SERIALNUMBER | Returns the serial number field of the client certificate |
| CERT_SERVER_ISSUER | Returns the issuer field of the server certificate |
| CERT_SERVER_SUBJECT | Returns the subject field of the server certificate |
| CERT_SUBJECT | Returns the subject field of the client certificate |
| CONTENT_LENGTH | Returns the length of the content as sent by the client |
| CONTENT_TYPE | Returns the data type of the content |
| GATEWAY_INTERFACE | Returns the revision of the CGI specification used by the server |
| HTTP_<HeaderName> | Returns the value stored in the header HeaderName |
| HTTP_ACCEPT | Returns the value of the Accept header |
| HTTP_ACCEPT_LANGUAGE | Returns a string describing the language to use for displaying content |
| HTTP_COOKIE | Returns the cookie string included with the request |
| HTTP_REFERER | Returns a string containing the URL of the page that referred the request to the current page using an <a> tag. If the page is redirected, HTTP_REFERER is empty |
| HTTP_USER_AGENT | Returns a string describing the browser that sent the request |
| HTTPS | Returns ON if the request came in through secure channel or OFF if the request came in through a non-secure channel |
| HTTPS_KEYSIZE | Returns the number of bits in Secure Sockets Layer connection key size |
| HTTPS_SECRETKEYSIZE | Returns the number of bits in server certificate private key |
| HTTPS_SERVER_ISSUER | Returns the issuer field of the server certificate |
| HTTPS_SERVER_SUBJECT | Returns the subject field of the server certificate |
| INSTANCE_ID | The ID for the IIS instance in text format |
| INSTANCE_META_PATH | The meta base path for the instance of IIS that responds to the request |
| LOCAL_ADDR | Returns the server address on which the request came in |
| LOGON_USER | Returns the Windows account that the user is logged into |
| PATH_INFO | Returns extra path information as given by the client |
| PATH_TRANSLATED | A translated version of PATH_INFO that takes the path and performs any necessary virtual-to-physical mapping |
| QUERY_STRING | Returns the query information stored in the string following the question mark (?) in the HTTP request |
| REMOTE_ADDR | Returns the IP address of the remote host making the request |
| REMOTE_HOST | Returns the name of the host making the request |
| REMOTE_USER | Returns an unmapped user-name string sent in by the user |
| REQUEST_METHOD | Returns the method used to make the request |
| SCRIPT_NAME | Returns a virtual path to the script being executed |
| SERVER_NAME | Returns the server’s host name, DNS alias, or IP address as it would appear in self-referencing URLs |
| SERVER_PORT | Returns the port number to which the request was sent |
| SERVER_PORT_SECURE | Returns a string that contains 0 or 1. If the request is being handled on the secure port, it will be 1. Otherwise, it will be 0 |
| SERVER_PROTOCOL | Returns the name and revision of the request information protocol |
| SERVER_SOFTWARE | Returns the name and version of the server software that answers the request and runs the gateway |
| URL | Returns the base portion of the URL |
Informacje z artykułu
Krok 1
Krok 2 – weryfikacja domeny
Krok 3 – generowanie certyfikatu SSL i klucza prywatnego
Krok 4 – skopiowanie certyfikatu i klucza do panelu firmy hostingowej
Krok 5 – ostatni – weryfikacja
Uwaga: ważność darmowych certyfikatów SSL to tylko 90 dni, więc cały opisany wyżej proces trzeba powtarzać do trzy miesiące.
– Close all open programs and documents
– Simply start setup
– when will be presented error window:
– Click OK
– Next you will be presented with the second usual error window:
– Don’t click OK now, instead Sign out the user
The operation cannot be carried out because of that window waiting for intervention.
– Wait a few seconds and then click on Cancel, you are returned where you left
– NOW click OK
The installation will end without errors!!!
https://www.diskpart.com/server-2019/windows-server-2019-iso-to-usb-1984.html
————————————————————
Step 1. Click “start”, input “cmd” in the search box and right-click on the search outcome, then click”Run as administrator” to open the Command Prompt window tool.
Step 2. Type “diskpart” and press Enter to open the Diskpart tool. Type all the following commands and press Enter to execute them one by one.
● list disk
● select disk x (x is the number of your USB flash drive)
● clean
● create partition primary
● select partition 1
● format fs=ntfs quick (if you want to create UEFI bootable USB, type “format fs=fat32 quick”).
● active
Step 3. Type “exit” and press Enter to close diskpart command window.
Now your USB drive is bootable, do not close the Command Prompt. Mount the Windows Server 2019 ISO and follow the next steps to copy/burn Windows Server 2019 files to USB.
Step 4. Type “xcopy D:\*.* E: /s/e/f”(D is the ISO image drive, and drive E: is the USB drive letter) in the Command Prompt and press Enter.
Step 5. Type “D:\Boot\Bootsect /NT60 E: /force /mbr” to write a bootloader to your USB drive.
cscript.exe c:\windows\system32\slmgr.vbs -upk
cscript.exe c:\windows\system32\slmgr.vbs -ipk KLUCZ_LICENCYJNY
cscript.exe c:\windows\system32\slmgr.vbs -ato
Once the SSL certificate is installed, your site still remains accessible via a regular insecure HTTP connection. To connect securely, visitors must specify the https:// prefix manually when entering your site’s address in their browsers.
In order to force a secure connection on your website, it is necessary to set up a certain HTTP/HTTPS redirection rule. This way, anyone who enters your site using a link like “yourdomain.com” will be redirected to “https://yourdomain.com” or “https://www.yourdomain.com” (depending on your choice) making the traffic encrypted between the server and the client side.
Below are steps to setup a IIS HTTPS redirect:

NOTE: There are 4 redirect types of the redirect rule that can be selected in that menu:
– Permanent (301) – preferable type in this case, which tells clients that the content of the site is permanently moved to the HTTPS version. Good for SEO, as it brings all the traffic to your HTTPS website making a positive effect on its ranking in search engines.
– Found (302) – should be used only if you moved the content of certain pages to a new place *temporarily*. This way the SEO traffic goes in favour of the previous content’s location. This option is generally not recommended for a HTTP/HTTPS redirect.
– See Other (303) – specific redirect type for GET requests. Not recommended for HTTP/HTTPS.
– Temporary (307) – HTTP/1.1 successor of 302 redirect type. Not recommended for HTTP/HTTPS.
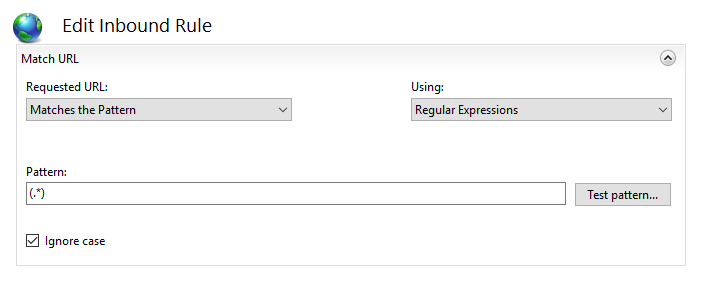
OPTION 2: Specify the Redirect Rule as https://{HTTP_HOST}/{R:1} and check the Append query string box. The Action type is also to be set as Redirect.
The IIS redirect can be checked by accessing your site via http:// specified in the URL. To make sure that your browser displays not the cached version of your site, you can use anonymous mode of the browser.
The rule is created in IIS, but the site is still not redirected to https://
Normally, the redirection rule gets written into the web.config file located in the document root directory of your website. If the redirection does not work for some reason, make sure that web.config exists and check if it contains the appropriate rule.
To do this, follow these steps:
<configuration>
<system.webServer>
<rewrite>
<rules>
<rule name="HTTPS force" enabled="true" stopProcessing="true">
<match url="(.*)" />
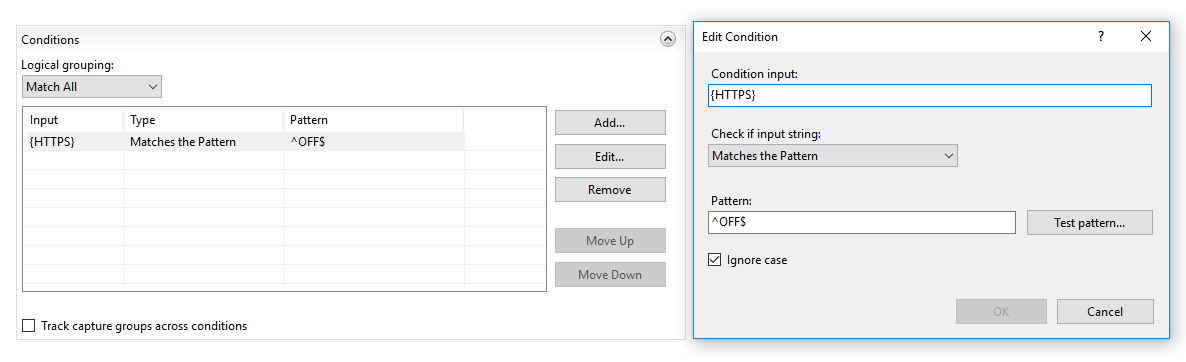
<conditions>
<add input="{HTTPS}" pattern="^OFF$" />
</conditions>
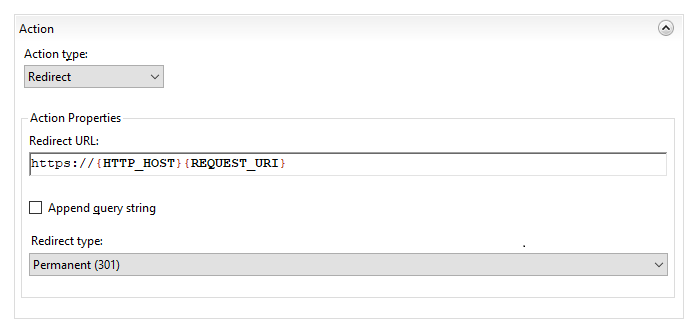
<action type="Redirect" url="https://{HTTP_HOST}{REQUEST_URI}" redirectType="Permanent" />
</rule>
</rules>
</rewrite>
</system.webServer>
</configuration>
Note: This is a default configuration. If you’d like to change it, you might need to check this server documentation.
sudo apt-get install mysql-serversudo service mysql start
sudo ufw allow 3306/tcp
sudo nano /etc/mysql/mysql.conf.d/mysqld.cnf
bind-address = 0.0.0.0
Save (ctrl + o then ctrl+x) and restart MySql Server.
sudo service mysql restartsudo mysql -u rootmysql> CREATE USER 'username'@'%' IDENTIFIED BY 'xxxxxxxx';
mysql> GRANT ALL PRIVILEGES ON * . * TO 'username'@'%';
mysql> FLUSH PRIVILEGES;W wierszu polecenia wpisz następujące polecenie, a następnie naciśnij klawisz Enter:
SFC /SCANNOW
dokładniejszy opis na stronie
https://support.microsoft.com/pl-pl/help/929833/use-the-system-file-checker-tool-to-repair-missing-or-corrupted-system
This post will cover the steps needed to configure the ADFS Web Application proxy.
WAP provides reverse proxy functionality for web applications in the corporate network which allows users on most devices to access internal web applications from external networks.
The WAP should not be part of the domain and should be used as an standalone server.
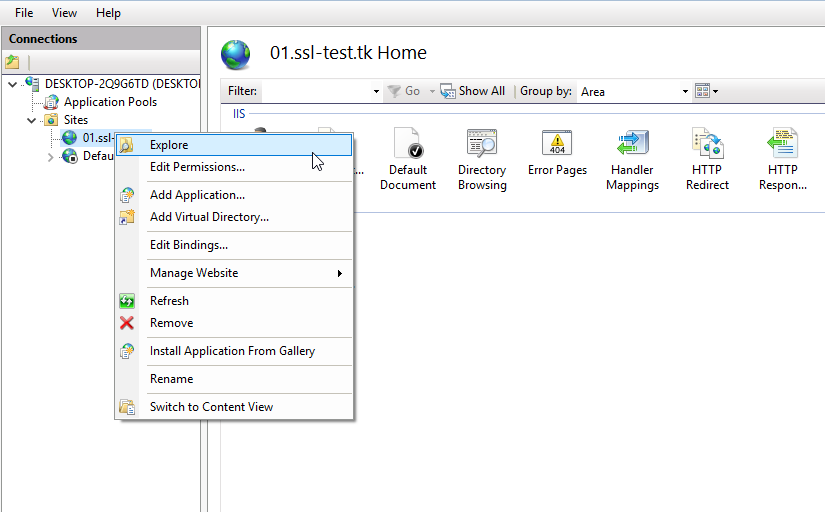
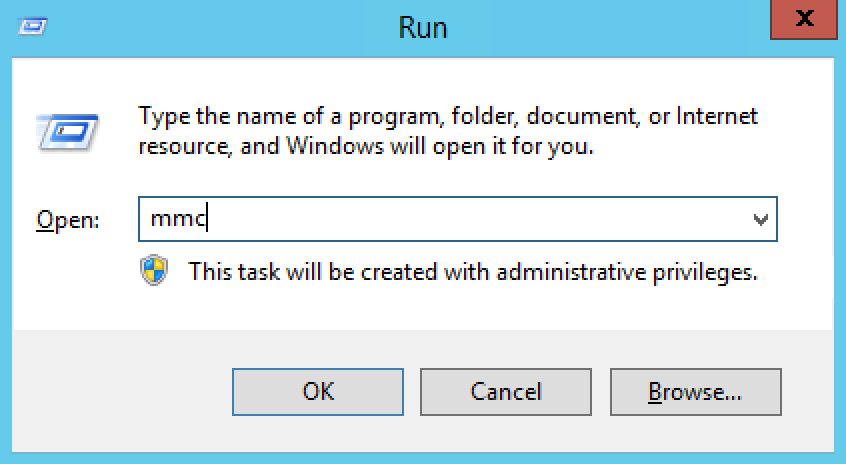
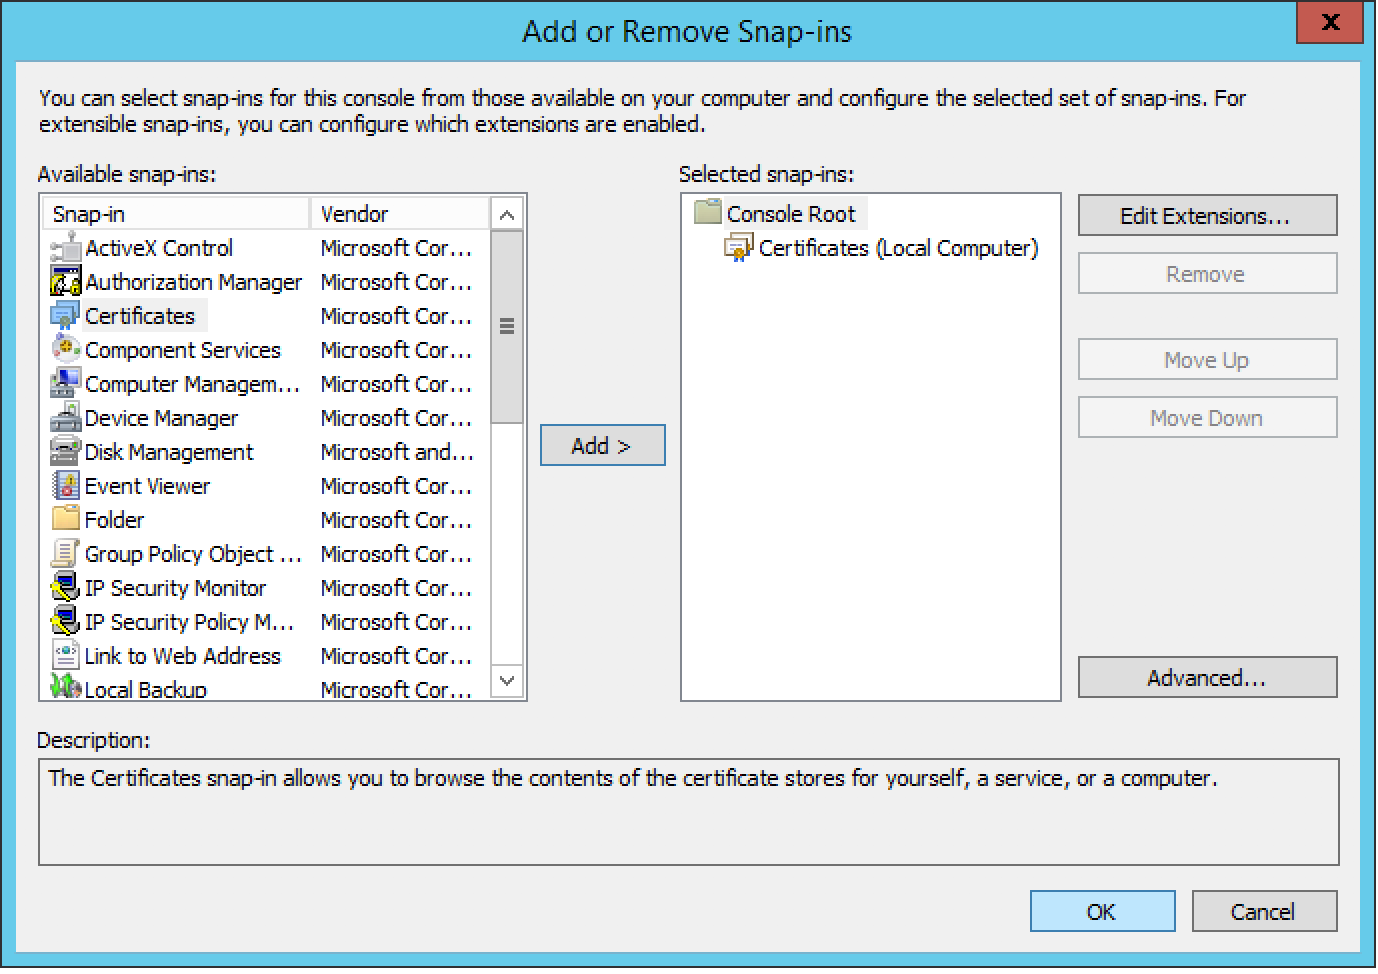
Open run, then type mmc
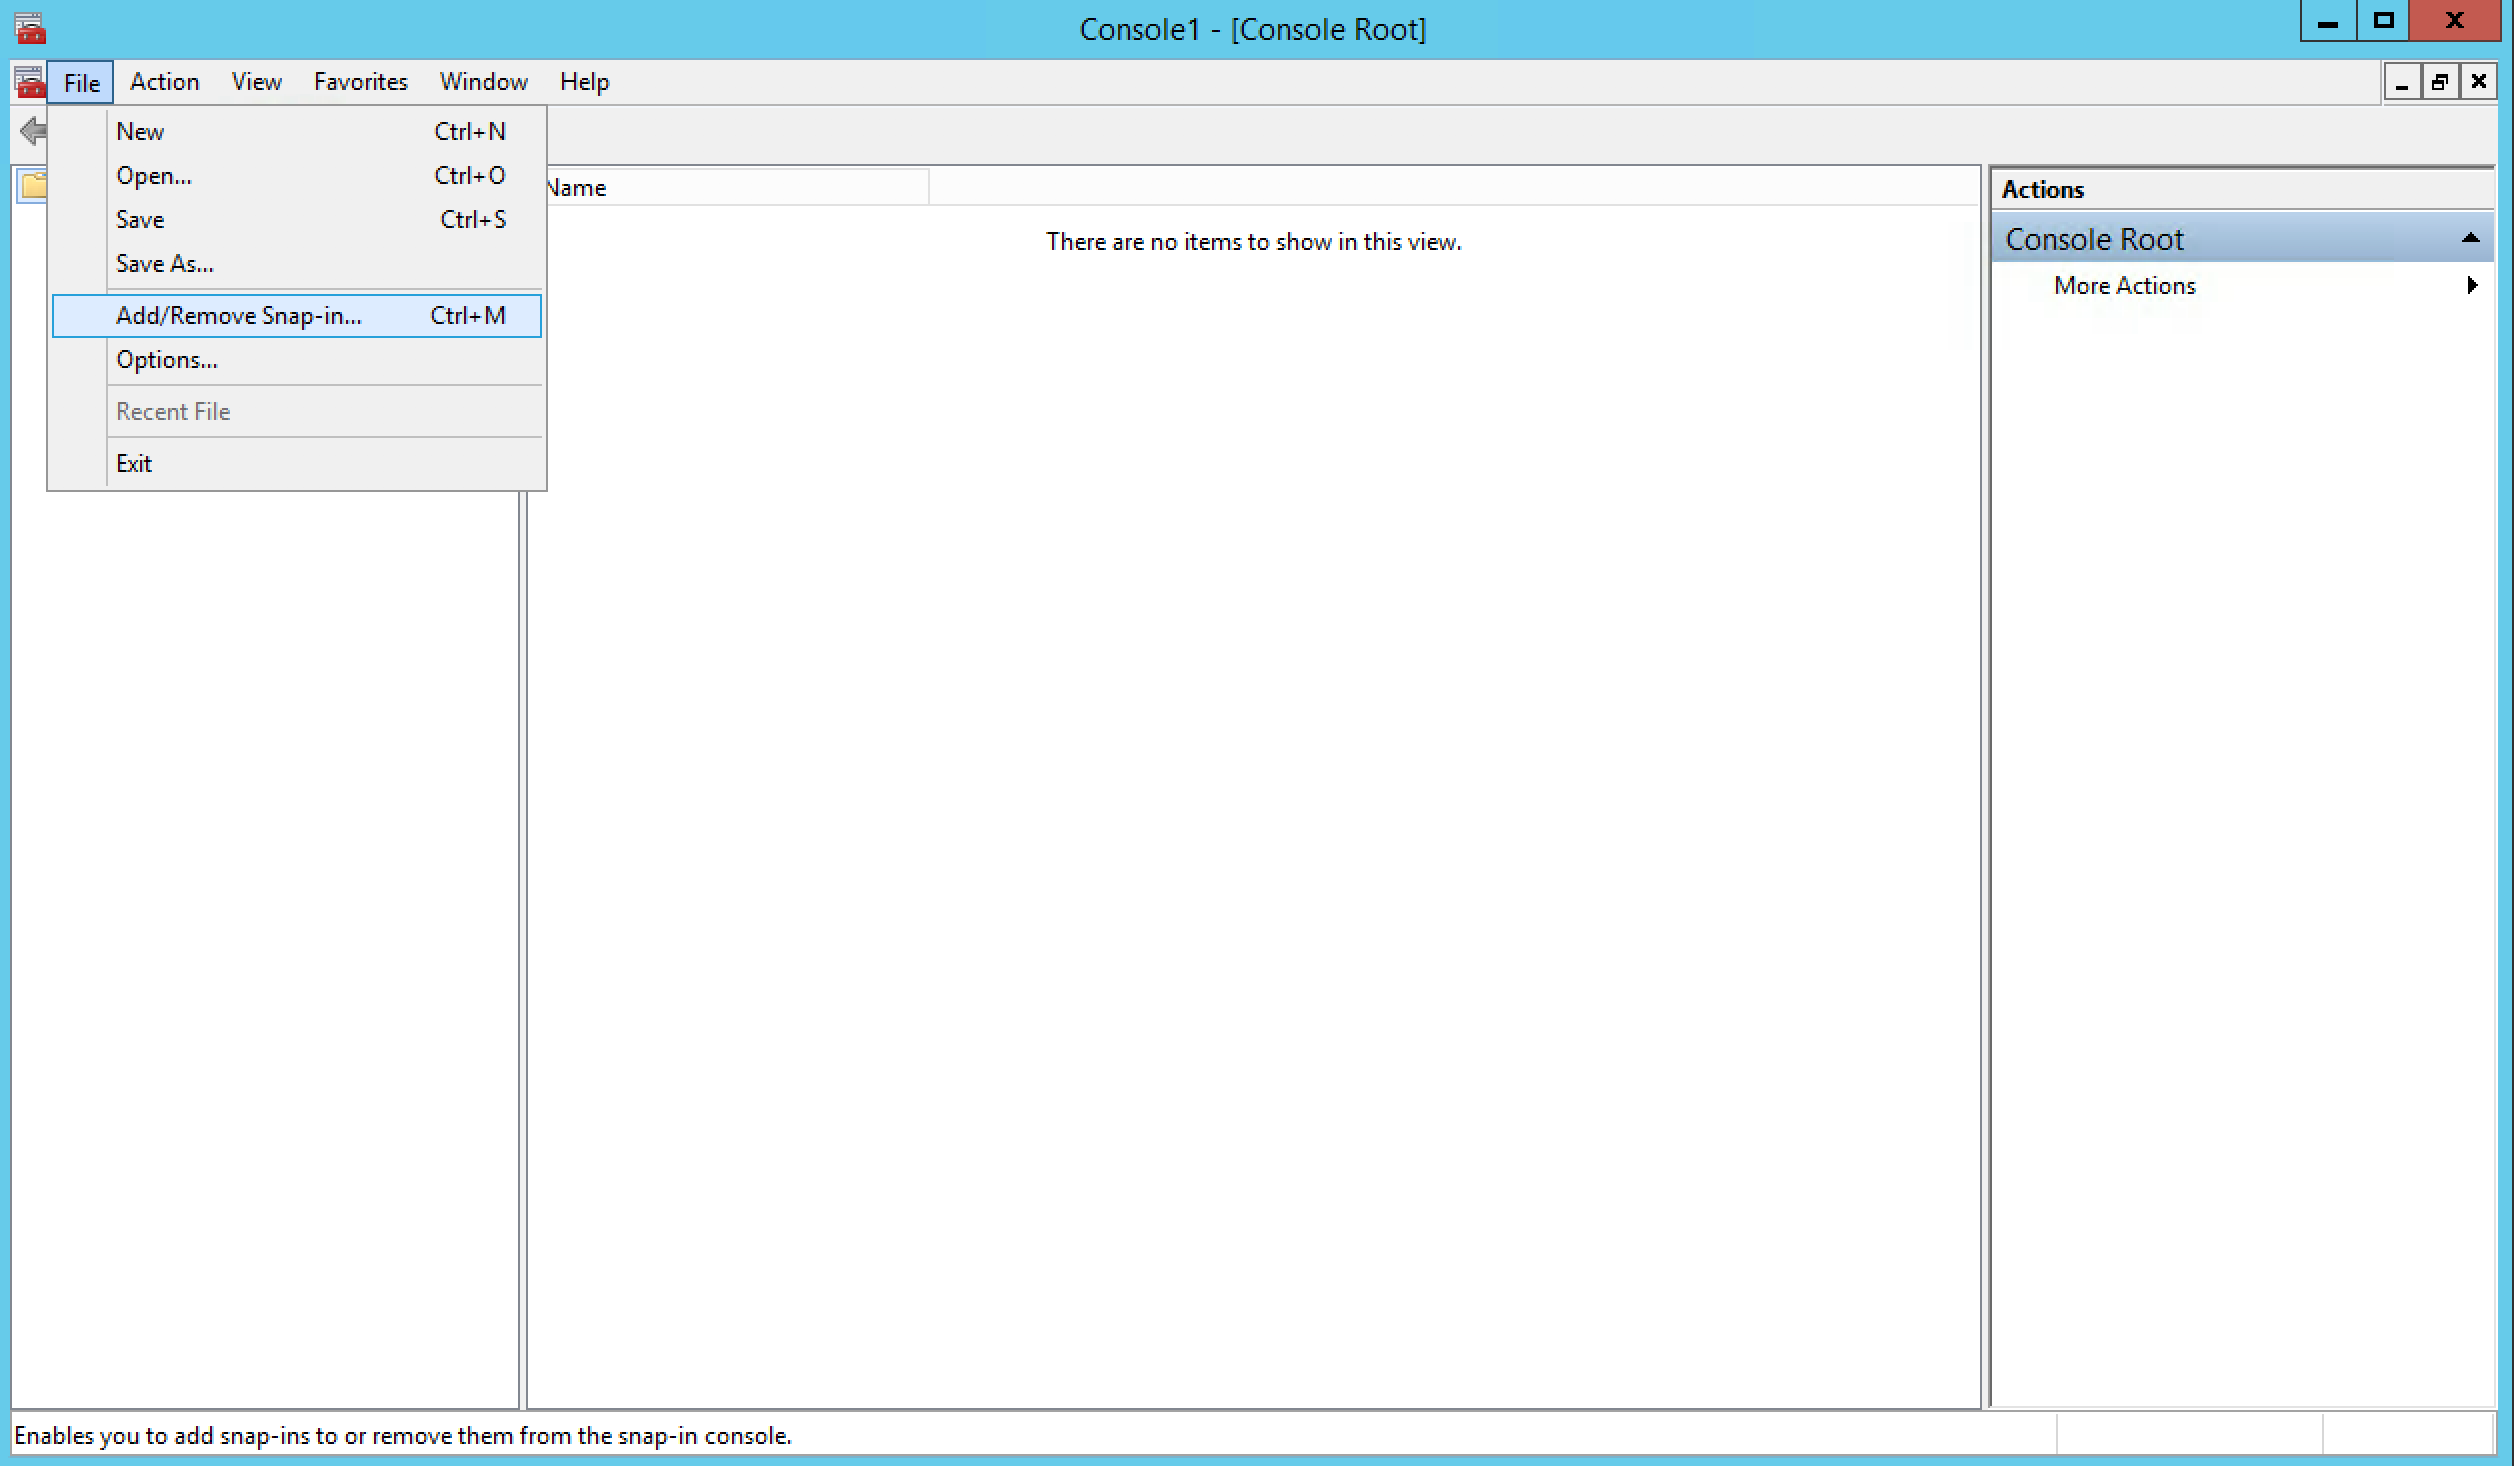
Once the mmc console is open , click on File >> Add /Remove Snap-In
Select Certificates from the list and then click on Add.
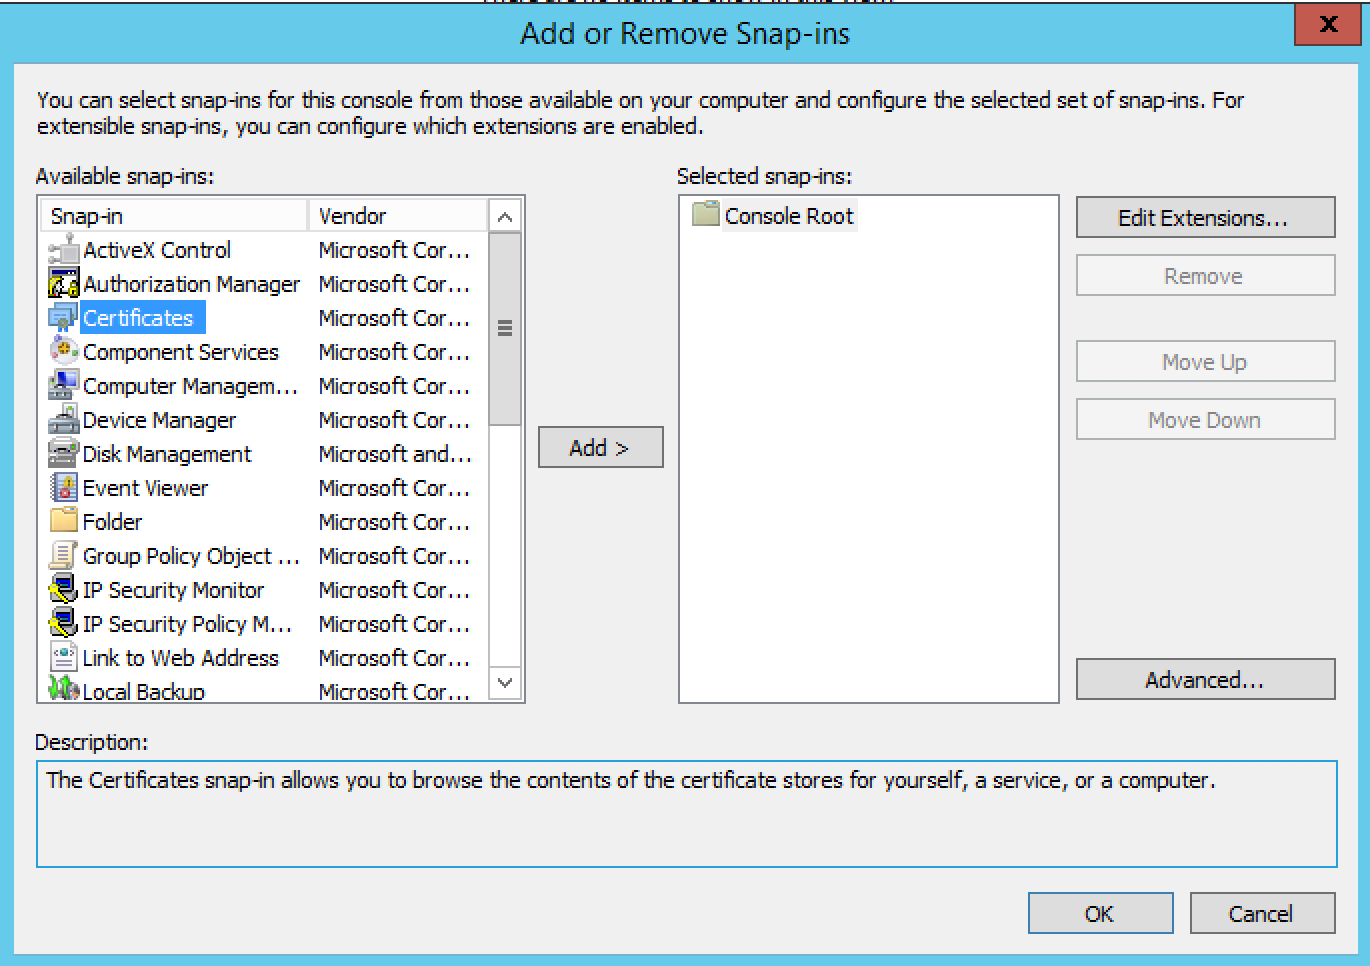
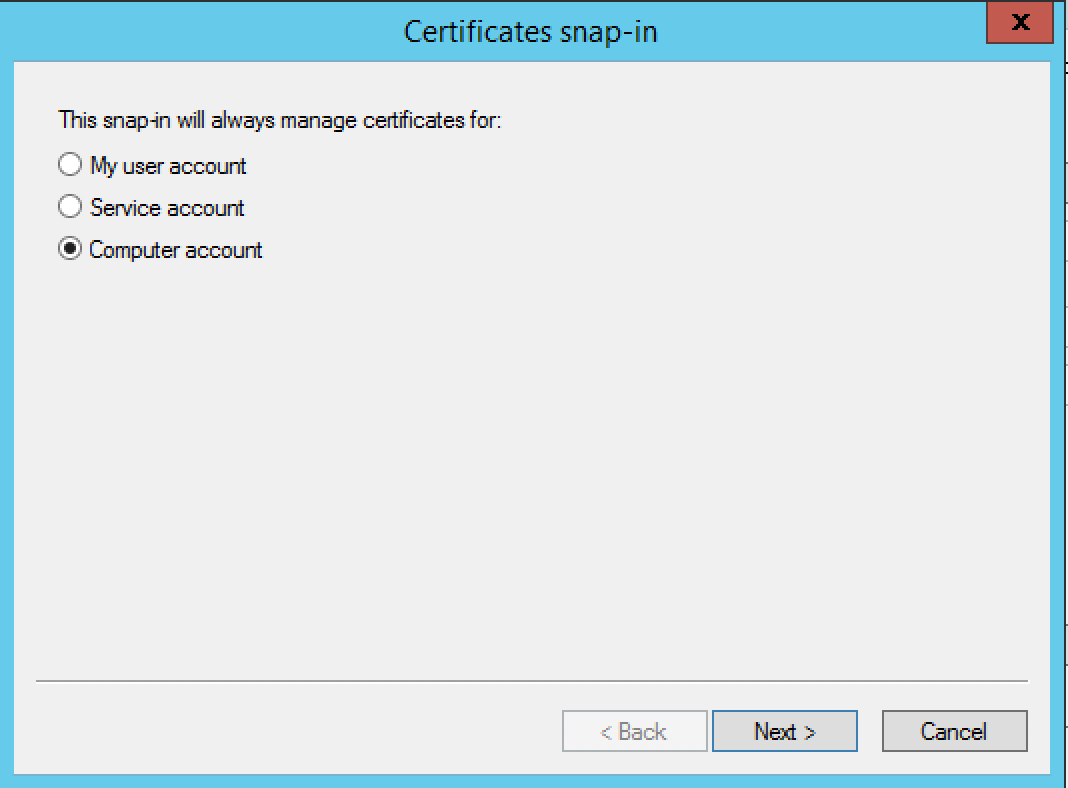
Select Computer account from the list, then click Next
Select Local computer, then click Next

To close the Snap-in , Click on Ok
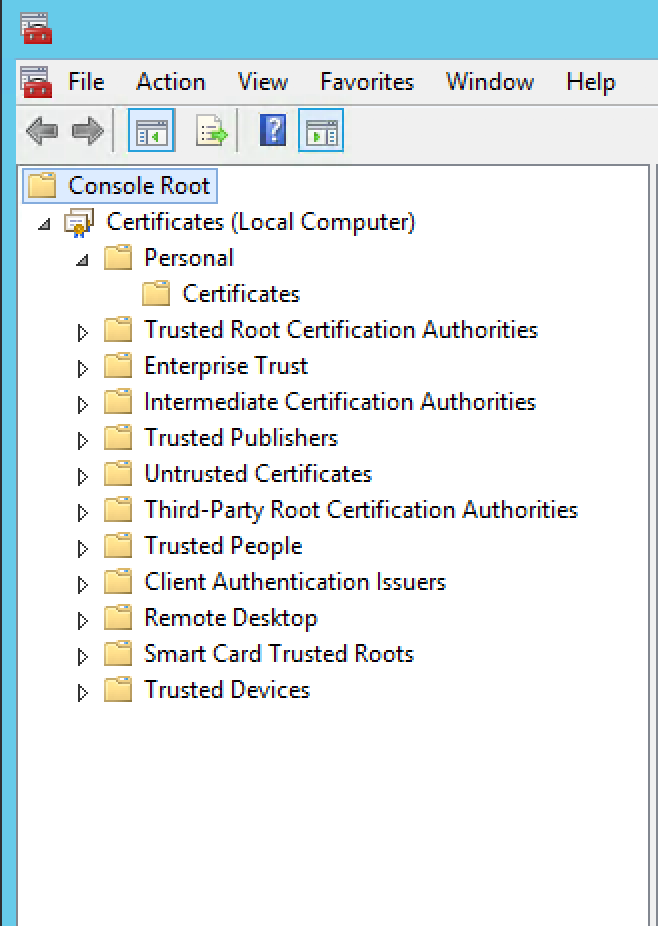
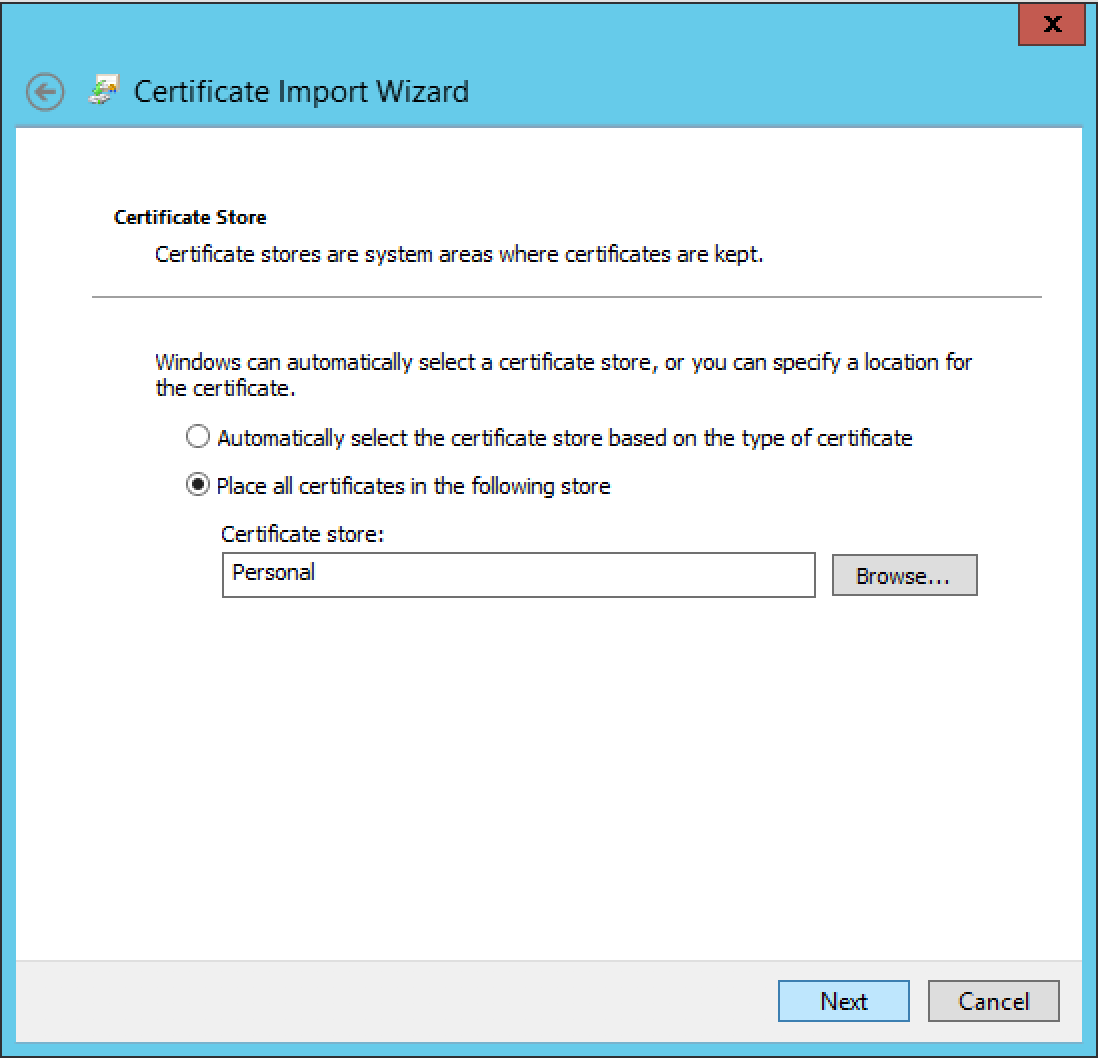
Expand Certificate, then expand Personal and click on Certificates.
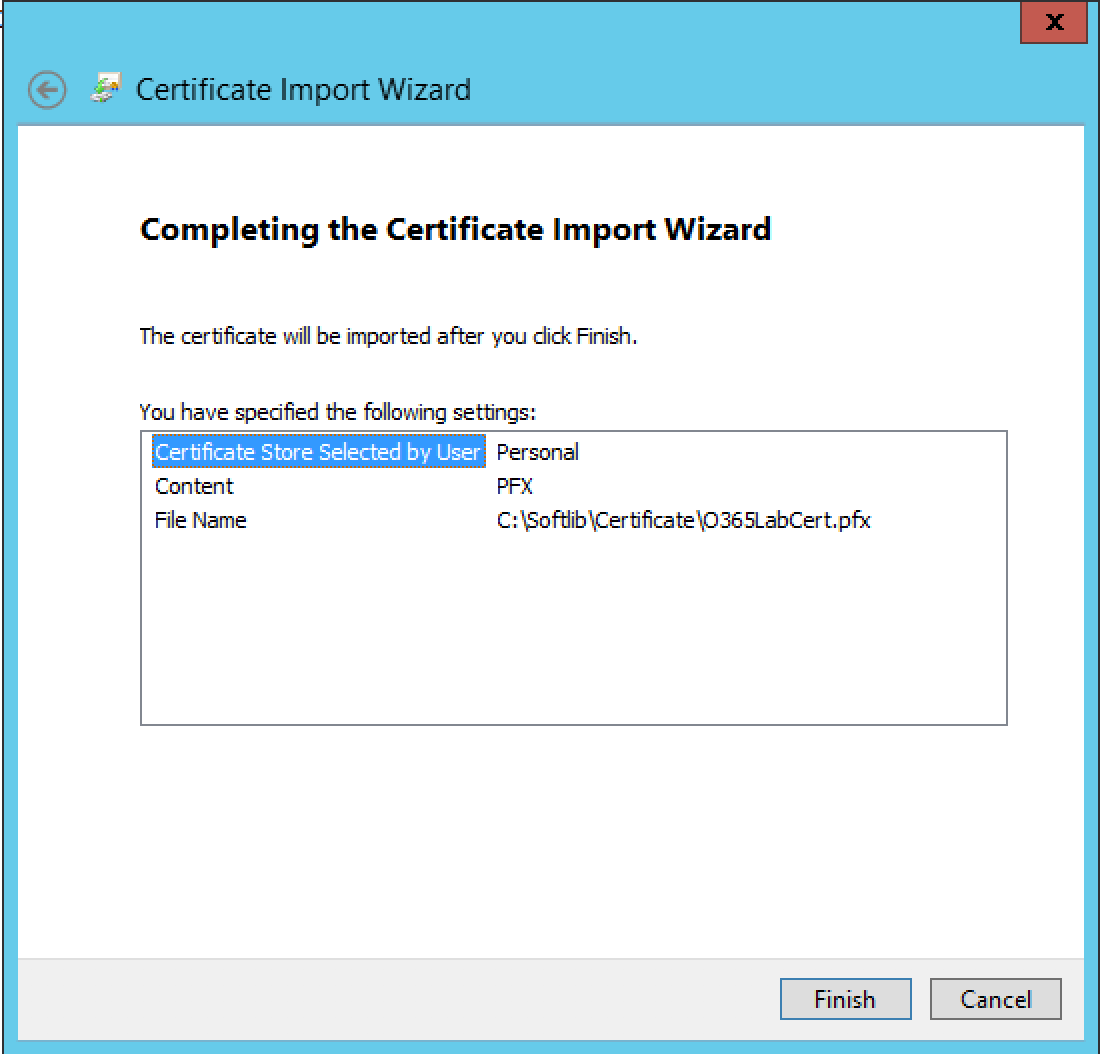
Right Click on Personal Certificates, then All Tasks and click on Import.
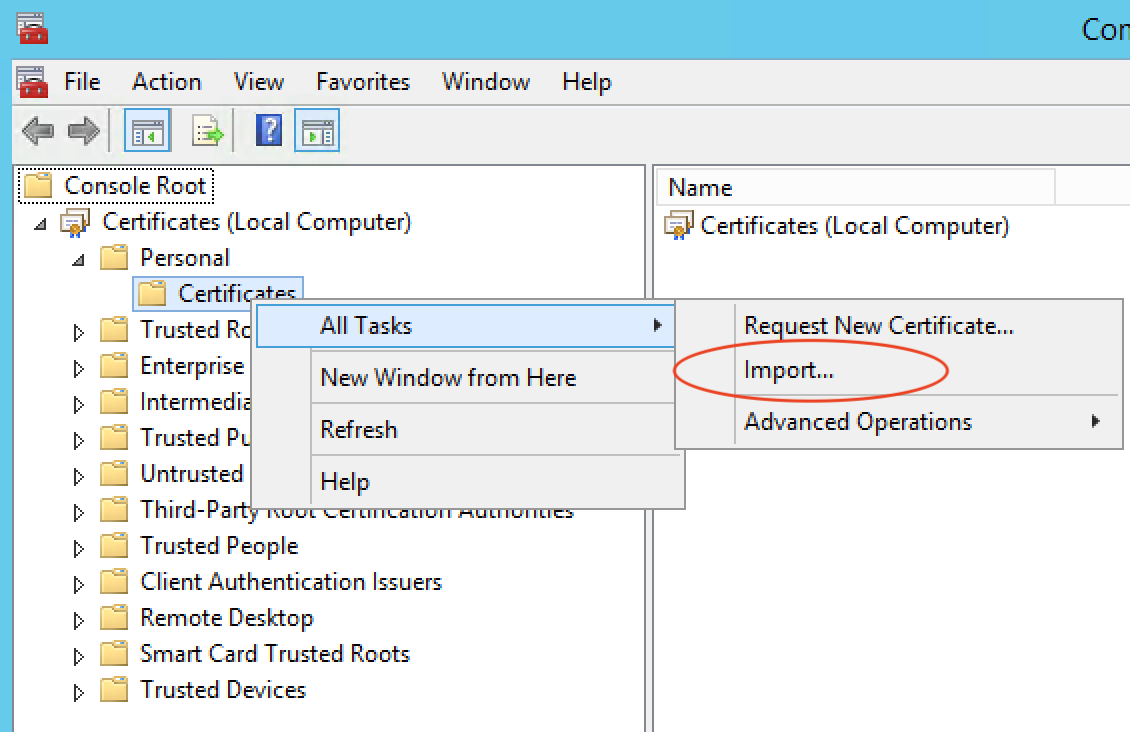
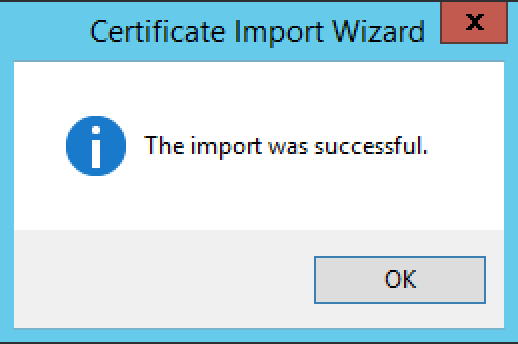
Follow the Import Wizard, then complete the Certificate import process.


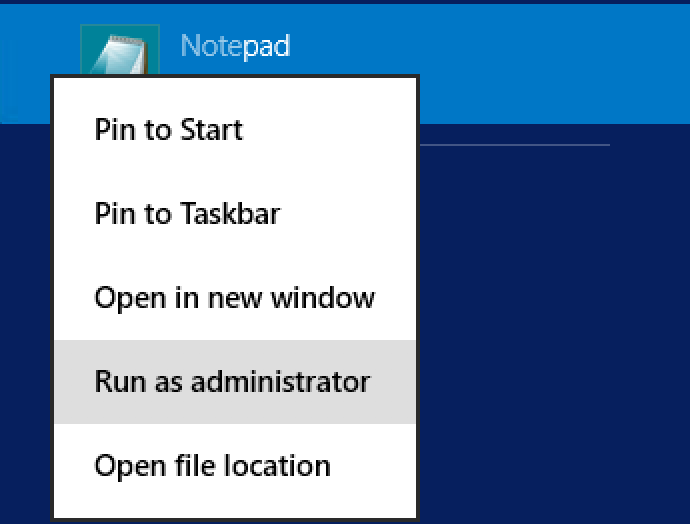
The next step is to edit the Host File and add and entry for the ADFS server. To open the Host file, Run Notepad as Administrator.
Location: C:\Windows\System32\drives\etc
Then navigate to the Host File location.
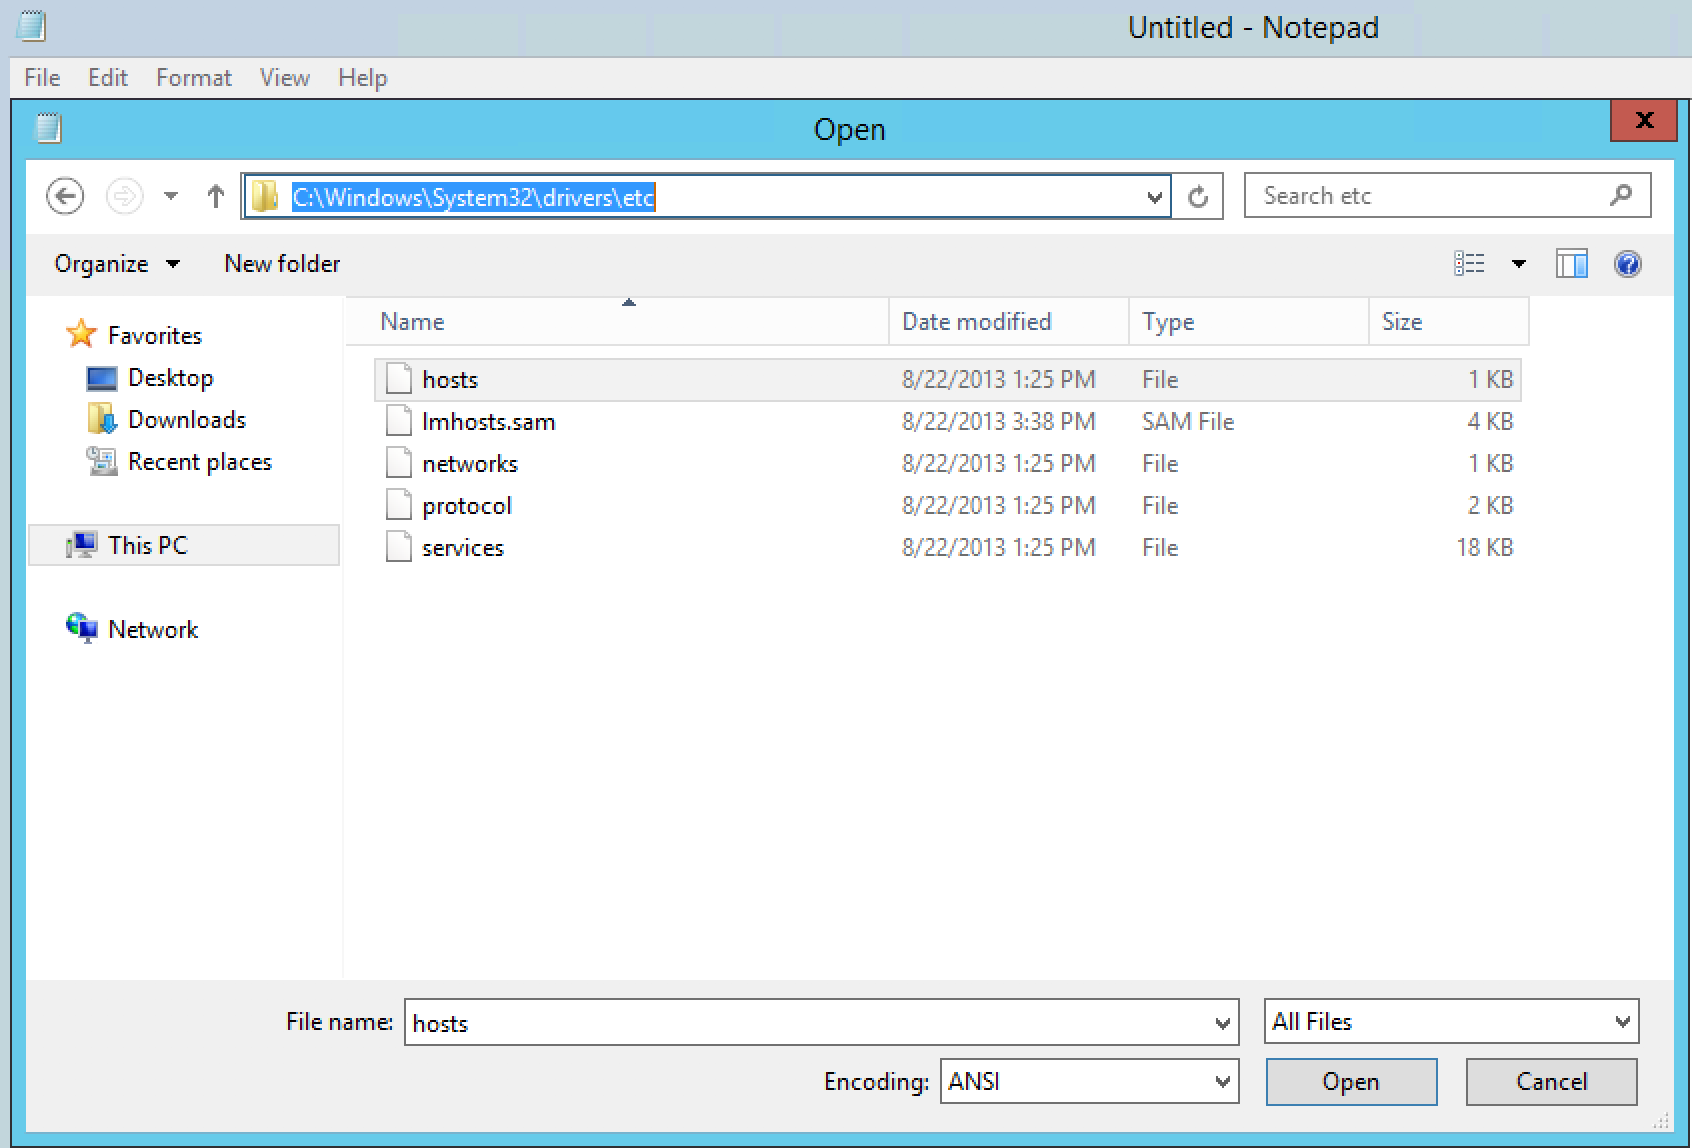
Modify the Host File, by adding the entry for the ADFS server with the associated IP.
Example: 10.2.0.14 fs.o365cloudlab.co.za

Click on File and then Save , to save the changes.

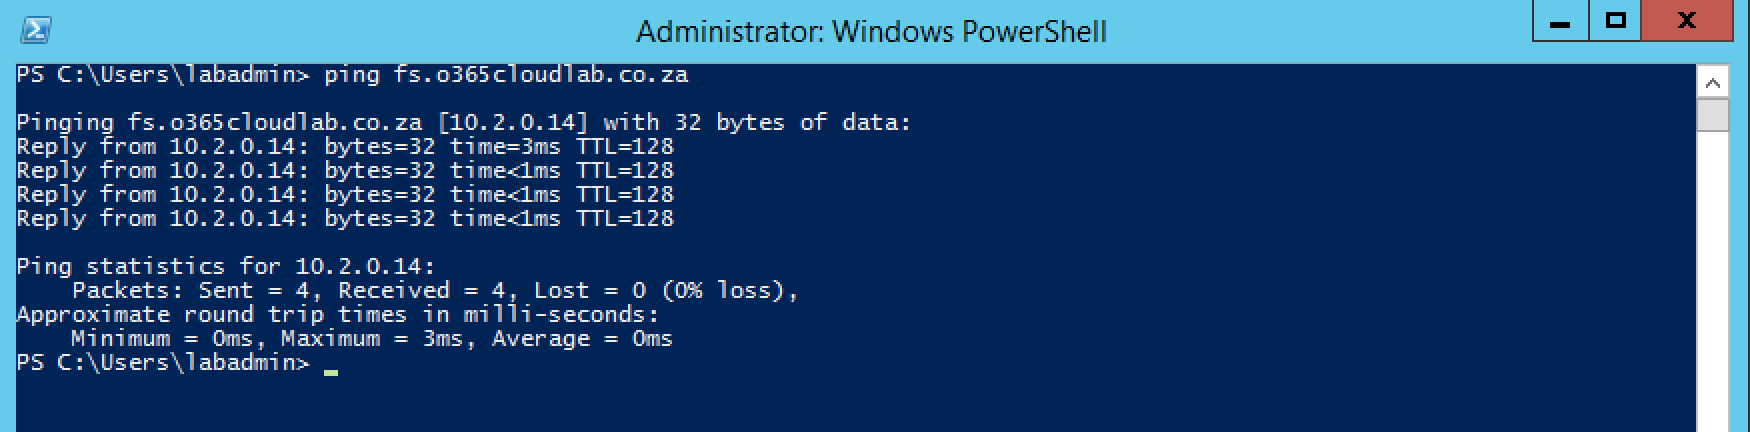
Lastly, lets ping the new entry from the WAP server, you should receive a response.
From a PowerShell session, run the following to start the installation process of the Web Application Proxy role.
|
1
|
add-windowsfeature web-application-proxy
|


Once the Installation has been completed, run the following in the same PowerShell Session to restart the Server.
|
1
|
Restart-Computer
|

Log back in to the server with the same credentials and Navigate to Server Manager and complete the configuration Process of the Role.

When you click on “Open the Web Application Proxy Wizard”, you are prompted with the following Error.

The RSAT-Administration Modules has not been added to the Server, to resolve this Error. Run the Following in PowerShell.
|
1
|
Add-WindowsFeature -Name RSAT-RemoteAccess -IncludeAllSubFeature
|


Close the Server Manager Console and Launch it again.
The Web Application Proxy Wizard will open, then Click on Next

On the Federation service name, add the DNS name for the ADFS server which was specified in the Host File. Then provide a domain username and password.

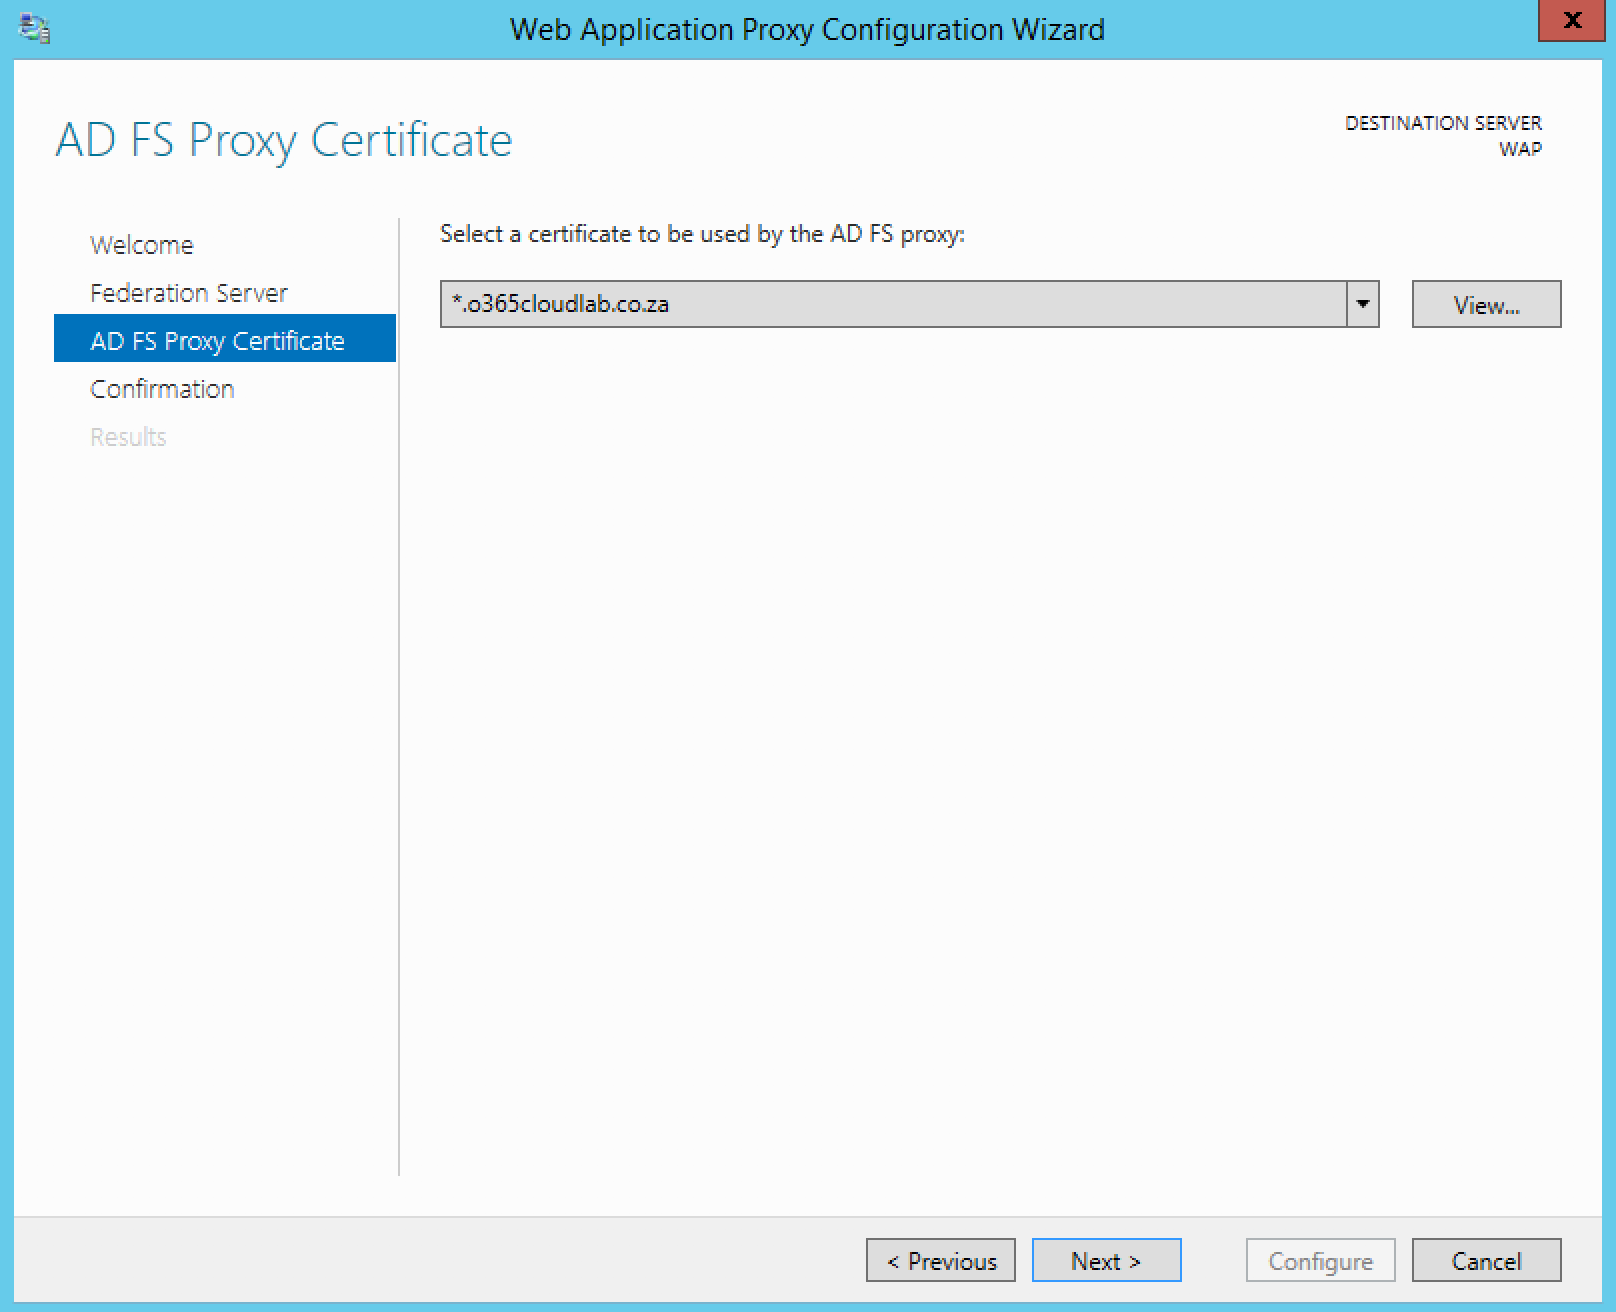
Select the certificate which was installed during the beginning of the deployment and then click next.
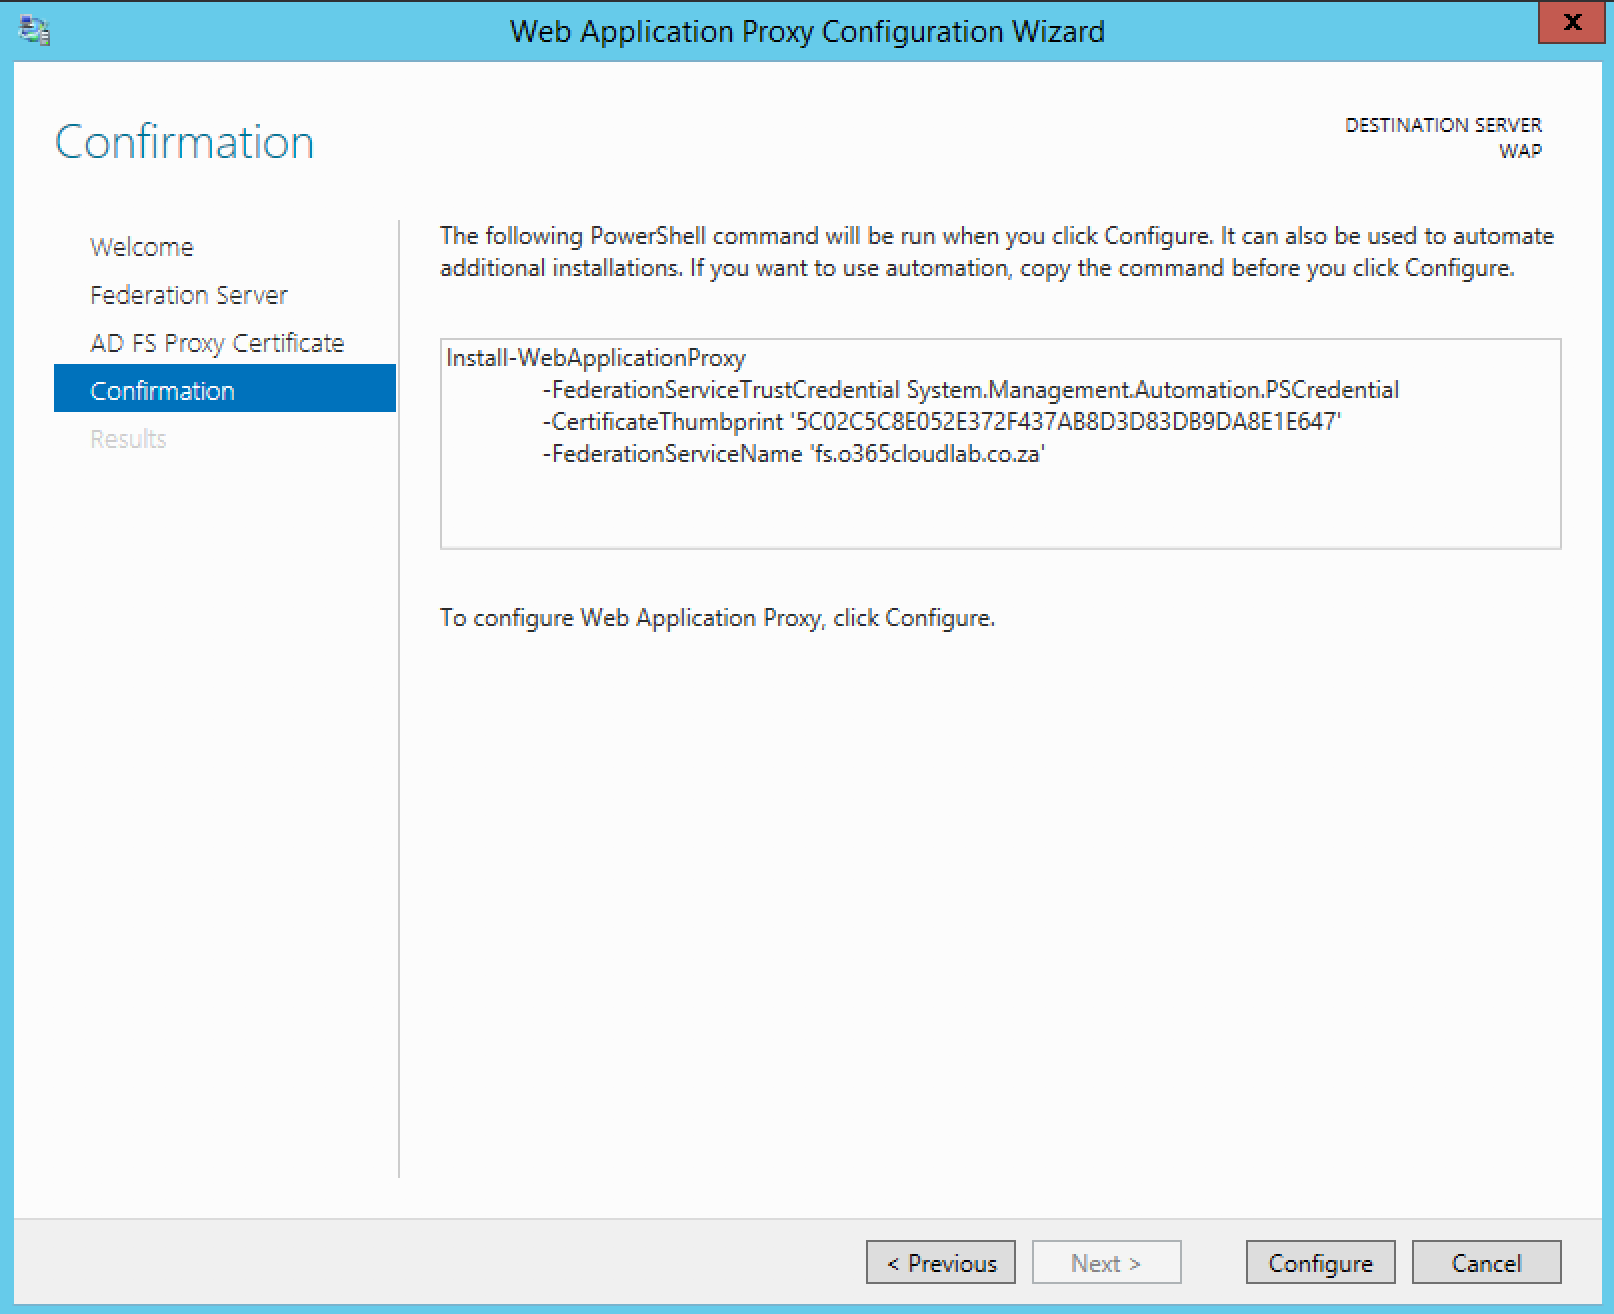
The final screen will show a confirmation screen before the configuration starts. It also shows you a PowerShell version of what will be configured.
|
1
2
3
|
Install-WebApplicationProxy -FederationServiceTrustCredential System.Management.Automation.PSCredential
-CertificateThumbprint ’5C02C5C8E052E372F437AB8D3D83DB9DA8E1E647′
-FederationServiceName ’fs.o365cloudlab.co.za’
|
To continue, Click on Configure.
Click on Close, when the configuration is done.

From the Remote Access Management Console, Click on Operation Status and make sure that all is green.

From a Machine that is connected to the internet but not part of the network verify that you can reach your ADFS server by clicking on the following link.
https://fs.<YourDomainName>/adfs/ls/IdpInitiatedSignon.aspx

Verify that you can sign in.

On successful logon you will be redirected to s screen showing the logout icon. This mean that you have successfully connected from external.

Definition
[Vol-] = button to decrease the volume, identified by two small black dots
[Vol +] = button to increase the volume, identified by a black dot
[Lock] = button to lock the screen rotation
[Power] = button to turn on the tablet
[Reset] = reset button to restart the tablet, located next to the USB port you need a paper clip to press it.
Boot into recovery:
– Press [vol-] + [power]
– Once the tablet vibrated, let go [power] and keep [vol-].
– Once the text that appears on the screen („loading recovery kernel image”), let go [vol-].
Factory reset:
– Press [vol +] + [power]
– As soon as the tablet vibrates, let go of power and play several times [lock]
Fastboot boot mode:
– Press [vol-] + [power]
– As soon as the tablet vibrates, let go [power] and play [lock]
APX mode startup:
This mode is required to use the nvflash tool (not available yet)
– Press [vol +] and [vol-] (keep the pressure on both)
– Press [reset] once
– Releasing the volume buttons.
Nothing on the shelf says it is in this mode (black screen and LED power off), you must connect to the PC to make sure it detects the device.
Boot into recovery:
– Press [vol-] + [power]
– Once the tablet vibrated, let go [power] and keep [vol-].
– Now the tablet vibrates a second time, let go [vol-] and press [vol+] quick
– Once the text that appears on the screen („loading recovery kernel image”), let go [vol+].
Odpowiedni artykuł znajduje się na tej stronie
Login to the Office 365 Exchange Admin Portal.
Go to Permissions, then under Admin Roles click the '+’ symbol to add a new role and enter the Name and Description 'CloudMigratorImpersonation’.
Click the '+’ symbol under 'Roles:’, select ApplicationImpersonation, click 'add →’ then 'OK’

Click the '+’ symbol under 'Members:’ and select your Admin User, click 'add →’ then 'OK’

Click 'Save’ in the 'Role Group’ window and you will then see the Impersonation role listed in Admin Roles. You can now use application impersonation with your admin user in CloudMigrator.

odpowiedni artykuł znajduje się na tej stronie
odpowiednie informacje znajdują się na tej stronie:
drukowanie z pulpitu działa
problem występuje przy zdalnym wywołaniu procesu drukowania np. do pdf
problem występuje również przy ustawieniu procesu automatycznego drukowania w Scheduler
Problem rozwiązuje dodanie tych katalogów
C:\Windows\System32\config\systemprofile\Dektop
C:\Windows\SysWOW64\config\systemprofile\Desktop
Przygotuj plik tekstowy z rozszerzeniem .reg np.: DisableSSL3.reg
zawartość pliku poniżej
—————————————————————————
Windows Registry Editor Version 5.00
[HKEY_LOCAL_MACHINE\SYSTEM\CurrentControlSet\Control\SecurityProviders\SCHANNEL\Protocols]
[HKEY_LOCAL_MACHINE\SYSTEM\CurrentControlSet\Control\SecurityProviders\SCHANNEL\Protocols\SSL 2.0]
[HKEY_LOCAL_MACHINE\SYSTEM\CurrentControlSet\Control\SecurityProviders\SCHANNEL\Protocols\SSL 2.0\Client]
„DisabledByDefault”=dword:00000001
[HKEY_LOCAL_MACHINE\SYSTEM\CurrentControlSet\Control\SecurityProviders\SCHANNEL\Protocols\SSL 2.0\Server]
„Enabled”=dword:00000000
[HKEY_LOCAL_MACHINE\SYSTEM\CurrentControlSet\Control\SecurityProviders\SCHANNEL\Protocols\SSL 3.0]
[HKEY_LOCAL_MACHINE\SYSTEM\CurrentControlSet\Control\SecurityProviders\SCHANNEL\Protocols\SSL 3.0\Client]
„DisabledByDefault”=dword:00000001
[HKEY_LOCAL_MACHINE\SYSTEM\CurrentControlSet\Control\SecurityProviders\SCHANNEL\Protocols\SSL 3.0\Server]
„Enabled”=dword:00000000
———————————————————————
Opis ręcznie wykonanych zmian w rejestrach znajduje się poniżej.
—————————————————————————————————————–


After the restart, verify whether your changes have applied successfully by checking your domain again on POODLE Scan Test, and you are done!
informacje ze strony https://pl.wikipedia.org/wiki/Serwer_czasu
W Polsce oficjalnym źródłem urzędowego czasu UTC są publiczne serwery NTP Głównego Urzędu Miar[1]. Serwery te są bezpośrednio dołączone łączem 1PPS do zegara atomowego (5071A), którego wskazania są kontrolowane i korygowane do innych wzorców skali czasu atomowego tzw. TA.
| nazwa serwera | adres IP | stratum | źródło |
|---|---|---|---|
| vega.cbk.poznan.pl | 150.254.183.15 | 3 | news-archive.icm.edu.pl (stratum 2), 247.92.156.107 (stratum 1) |
| ntp.itl.waw.pl | 193.110.137.171 | 1 | atomowy zegar cezowy 5071A Instytutu Łączności w Warszawie |
| ntp.elpromaelectronics.com | 5.226.98.186 | 1 | rubidowy atomowy wzorzec firmy STANFORD Research, ELPROMA Łomianki k. Warszawy |
| zegar.umk.pl, ntp.fizyka.umk.pl | 158.75.5.245 | 1 | Polski Optyczny Zegar Atomowy zlokalizowany w Instytucie Fizyki UMK w Toruniu i Krajowym Laboratorium FAMO |
| nazwa serwera | adres IPv4 | adres IPv6 | stratum | źródło | utrzymanie |
|---|---|---|---|---|---|
| ntp1.tp.pl | 80.50.231.226 | 1 | atomowy zegar cezowy 5071A TP S.A. | Orange Polska S.A. | |
| ntp2.tp.pl | 217.96.29.26 | 1 | atomowy zegar cezowy 5071A TP S.A. | Orange Polska S.A. | |
| time.coi.pw.edu.pl | 194.29.130.252 | 1 | Politechnika Warszawska | ||
| ntp.nask.pl | 195.187.245.55 | 1 | GPS | NASK S.A. | |
| ntp.certum.pl | 213.222.200.99 | 1 | Asseco Poland S.A. | ||
| info.cyf-kr.edu.pl | 149.156.4.11 | 3 | chronos.cru.fr (stratum 2), ntp.genoscope.cns.fr (stratum 1) | Akademia Górniczo Hutnicza (Cyfronet) | |
| ntp.icm.edu.pl | 213.135.59.38 | 2 | zegar.umk.pl (stratum 1) | Uniwersytet Warszawski (ICM) | |
| ntp.task.gda.pl | 153.19.250.123 | 2 | 210.100.177.101 (stratum 1) | Politechnika Gdańska (TASK) | |
| ntp0.pl | 91.212.242.19 | 2001:67c:24c:1::19 | 1 | GPS | Aplitt S.A. |
| ntp1.pl | 91.212.242.20 | 2001:67c:24c:1::20 | 2 | tempus1.gum.gov.pl, tempus2.gum.gov.pl (stratum 1) | Aplitt S.A. |
| ntp2.pl | 91.212.242.21 | 2001:67c:24c:1::21 | 2 | tempus1.gum.gov.pl, tempus2.gum.gov.pl (stratum 1) | Aplitt S.A. |
| time.atman.pl | 217.17.34.82 | 2 | ntp.itl.waw.pl (stratum 1) | ATM S.A. | |
| ntp.centos.com.pl | 81.2.136.218 | 2 | ntp1.tp.pl (stratum 1) | Przemysław Sikora | |
| ntp.e-utp.net | 89.231.96.83 | 1 | GPS NMEA | Marcin Gondek | |
| news-archive.icm.edu.pl | 193.219.28.147 | 2 | 247.92.156.107 (stratum 1) | Uniwersytet Warszawski (ICM) |
Poniższe nazwy wskazują losowo na serwery z puli udostępnionych publicznie serwerów NTP. Adresy IP serwerów zmieniają się co godzinę[3].
using System;
using System.Collections.Generic;
using System.ComponentModel;
using System.Data;
using System.Drawing;
using System.Linq;
using System.Text;
using System.Threading.Tasks;
using System.Windows.Forms;
using Microsoft.Win32;
using System.Diagnostics;
namespace WindowsFormsApplication11
{
public partial class Form1 : Form
{
public Form1()
{
SetBrowserFeatureControl();
InitializeComponent();
}
private void Form1_Load(object sender, EventArgs e)
{
webBrowser1.Navigate(„https://www.my.telstra.com.au/myaccount/home?red=/myaccount/”);
}
private void SetBrowserFeatureControlKey(string feature, string appName, uint value)
{
using (var key = Registry.CurrentUser.CreateSubKey(
String.Concat(@”Software\Microsoft\Internet Explorer\Main\FeatureControl\”, feature),
RegistryKeyPermissionCheck.ReadWriteSubTree))
{
key.SetValue(appName, (UInt32)value, RegistryValueKind.DWord);
}
}
private void SetBrowserFeatureControl()
{
// http://msdn.microsoft.com/en-us/library/ee330720(v=vs.85).aspx
// FeatureControl settings are per-process
var fileName = System.IO.Path.GetFileName(Process.GetCurrentProcess().MainModule.FileName);
// make the control is not running inside Visual Studio Designer
if (String.Compare(fileName, „devenv.exe”, true) == 0 || String.Compare(fileName, „XDesProc.exe”, true) == 0)
return;
SetBrowserFeatureControlKey(„FEATURE_BROWSER_EMULATION”, fileName, GetBrowserEmulationMode()); // Webpages containing standards-based !DOCTYPE directives are displayed in IE10 Standards mode.
SetBrowserFeatureControlKey(„FEATURE_AJAX_CONNECTIONEVENTS”, fileName, 1);
SetBrowserFeatureControlKey(„FEATURE_ENABLE_CLIPCHILDREN_OPTIMIZATION”, fileName, 1);
SetBrowserFeatureControlKey(„FEATURE_MANAGE_SCRIPT_CIRCULAR_REFS”, fileName, 1);
SetBrowserFeatureControlKey(„FEATURE_DOMSTORAGE „, fileName, 1);
SetBrowserFeatureControlKey(„FEATURE_GPU_RENDERING „, fileName, 1);
SetBrowserFeatureControlKey(„FEATURE_IVIEWOBJECTDRAW_DMLT9_WITH_GDI „, fileName, 0);
SetBrowserFeatureControlKey(„FEATURE_NINPUT_LEGACYMODE”, fileName, 0);
SetBrowserFeatureControlKey(„FEATURE_DISABLE_LEGACY_COMPRESSION”, fileName, 1);
SetBrowserFeatureControlKey(„FEATURE_LOCALMACHINE_LOCKDOWN”, fileName, 0);
SetBrowserFeatureControlKey(„FEATURE_BLOCK_LMZ_OBJECT”, fileName, 0);
SetBrowserFeatureControlKey(„FEATURE_BLOCK_LMZ_SCRIPT”, fileName, 0);
SetBrowserFeatureControlKey(„FEATURE_DISABLE_NAVIGATION_SOUNDS”, fileName, 1);
SetBrowserFeatureControlKey(„FEATURE_SCRIPTURL_MITIGATION”, fileName, 1);
SetBrowserFeatureControlKey(„FEATURE_SPELLCHECKING”, fileName, 0);
SetBrowserFeatureControlKey(„FEATURE_STATUS_BAR_THROTTLING”, fileName, 1);
SetBrowserFeatureControlKey(„FEATURE_TABBED_BROWSING”, fileName, 1);
SetBrowserFeatureControlKey(„FEATURE_VALIDATE_NAVIGATE_URL”, fileName, 1);
SetBrowserFeatureControlKey(„FEATURE_WEBOC_DOCUMENT_ZOOM”, fileName, 1);
SetBrowserFeatureControlKey(„FEATURE_WEBOC_POPUPMANAGEMENT”, fileName, 0);
SetBrowserFeatureControlKey(„FEATURE_WEBOC_MOVESIZECHILD”, fileName, 1);
SetBrowserFeatureControlKey(„FEATURE_ADDON_MANAGEMENT”, fileName, 0);
SetBrowserFeatureControlKey(„FEATURE_WEBSOCKET”, fileName, 1);
SetBrowserFeatureControlKey(„FEATURE_WINDOW_RESTRICTIONS „, fileName, 0);
SetBrowserFeatureControlKey(„FEATURE_XMLHTTP”, fileName, 1);
}
private UInt32 GetBrowserEmulationMode()
{
int browserVersion = 7;
using (var ieKey = Registry.LocalMachine.OpenSubKey(@”SOFTWARE\Microsoft\Internet Explorer”,
RegistryKeyPermissionCheck.ReadSubTree,
System.Security.AccessControl.RegistryRights.QueryValues))
{
var version = ieKey.GetValue(„svcVersion”);
if (null == version)
{
version = ieKey.GetValue(„Version”);
if (null == version)
throw new ApplicationException(„Microsoft Internet Explorer is required!”);
}
int.TryParse(version.ToString().Split(’.’)[0], out browserVersion);
}
UInt32 mode = 10000; // Internet Explorer 10. Webpages containing standards-based !DOCTYPE directives are displayed in IE10 Standards mode. Default value for Internet Explorer 10.
switch (browserVersion)
{
case 7:
mode = 7000; // Webpages containing standards-based !DOCTYPE directives are displayed in IE7 Standards mode. Default value for applications hosting the WebBrowser Control.
break;
case 8:
mode = 8000; // Webpages containing standards-based !DOCTYPE directives are displayed in IE8 mode. Default value for Internet Explorer 8
break;
case 9:
mode = 9000; // Internet Explorer 9. Webpages containing standards-based !DOCTYPE directives are displayed in IE9 mode. Default value for Internet Explorer 9.
break;
default:
// use IE10 mode by default
break;
}
return mode;
}
}
}
[RM_Form id=’3′]
by Maurycy Markowski, Raquel Soares De Almeida, Robert McMurray
This tutorial shows you how to replace the default data storage mechanism for ASP.NET Identity with EntityFramework (SQL client provider) with a MySQL provider.
The following topics will be covered in this tutorial:
At the end of this tutorial, you will have an MVC application with the ASP.NET Identity store that is using a MySQL database that is hosted in Azure.


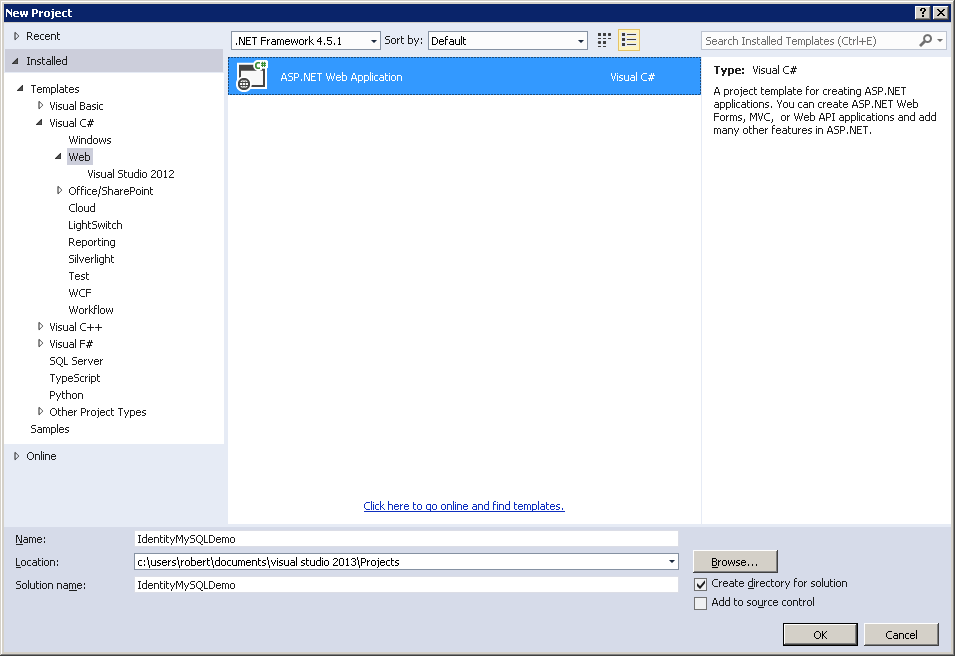
To complete the steps in this section of the tutorial, you will first need to install Visual Studio Express 2013 for Web or Visual Studio 2013. Once Visual Studio has been installed, use the following steps to create a new MVC application project:


The MVC application that was created from the Visual Studio 2013 template contains a reference to the EntityFramework 6.0.0 package, but there have been updates to to that assembly since its release which contain significant performance improvements. In order to use these latest updates in your application, use the following steps.
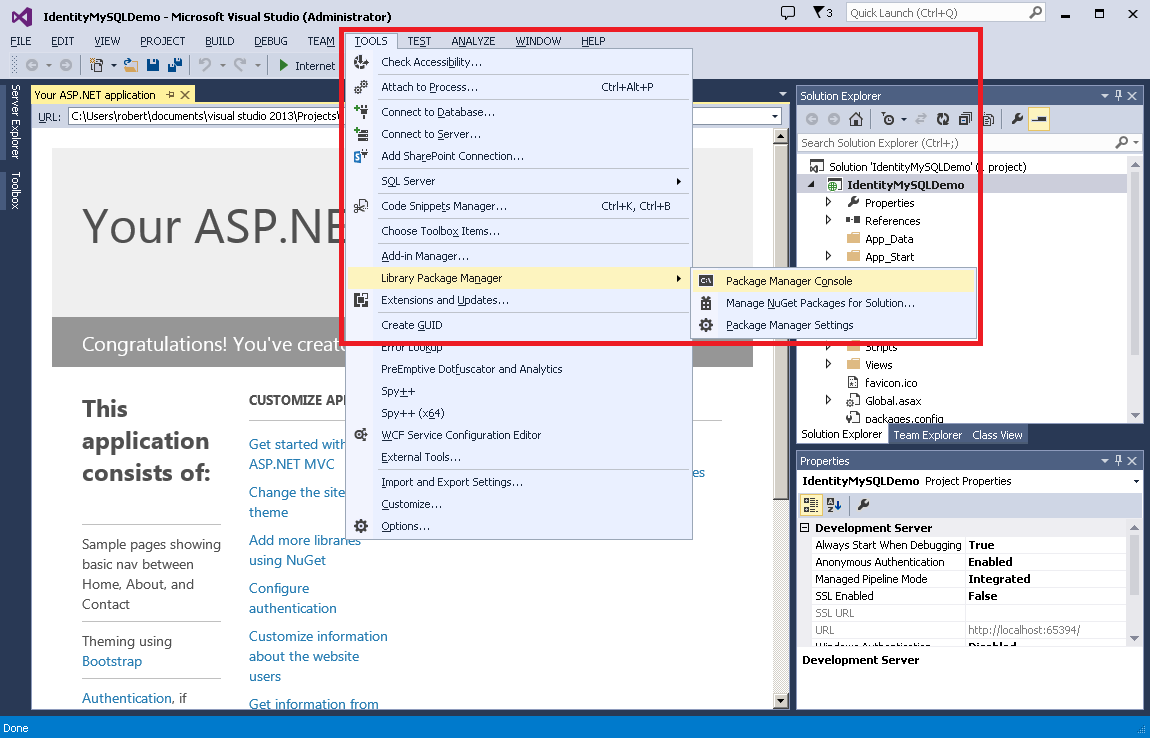
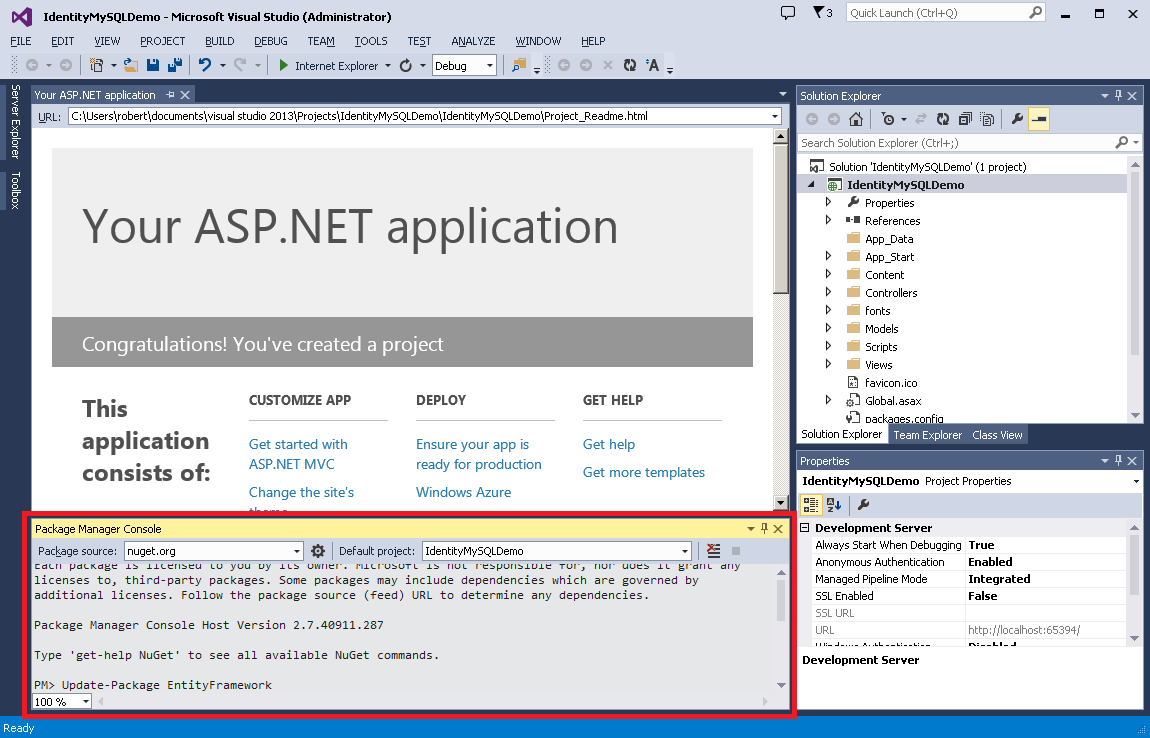
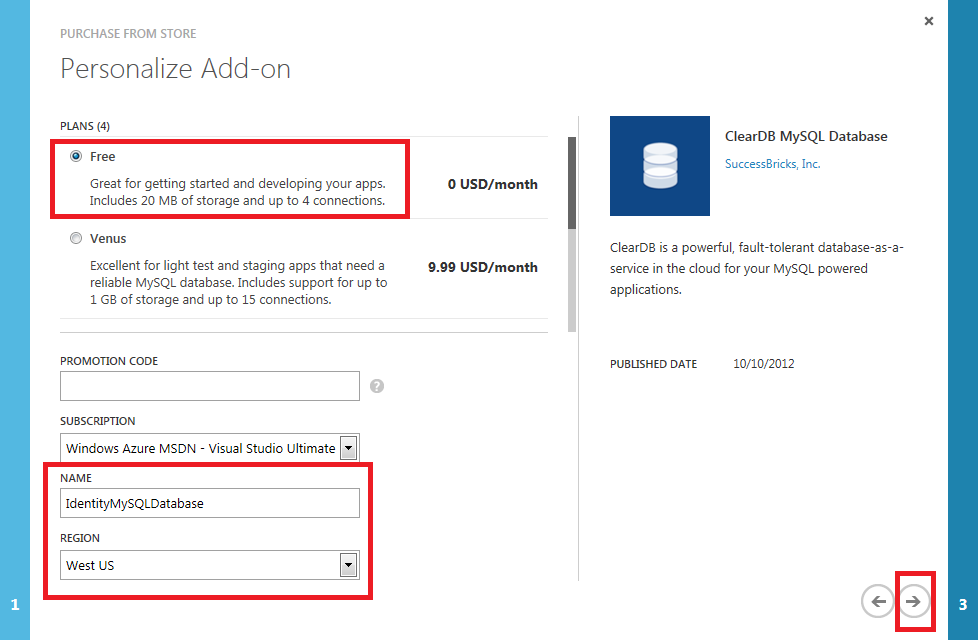
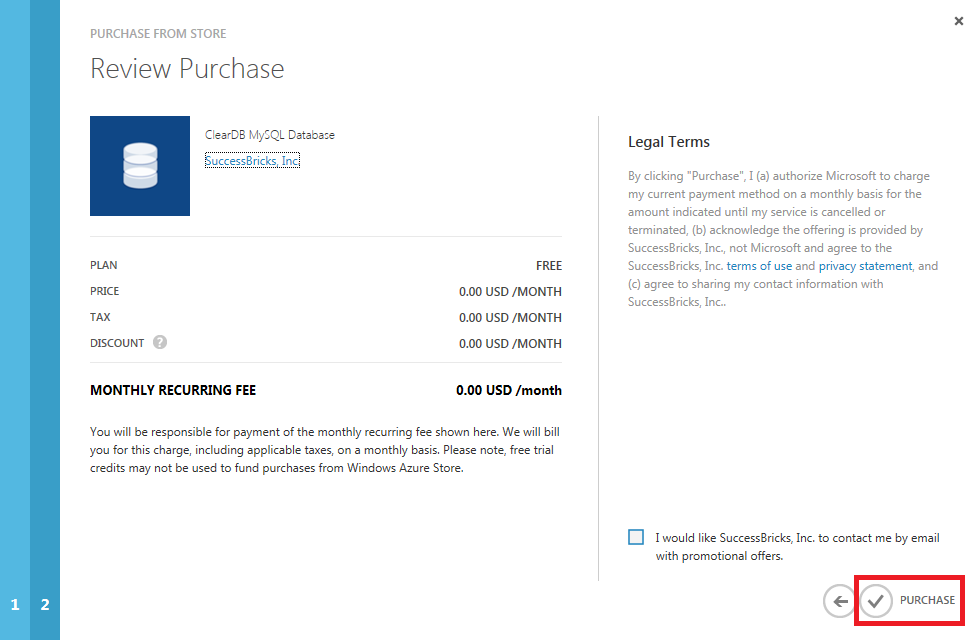
In order for EntityFramework to connect to MySQL database, you need to install a MySQL provider. To do so, open the Package Manager Console and type „Install-Package MySql.Data.Entity -Pre„, and then press Enter.
This is a pre-release version of the assembly, and as such it may contain bugs. You should not use a pre-release version of the provider in production.
[Click the following image to expand it.]

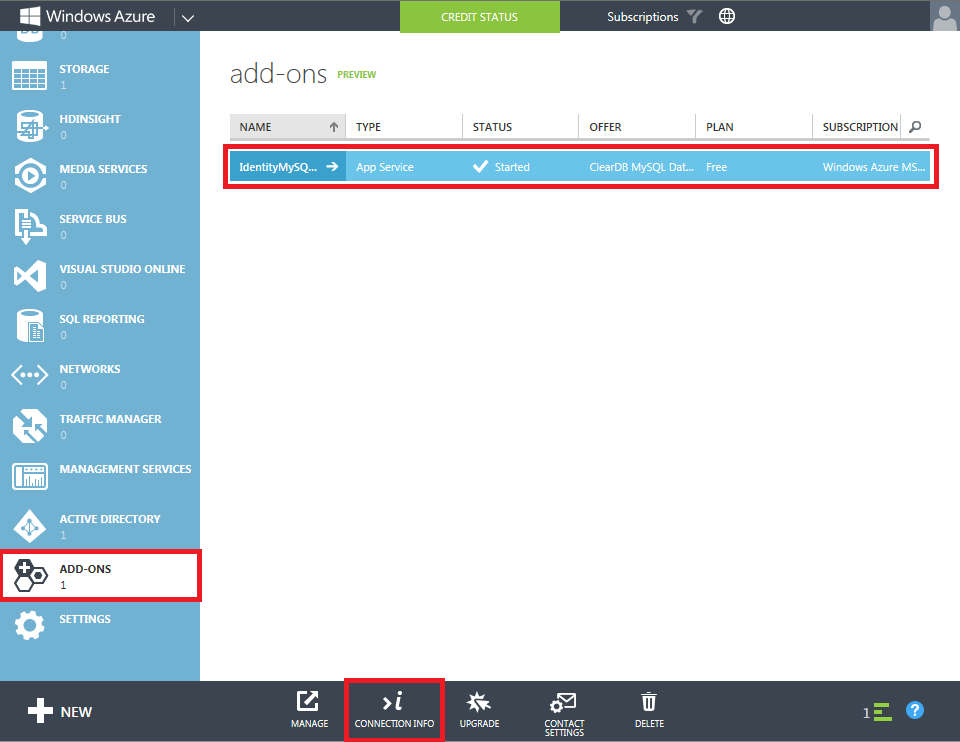
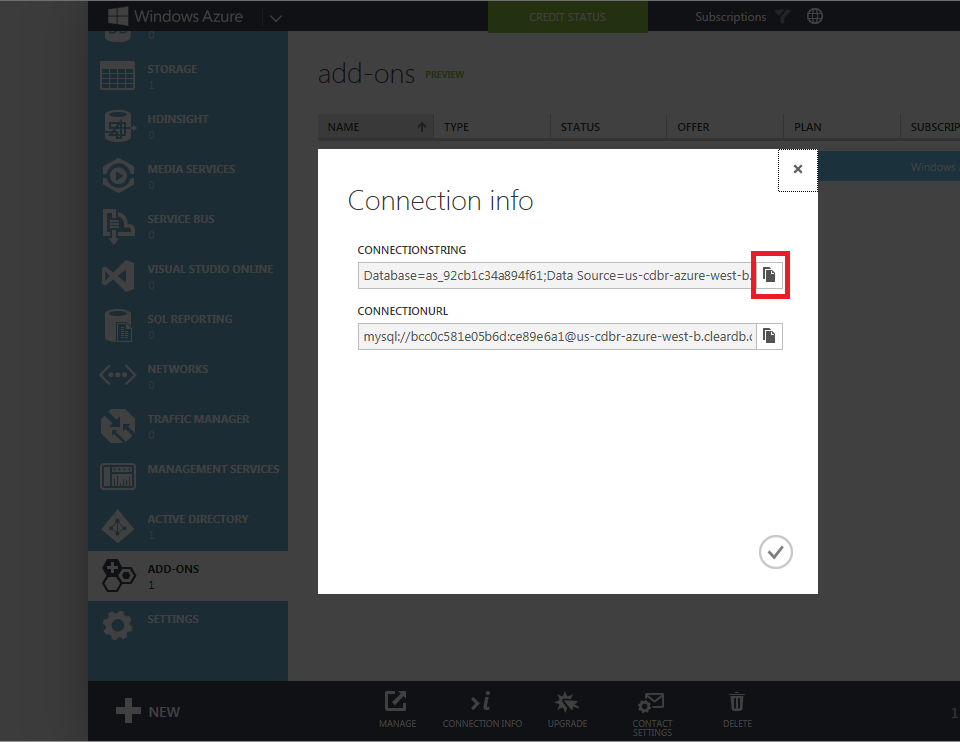
In this section you will configure the Entity Framework to use the MySQL provider that you just installed, register the MySQL provider factory, and add your connection string from Azure.
The following examples contain a specific assembly version for MySql.Data.dll. If the assembly version changes, you will need to modify the appropriate configuration settings with the correct version.
<entityFramework>
  <defaultConnectionFactory
      type="System.Data.Entity.Infrastructure.LocalDbConnectionFactory, EntityFramework">
    <parameters>
      <parameter value="v11.0" />
    </parameters>
  </defaultConnectionFactory>
  <providers>
    <provider
      invariantName="System.Data.SqlClient"
      type="System.Data.Entity.SqlServer.SqlProviderServices, EntityFramework.SqlServer" />
  </providers>
</entityFramework>
<entityFramework>
  <providers>
    <provider invariantName="MySql.Data.MySqlClient"
      type="MySql.Data.MySqlClient.MySqlProviderServices, MySql.Data.Entity"/>
  </providers>
</entityFramework>
<system.data>
  <DbProviderFactories>
    <remove invariant="MySql.Data.MySqlClient"></remove>
    <add name="MySQL Data Provider"
      invariant="MySql.Data.MySqlClient"
      description=".Net Framework Data Provider for MySQL"
      type="MySql.Data.MySqlClient.MySqlClientFactory, MySql.Data, Version=6.7.2.0"/>
  </DbProviderFactories>
</system.data>
<connectionStrings>
  <add name="DefaultConnection"
    providerName="MySql.Data.MySqlClient"
    connectionString="[Insert your ConnectionString from Azure here]"/>
</connectionStrings>
Entity Framework Code First uses a MigrationHistory table to keep track of model changes and to ensure the consistency between the database schema and conceptual schema. However, this table does not work for MySQL by default because the primary key is too large. To remedy this situation, you will need to shrink the key size for that table. To do so, use the following steps:
using System.Data.Common;
using System.Data.Entity;
using System.Data.Entity.Migrations.History;

namespace IdentityMySQLDemo
{
  public class MySqlHistoryContext : HistoryContext
  {
    public MySqlHistoryContext(
      DbConnection existingConnection,
      string defaultSchema)
    : base(existingConnection, defaultSchema)
    {
    }

    protected override void OnModelCreating(DbModelBuilder modelBuilder)
    {
      base.OnModelCreating(modelBuilder);
      modelBuilder.Entity<HistoryRow>().Property(h => h.MigrationId).HasMaxLength(100).IsRequired();
      modelBuilder.Entity<HistoryRow>().Property(h => h.ContextKey).HasMaxLength(200).IsRequired();
    }
  }
}
using System.Data.Entity;

namespace IdentityMySQLDemo
{
  public class MySqlConfiguration : DbConfiguration
  {
    public MySqlConfiguration()
    {
      SetHistoryContext(
      "MySql.Data.MySqlClient", (conn, schema) => new MySqlHistoryContext(conn, schema));
    }
  }
}
The MySQL provider that is featured in this tutorial does not currently support Entity Framework migrations, so you will need to use model initializers in order to connect to the database. Because this tutorial is using a MySQL instance on Azure, you will need need to create a custom Entity Framework initializer.
This step is not required if you are connecting to a SQL Server instance on Azure or if you are using a database that is hosted on premises.
To create a custom Entity Framework initializer for MySQL, use the following steps:
using IdentityMySQLDemo.Models;
using System.Data.Entity;
using System.Data.Entity.Infrastructure;
using System.Linq;

namespace IdentityMySQLDemo
{
  public class MySqlInitializer : IDatabaseInitializer<ApplicationDbContext>
  {
    public void InitializeDatabase(ApplicationDbContext context)
    {
      if (!context.Database.Exists())
      {
        // if database did not exist before - create it
        context.Database.Create();
      }
      else
      {
        // query to check if MigrationHistory table is present in the database
        var migrationHistoryTableExists = ((IObjectContextAdapter)context).ObjectContext.ExecuteStoreQuery<int>(
        string.Format(
          "SELECT COUNT(*) FROM information_schema.tables WHERE table_schema = '{0}' AND table_name = '__MigrationHistory'",
          "[Insert your database schema here - such as 'users']"));

        // if MigrationHistory table is not there (which is the case first time we run) - create it
        if (migrationHistoryTableExists.FirstOrDefault() == 0)
        {
          context.Database.Delete();
          context.Database.Create();
        }
      }
    }
  }
}
using Microsoft.AspNet.Identity.EntityFramework;
using System.Data.Entity;

namespace IdentityMySQLDemo.Models
{
  // You can add profile data for the user by adding more properties to your ApplicationUser
  // class, please visit http://go.microsoft.com/fwlink/?LinkID=317594 to learn more.
  public class ApplicationUser : IdentityUser
  {
  }

  public class ApplicationDbContext : IdentityDbContext<ApplicationUser>
  {
    static ApplicationDbContext()
    {
      Database.SetInitializer(new MySqlInitializer());
    }

    public ApplicationDbContext()
      : base("DefaultConnection")
    {
    }
  }
}
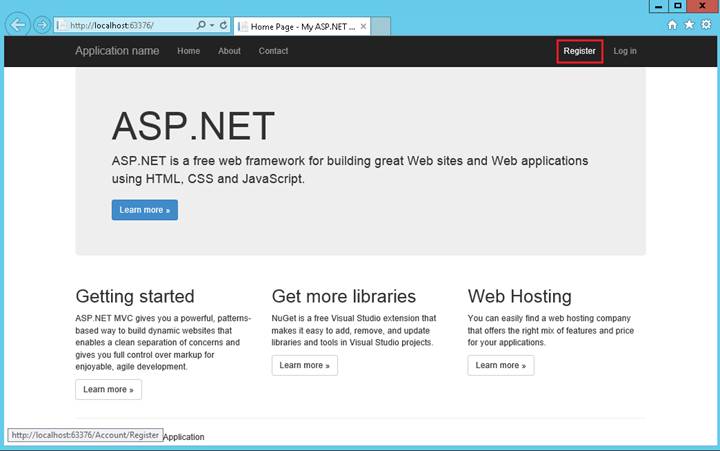
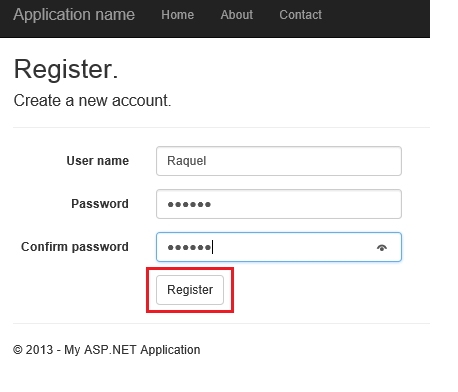
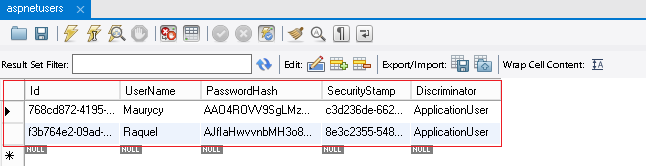
Once you have completed the steps in the preceding sections, you should test your database. To do so, use the following steps:

ew strony https://msdn.microsoft.com/en-us/library/office/bb862071(v=office.14).aspx
Applies to: SharePoint Foundation 2010The following tables provide information about the various kinds of formulas you can implement in a calculated field by using the Formula of the Microsoft.SharePoint.SPFieldCalculated class.
 Note Note |
|---|
| Microsoft SharePoint Foundation formulas for calculated fields are based on Microsoft Excel functions and syntax. However, Microsoft supports only those functions mentioned on this page for use in SharePoint Foundation calculated fields. For example, the Excel function MID is not supported. |
 Important Important |
|---|
| All example formulas in this topic use commas „,” as the parameter delimiter character. In some countries, the comma is reserved for use as the decimal mark. In such countries, users creating a calculated field must use semi-colons „;” as the delimiter character. Regardless of which character is used when the field is created, the formula works on lists in SharePoint websites anywhere in the world. SharePoint automatically changes the delimiter character to the one that is appropriate for the language/culture of the current page. For example, suppose the following formula is created on a website whose culture setting is fr-fr (France): =IF(Number1>Number2;5;10). If the website’s culture is then changed to en-us (United States), the formula changes automatically to: =IF(Number1>Number2,5,10). |
You can use the following formulas to test the condition of a statement and return a Yes or No value, to test an alternate value such as OK or Not OK, or to return a blank or dash to represent a null value.
Use the IF function to perform this comparison.
| Column1 | Column2 | Formula | Description (possible result) |
|---|---|---|---|
| 15000 | 9000 | =[Column1]>[Column2] | Is Column1 greater than Column2? (Yes) |
| 15000 | 9000 | =IF([Column1]<=[Column2], „OK”, „Not OK”) | Is Column1 less than or equal to Column2? (Not OK) |
For a result that is a logical value (Yes or No), use the AND, OR, and NOT functions.
| Column1 | Column2 | Column3 | Formula | Description (possible result) |
|---|---|---|---|---|
| 15 | 9 | 8 | =AND([Column1]>[Column2], [Column1]<[Column3]) | Is 15 greater than 9 and less than 8? (No) |
| 15 | 9 | 8 | =OR([Column1]>[Column2], [Column1]<[Column3]) | Is 15 greater than 9 or less than 8? (Yes) |
| 15 | 9 | 8 | =NOT([Column1]+[Column2]=24) | Is 15 plus 9 not equal to 24? (No) |
For a result that is another calculation, or any other value other than Yes or No, use the IF, AND, and OR functions.
| Column1 | Column2 | Column3 | Formula | Description (possible result) |
|---|---|---|---|---|
| 15 | 9 | 8 | =IF([Column1]=15, „OK”, „Not OK”) | If the value in Column1 equals 15, return „OK”. (OK) |
| 15 | 9 | 8 | =IF(AND([Column1]>[Column2], [Column1]<[Column3]), „OK”, „Not OK”) | If 15 is greater than 9 and less than 8, return „OK”. (Not OK) |
| 15 | 9 | 8 | =IF(OR([Column1]>[Column2], [Column1]<[Column3]), „OK”, „Not OK”) | If 15 is greater than 9 or less than 8, return „OK”. (OK) |
To display a zero, perform a simple calculation. To display a blank or a dash, use the IF function.
| Column1 | Column2 | Formula | Description (possible result) |
|---|---|---|---|
| 10 | 10 | =[Column1]-[Column2] | Second number subtracted from the first. (0) |
| 15 | 9 | =IF([Column1]-[Column2],[Column1]-[Column2],”-„) | Returns a dash when the value is zero. (-) |
To display a dash, #N/A, or NA in place of an error value, use the ISERROR function.
| Column1 | Column2 | Formula | Description (possible result) |
|---|---|---|---|
| 10 | 0 | =[Column1]/[Column2] | Results in an error (#DIV/0) |
| 10 | 0 | =IF(ISERROR([Column1]/[Column2]),”NA”,[Column1]/[Column2]) | Returns NA when the value is an error |
| 10 | 0 | =IF(ISERROR([Column1]/[Column2]),”-„,[Column1]/[Column2]) | Returns a dash when the value is an error |
You can use the following formulas to perform calculations that are based on dates and times, such as adding a number of days, months, or years to a date, calculating the difference between two dates, and converting time to a decimal value.
To add a number of days to a date, use the addition (+) operator.
| Note |
|---|
| When you manipulate dates, the return type of the calculated column must be set to Date and Time. |
| Column1 | Column2 | Formula | Description (possible result) |
|---|---|---|---|
| 6/9/2007 | 3 | =[Column1]+[Column2] | Adds 3 days to 6/9/2007 (6/12/2007) |
| 12/10/2008 | 54 | =[Column1]+[Column2] | Adds 54 days to 12/10/2008 (2/2/2009) |
To add a number of months to a date, use the DATE, YEAR, MONTH, and DAY functions.
| Column1 | Column2 | Formula | Description (possible result) |
|---|---|---|---|
| 6/9/2007 | 3 | =DATE(YEAR([Column1]),MONTH([Column1])+[Column2],DAY([Column1])) | Adds 3 months to 6/9/2007 (9/9/2007) |
| 12/10/2008 | 25 | =DATE(YEAR([Column1]),MONTH([Column1])+[Column2],DAY([Column1])) | Adds 25 months to 12/10/2008 (1/10/2011) |
To add a number of years to a date, use the DATE, YEAR, MONTH, and DAY functions.
| Column1 | Column2 | Formula | Description (possible result) |
|---|---|---|---|
| 6/9/2007 | 3 | =DATE(YEAR([Column1])+[Column2],MONTH([Column1]),DAY([Column1])) | Adds 3 years to 6/9/2007 (6/9/2010) |
| 12/10/2008 | 25 | =DATE(YEAR([Column1])+[Column2],MONTH([Column1]),DAY([Column1])) | Adds 25 years to 12/10/2008 (12/10/2033) |
To add a combination of days, months, and years to a date, use the DATE, YEAR, MONTH, and DAY functions.
| Column1 | Formula | Description (possible result) |
|---|---|---|
| 6/9/2007 | =DATE(YEAR([Column1])+3,MONTH([Column1])+1,DAY([Column1])+5) | Adds 3 years, 1 month, and 5 days to 6/9/2007 (7/14/2010) |
| 12/10/2008 | =DATE(YEAR([Column1])+1,MONTH([Column1])+7,DAY([Column1])+5) | Adds 1 year, 7 months, and 5 days to 12/10/2008 (7/15/2010) |
Use the DATEDIF function to perform this calculation.
| Column1 | Column2 | Formula | Description (possible result) |
|---|---|---|---|
| 01-Jan-1995 | 15-Jun-1999 | =DATEDIF([Column1], [Column2],”d”) | Returns the number of days between the two dates (1626) |
| 01-Jan-1995 | 15-Jun-1999 | =DATEDIF([Column1], [Column2],”ym”) | Returns the number of months between the dates, ignoring the year part (5) |
| 01-Jan-1995 | 15-Jun-1999 | =DATEDIF([Column1], [Column2],”yd”) | Returns the number of days between the dates, ignoring the year part (165) |
To present the result in the standard time format (hours:minutes:seconds), use the subtraction operator (-) and the TEXT function. For this method to work, hours must not exceed 24, and minutes and seconds must not exceed 60.
| Column1 | Column2 | Formula | Description (possible result) |
|---|---|---|---|
| 06/09/2007 10:35 AM | 06/09/2007 3:30 PM | =TEXT([Column2]-[Column1],”h”) | Hours between two times (4) |
| 06/09/2007 10:35 AM | 06/09/2007 3:30 PM | =TEXT([Column2]-[Column1],”h:mm”) | Hours and minutes between two times (4:55) |
| 06/09/2007 10:35 AM | 06/09/2007 3:30 PM | =TEXT([Column2]-[Column1],”h:mm:ss”) | Hours, minutes, and seconds between two times (4:55:00) |
To present the result in a total that is based on one time unit, use the INT function, or HOUR, MINUTE, or SECOND function.
| Column1 | Column2 | Formula | Description (possible result) |
|---|---|---|---|
| 06/09/2007 10:35 AM | 06/10/2007 3:30 PM | =INT(([Column2]-[Column1])*24) | Total hours between two times (28) |
| 06/09/2007 10:35 AM | 06/10/2007 3:30 PM | =INT(([Column2]-[Column1])*1440) | Total minutes between two times (1735) |
| 06/09/2007 10:35 AM | 06/10/2007 3:30 PM | =INT(([Column2]-[Column1])*86400) | Total seconds between two times (104100) |
| 06/09/2007 10:35 AM | 06/10/2007 3:30 PM | =HOUR([Column2]-[Column1]) | Hours between two times, when the difference does not exceed 24 (4) |
| 06/09/2007 10:35 AM | 06/10/2007 3:30 PM | =MINUTE([Column2]-[Column1]) | Minutes between two times, when the difference does not exceed 60 (55) |
| 06/09/2007 10:35 AM | 06/10/2007 3:30 PM | =SECOND([Column2]-[Column1]) | Seconds between two times, when the difference does not exceed 60 (0) |
To convert hours from the standard time format to a decimal number, use the INT function.
| Column1 | Formula | Description (possible result) |
|---|---|---|
| 10:35 AM | =([Column1]-INT([Column1]))*24 | Number of hours since 12:00 AM (10.583333) |
| 12:15 PM | =([Column1]-INT([Column1]))*24 | Number of hours since 12:00 AM (12.25) |
To convert hours from a decimal number to the standard time format (hours:minutes:seconds), use the division operator and the TEXT function.
| Column1 | Formula | Description (possible result) |
|---|---|---|
| 23:58 | =TEXT(Column1/24, „hh:mm:ss”) | Hours, minutes, and seconds since 12:00 AM (00:59:55) |
| 2:06 | =TEXT(Column1/24, „h:mm”) | Hours and minutes since 12:00 AM (0:05) |
A Julian date refers to a date format that is a combination of the current year and the number of days since the beginning of the year. For example, January 1, 2007, is represented as 2007001 and December 31, 2007, is represented as 2007365. This format is not based on the Julian calendar.
To convert a date to a Julian date, use the TEXT and DATEVALUE functions.
| Column1 | Formula | Description (possible result) |
|---|---|---|
| 6/23/2007 | =TEXT([Column1],”yy”)&TEXT(([Column1]-DATEVALUE(„1/1/”& TEXT([Column1],”yy”))+1),”000″) | Date in Julian format, with a two-digit year (07174) |
| 6/23/2007 | =TEXT([Column1],”yyyy”)&TEXT(([Column1]-DATEVALUE(„1/1/”&TEXT([Column1],”yy”))+1),”000″) | Date in Julian format, with a four-digit year (2007174) |
To convert a date to a Julian date that is used in astronomy, use the constant 2415018.50. This formula works only for dates after 3/1/1901, and if you are using the 1900 date system.
| Column1 | Formula | Description (possible result) |
|---|---|---|
| 6/23/2007 | =[Column1]+2415018.50 | Date in Julian format, used in astronomy (2454274.50) |
To convert dates to the text for the day of the week, use the TEXT and WEEKDAY functions.
| Column1 | Formula | Description (possible result) |
|---|---|---|
| 19-Feb-2007 | =TEXT(WEEKDAY([Column1]), „dddd”) | Calculates the day of the week for the date and returns the full name of the day (Monday) |
| 3-Jan-2008 | =TEXT(WEEKDAY([Column1]), „ddd”) | Calculates the day of the week for the date and returns the abbreviated name of the day (Thu) |
You can use the following formulas to perform a variety of mathematical calculations, such as adding, subtracting, multiplying, and dividing numbers; calculating the average or median of numbers; rounding a number; and counting values.
To add numbers in two or more columns in a row, use the addition operator (+) or the SUM function.
| Column1 | Column2 | Column3 | Formula | Description (possible result) |
|---|---|---|---|---|
| 6 | 5 | 4 | =[Column1]+[Column2]+[Column3] | Adds the values in the first three columns (15) |
| 6 | 5 | 4 | =SUM([Column1],[Column2],[Column3]) | Adds the values in the first three columns (15) |
| 6 | 5 | 4 | =SUM(IF([Column1]>[Column2], [Column1]-[Column2], 10), [Column3]) | If Column1 is greater than Column2, adds the difference and Column3. Else add 10 and Column3 (5) |
To subtract numbers in two or more columns in a row, use the subtraction operator (-) or the SUM function with negative numbers.
| Column1 | Column2 | Column3 | Formula | Description (possible result) |
|---|---|---|---|---|
| 15000 | 9000 | -8000 | =[Column1]-[Column2] | Subtracts 9000 from 15000 (6000) |
| 15000 | 9000 | -8000 | =SUM([Column1], [Column2], [Column3]) | Adds numbers in the first three columns, including negative values (16000) |
Use the subtraction (-) and division (/) operators and the ABS function.
| Column1 | Column2 | Formula | Description (possible result) |
|---|---|---|---|
| 2342 | 2500 | =([Column2]-[Column1])/ABS([Column1]) | Percentage change (6.75% or 0.06746) |
To multiply numbers in two or more columns in a row, use the multiplication operator (*) or the PRODUCT function.
| Column1 | Column2 | Formula | Description (possible result) |
|---|---|---|---|
| 5 | 2 | =[Column1]*[Column2] | Multiplies the numbers in the first two columns (10) |
| 5 | 2 | =PRODUCT([Column1], [Column2]) | Multiplies the numbers in the first two columns (10) |
| 5 | 2 | =PRODUCT([Column1],[Column2],2) | Multiplies the numbers in the first two columns and the number 2 (20) |
To divide numbers in two or more columns in a row, use the division operator (/).
| Column1 | Column2 | Formula | Description (possible result) |
|---|---|---|---|
| 15000 | 12 | =[Column1]/[Column2] | Divides 15000 by 12 (1250) |
| 15000 | 12 | =([Column1]+10000)/[Column2] | Adds 15000 and 10000, and then divides the total by 12 (2083) |
The average is also called the mean. To calculate the average of numbers in two or more columns in a row, use the AVERAGE function.
| Column1 | Column2 | Column3 | Formula | Description (possible result) |
|---|---|---|---|---|
| 6 | 5 | 4 | =AVERAGE([Column1], [Column2],[Column3]) | Average of the numbers in the first three columns (5) |
| 6 | 5 | 4 | =AVERAGE(IF([Column1]>[Column2], [Column1]-[Column2], 10), [Column3]) | If Column1 is greater than Column2, calculate the average of the difference and Column3. Else calculate the average of the value 10 and Column3 (2.5) |
The median is the value at the center of an ordered range of numbers. Use the MEDIAN function to calculate the median of a group of numbers.
| A | B | C | D | E | F | Formula | Description (result) |
|---|---|---|---|---|---|---|---|
| 10 | 7 | 9 | 27 | 0 | 4 | =MEDIAN(A, B, C, D, E, F) | Median of numbers in the first 6 columns (8) |
To calculate the smallest or largest number in two or more columns in a row, use the MIN and MAX functions.
| Column1 | Column2 | Column3 | Formula | Description (possible result) |
|---|---|---|---|---|
| 10 | 7 | 9 | =MIN([Column1], [Column2], [Column3]) | Smallest number (7) |
| 10 | 7 | 9 | =MAX([Column1], [Column2], [Column3]) | Largest number (10) |
To count numeric values, use the COUNT function.
| Column1 | Column2 | Column3 | Formula | Description (possible result) |
|---|---|---|---|---|
| Apple | 12/12/2007 | =COUNT([Column1], [Column2], [Column3]) | Counts the number of columns that contain numeric values. Excludes date and time, text, and null values (0) | |
| $12 | #DIV/0! | 1.01 | =COUNT([Column1], [Column2], [Column3]) | Counts the number of columns that contain numeric values, but excludes error and logical values (2) |
Use the percent (%) operator to perform this calculation.
| Column1 | Column2 | Formula | Description (possible result) |
|---|---|---|---|
| 23 | 3% | =[Column1]*(1+5%) | Increases number in Column1 by 5% (24.15) |
| 23 | 3% | =[Column1]*(1+[Column2]) | Increases number in Column1 by the percent value in Column2: 3% (23.69) |
| 23 | 3% | =[Column1]*(1-[Column2]) | Decreases number in Column1 by the percent value in Column2: 3% (22.31) |
Use the exponentiation operator (^) or the POWER function to perform this calculation.
| Column1 | Column2 | Formula | Description (possible result) |
|---|---|---|---|
| 5 | 2 | =[Column1]^[Column2] | Calculates five squared (25) |
| 5 | 3 | =POWER([Column1], [Column2]) | Calculates five cubed (125) |
To round up a number, use the ROUNDUP, ODD, or EVEN function.
| Column1 | Formula | Description (possible result) |
|---|---|---|
| 20.3 | =ROUNDUP([Column1],0) | Rounds 20.3 up to the nearest whole number (21) |
| -5.9 | =ROUNDUP([Column1],0) | Rounds -5.9 up to the nearest whole number (-5) |
| 12.5493 | =ROUNDUP([Column1],2) | Rounds 12.5493 up to the nearest hundredth, two decimal places (12.55) |
| 20.3 | =EVEN([Column1]) | Rounds 20.3 up to the nearest even number (22) |
| 20.3 | =ODD([Column1]) | Rounds 20.3 up to the nearest odd number (21) |
To round down a number, use the ROUNDDOWN function.
| Column1 | Formula | Description (possible result) |
|---|---|---|
| 20.3 | =ROUNDDOWN([Column1],0) | Rounds 20.3 down to the nearest whole number (20) |
| -5.9 | =ROUNDDOWN([Column1],0) | Rounds -5.9 down to the nearest whole number (-6) |
| 12.5493 | =ROUNDDOWN([Column1],2) | Rounds 12.5493 down to the nearest hundredth, two decimal places (12.54) |
To round a number to the nearest number or fraction, use the ROUND function.
| Column1 | Formula | Description (possible result) |
|---|---|---|
| 20.3 | =ROUND([Column1],0) | Rounds 20.3 down, because the fractional part is less than .5 (20) |
| 5.9 | =ROUND([Column1],0) | Rounds 5.9 up, because the fractional part is greater than .5 (6) |
| -5.9 | =ROUND([Column1],0) | Rounds -5.9 down, because the fractional part is less than -.5 (-6) |
| 1.25 | =ROUND([Column1], 1) | Rounds the number to the nearest tenth (one decimal place). Because the portion to be rounded is 0.05 or greater, the number is rounded up (result: 1.3) |
| 30.452 | =ROUND([Column1], 2) | Rounds the number to the nearest hundredth (two decimal places). Because the portion to be rounded, 0.002, is less than 0.005, the number is rounded down (result: 30.45) |
To round a number to the significant digit above 0, use the ROUND, ROUNDUP, ROUNDDOWN, INT, and LEN functions.
| Column1 | Formula | Description (possible result) |
|---|---|---|
| 5492820 | =ROUND([Column1],3-LEN(INT([Column1]))) | Rounds the number to 3 significant digits (5490000) |
| 22230 | =ROUNDDOWN([Column1],3-LEN(INT([Column1]))) | Rounds the bottom number down to 3 significant digits (22200) |
| 5492820 | =ROUNDUP([Column1], 5-LEN(INT([Column1]))) | Rounds the top number up to 5 significant digits (5492900) |
You can use the following formulas to manipulate text, such as combining or concatenating the values from multiple columns, comparing the contents of columns, removing characters or spaces, and repeating characters.
To change the case of text, use the UPPER, LOWER, or PROPER function.
| Column1 | Formula | Description (possible result) |
|---|---|---|
| nina Vietzen | =UPPER([Column1]) | Changes text to uppercase (NINA VIETZEN) |
| nina Vietzen | =LOWER([Column1]) | Changes text to lowercase (nina vietzen) |
| nina Vietzen | =PROPER([Column1]) | Changes text to title case (Nina Vietzen) |
To combine first and last names, use the ampersand operator (&) or the CONCATENATE function.
| Column1 | Column2 | Formula | Description (possible result) |
|---|---|---|---|
| Carlos | Carvallo | =[Column1]&[Column2] | Combines the two strings (CarlosCarvallo) |
| Carlos | Carvallo | =[Column1]&” „&[Column2] | Combines the two strings, separated by a space (Carlos Carvallo) |
| Carlos | Carvallo | =[Column2]&”, „&[Column1] | Combines the two strings, separated by a comma and a space (Carvallo, Carlos) |
| Carlos | Carvallo | =CONCATENATE([Column2], „,”, [Column1]) | Combines the two strings, separated by a comma (Carvallo,Carlos) |
To combine text and numbers, use the CONCATENATE function, the ampersand operator (&), or the TEXT function and the ampersand operator.
| Column1 | Column2 | Formula | Description (possible result) |
|---|---|---|---|
| Yang | 28 | =[Column1]&” sold „&[Column2]&” units.” | Combines contents above into a phrase (Yang sold 28 units.) |
| Dubois | 40% | =[Column1]&” sold „&TEXT([Column2],”0%”)&” of the total sales.” | Combines contents above into a phrase (Dubois sold 40% of the total sales.)
Note The TEXT function appends the formatted value of Column2 instead of the underlying value, which is 0.4. |
| Yang | 28 | =CONCATENATE([Column1],” sold „,[Column2],” units.”) | Combines contents above into a phrase (Yang sold 28 units.) |
To combine text with a date or time, use the TEXT function and the ampersand operator (&).
| Column1 | Column2 | Formula | Description (possible result) |
|---|---|---|---|
| Billing Date | 5-Jun-2007 | =”Statement date: „&TEXT([Column2], „d-mmm-yyyy”) | Combines text with a date (Statement date: 5-Jun-2007) |
| Billing Date | 5-Jun-2007 | =[Column1]&” „&TEXT([Column2], „mmm-dd-yyyy”) | Combines text and date from different columns into one column (Billing Date Jun-05-2007) |
To compare one column to another column or a list of values, use the EXACT and OR functions.
| Column1 | Column2 | Formula | Description (possible result) |
|---|---|---|---|
| BD122 | BD123 | =EXACT([Column1],[Column2]) | Compares contents of first two columns (No) |
| BD122 | BD123 | =EXACT([Column1], „BD122”) | Compares contents of Column1 and the string „BD122” (Yes) |
To determine whether a column value or a part of it matches specific text, use the IF, FIND, SEARCH, and ISNUMBER functions.
| Column1 | Formula | Description (possible result) |
|---|---|---|
| Vietzen | =IF([Column1]=”Vietzen”, „OK”, „Not OK”) | Determines whether Column1 is Vietzen (OK) |
| Vietzen | =IF(ISNUMBER(FIND(„v”,[Column1])), „OK”, „Not OK”) | Determines whether Column1 contains the letter v (OK) |
| BD123 | =ISNUMBER(FIND(„BD”,[Column1])) | Determines whether Column1 contains BD (Yes) |
To count nonblank columns, use the COUNTA function.
| Column1 | Column2 | Column3 | Formula | Description (possible result) |
|---|---|---|---|---|
| Sales | 19 | =COUNTA([Column1], [Column2]) | Counts the number of nonblank columns (2) | |
| Sales | 19 | =COUNTA([Column1], [Column2], [Column3]) | Counts the number of nonblank columns (2) |
To remove characters from text, use the LEN, LEFT, and RIGHT functions.
| Column1 | Formula | Description (possible result) |
|---|---|---|
| Vitamin A | =LEFT([Column1],LEN([Column1])-2) | Returns 7 (9-2) characters, starting from left (Vitamin) |
| Vitamin B1 | =RIGHT([Column1], LEN([Column1])-8) | Returns 2 (10-8) characters, starting from right (B1) |
To remove spaces from a column, use the TRIM function.
| Column1 | Formula | Description (possible result) |
|---|---|---|
| Hello there! | =TRIM([Column1]) | Removes the spaces from the beginning and end (Hello there!) |
To repeat a character in a column, use the REPT function.
| Formula | Description (possible result) |
|---|---|
| =REPT(„.”,3) | Repeats a period 3 times (…) |
| =REPT(„-„,10) | Repeats a dash 10 times (———-) |
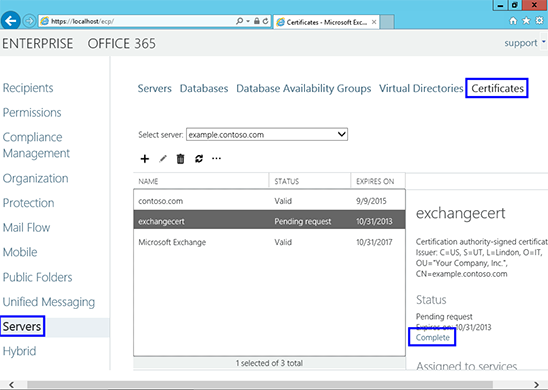
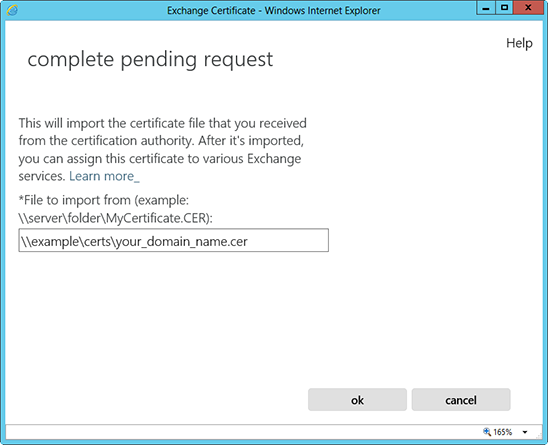
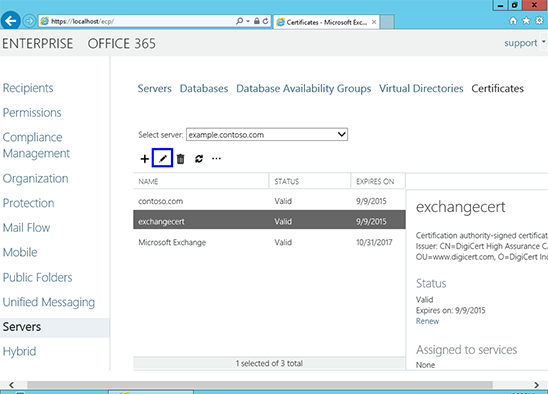
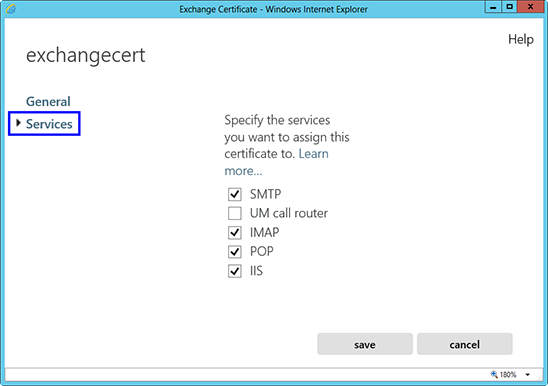
Instalacja certyfikatu SSL w programie Exchange 2013
doinstalować
Litery dysków należy dopasować do stanu zgodnego w danej instalacji !!!
w przykładzie obraz znajduje się na dysku X i przygotowujemy Pendrive Y.
| Firma | Model | Login | Hasło default |
| 2wire | wifi routers | none | Wireless |
| 3com | 812 | Administrator | admin |
| 3com | 3C16405 | admin | (brak) |
| 3com | 3c16405 | Administrator | (brak) |
| 3com | 3c16405 | Administrator | (brak) |
| 3com | 3c16405 | n/a | (brak) |
| 3COM | 3C16406 | admin | (brak) |
| 3COM | 3C16450 | admin | (brak) |
| 3COM | 3Com SuperStack 3 Switch 3300XM | security | security |
| 3com | 3CRADSL72 | (brak) | 1234admin |
| 3Com | 3CRWDR100A-72 | admin | 1234admin |
| 3com | CB9000 / 4007 | FORCE | (brak) |
| 3COM | cellplex | admin | admin |
| 3COM | CellPlex | admin | synnet |
| 3COM | CellPlex | admin | admin |
| 3com | cellplex | admin | admin |
| 3com | cellplex | admin | admin |
| 3com | cellplex | admin | admin |
| 3com | cellplex | n/a | (brak) |
| 3COM | cellplex | operator | (brak) |
| 3com | cellplex | operator | (brak) |
| 3COM | CellPlex | root | (brak) |
| 3com | CellPlex | root | (brak) |
| 3COM | CellPlex | tech | tech |
| 3COM | CellPlex | tech | (brak) |
| 3com | CellPlex | tech | tech |
| 3com | CellPlex | tech | (brak) |
| 3COM | CoreBuilder | debug | synnet |
| 3com | corebuilder | defug | synnet |
| 3COM | CoreBuilder | n/a | admin |
| 3COM | CoreBuilder | n/a | (brak) |
| 3COM | CoreBuilder | tech | tech |
| 3COM | HiPerACT | admin | (brak) |
| 3com | HiPerACT | admin | (brak) |
| 3com | HiPerACT | admin | (brak) |
| 3COM | HiPerARC | adm | (brak) |
| 3COM | HiPerARC | adm | (brak) |
| 3Com | Internet Firewall | admin | password |
| 3COM | LANplex | debug | synnet |
| 3com | LANplex | n/a | admin |
| 3COM | LANplex | tech | tech |
| 3COM | LANplex | tech | (brak) |
| 3COM | LinkSwitch | tech | tech |
| 3COM | NetBuilder | (brak) | admin |
| 3COM | Netbuilder | admin | (brak) |
| 3com | Netbuilder | admin | (brak) |
| 3COM | Netbuilder | Root | (brak) |
| 3COM | NetBuilder | ILMI | |
| 3com | office connect | admin | (brak) |
| 3COM | Office Connect ISDN Routers | n/a | PASSWORD |
| 3COM | Office Connect ISDN Routers | n/a | PASSWORD |
| 3com | officeconnect | admin | (brak) |
| 3com | officeconnect | n/a | (brak) |
| 3com | OfficeConnect 812 ADSL | admin | (brak) |
| 3com | OfficeConnect 812 ADSL | admin | (brak) |
| 3COM | OfficeConnect 812 ADSL | Administrator | admin |
| 3COM | OfficeConnect 812 ADSL | adminttd | adminttd |
| 3COM | OfficeConnect ADSL Wireless 11g Firewall Router | (brak) | admin |
| 3com | OfficeConnect Wireless 11g Cable/DSL Gateway | (brak) | admin |
| 3com | OfficeConnect Wireless 11g Cable/DSL Gateway | (brak) | admin |
| 3Com | Shark Fin | User | Password |
| 3com | SS III Switch | recovery | recovery |
| 3com | SS III Switch | recovery | recovery |
| 3com | super | admin | (brak) |
| 3COM | SuperStack 3 | admin | (brak) |
| 3COM | SuperStack 3 | manager | manager |
| 3COM | SuperStack 3 | monitor | monitor |
| 3COM | superstack II | 3comcso | RIP000 |
| 3com | superstack II Netbuilder | n/a | (brak) |
| 3COM | SuperStack II Switch | debug | synnet |
| 3COM | SuperStack II Switch | tech | tech |
| 3COM | SuperStack II Switch | tech | tech |
| 3com | Switch | admin | admin |
| 3com | Switch | admin | admin |
| 3COM | Wireless AP | admin | comcomcom |
| 3M | VOL-0215 etc. | volition | volition |
| 3ware | 3DM | Administrator | 3ware |
| Accelerated Networks | DSL CPE and DSLAM | sysadm | anicust |
| ACCTON | Wirelessrouter | none | 0 |
| accton t-online | accton | (brak) | 0 |
| accton t-online | accton | (brak) | 0 |
| Aceex | Modem ADSL Router | admin | (brak) |
| Aceex | Modem ADSL Router | admin | (brak) |
| Actiontec | Wireless Broadband Router | admin | password |
| ADC Kentrox | Pacesetter Router | n/a | secret |
| Addon | GWAR3000/ARM8100 | admin | admin |
| ADIC | Scalar 100/1000 | admin | secure |
| ADIC | Scalar i2000 | admin | password |
| adtran | Agent Card | n/a | ADTRAN |
| adtran | Atlas 800/800Plus/810Plus/550 | n/a | Password |
| adtran | Express 5110/5200/5210 | n/a | adtran |
| adtran | MX2800 | n/a | adtran |
| adtran | NxIQ | n/a | adtran |
| adtran | Smart 16/16e | n/a | (brak) |
| adtran | Smart 16/16e | n/a | PASSWORD |
| adtran | T3SU 300 | n/a | adtran |
| adtran | TSU IQ/DSU IQ | n/a | (brak) |
| adtran | TSU Router Module/L128/L768/1.5 | n/a | (brak) |
| Advantek Networks | Wireless LAN 802.11 g/b | admin | (brak) |
| Aethra | Starbridge EU | admin | password |
| AirTies RT-210 | AirTies RT-210 | admin | admin |
| ALCATEL | 4400 | mtcl | (brak) |
| Alcatel | 7300 ASAM | SUPERUSER | ANS#150 |
| Alcatel | Office 4200 | n/a | 1064 |
| Alcatel | OmniPCX Office | ftp_admi | kilo1987 |
| Alcatel | OmniPCX Office | ftp_inst | pbxk1064 |
| Alcatel | OmniPCX Office | ftp_nmc | tuxalize |
| Alcatel | OmniPCX Office | ftp_oper | help1954 |
| Alcatel | OmniStack 6024 | admin | switch |
| Alcatel | Omnistack/Omniswitch | diag | switch |
| Alcatel | Omnistack/omniswitch | diag | switch |
| Alcatel | OXO | (brak) | admin |
| Alcatel | PBX | adfexc | adfexc |
| Alcatel | PBX | at4400 | at4400 |
| Alcatel | PBX | client | client |
| Alcatel | PBX | dhs3mt | dhs3mt |
| Alcatel | PBX | dhs3pms | dhs3pms |
| Alcatel | PBX | halt | tlah |
| Alcatel | PBX | install | llatsni |
| Alcatel | PBX | kermit | kermit |
| Alcatel | PBX | mtch | mtch |
| Alcatel | PBX | mtcl | mtcl |
| Alcatel | PBX | root | letacla |
| Alcatel | Timestep VPN 1520 | root | permit |
| Allied | Telesyn | manager | friend |
| Allied Telesyn | ALAT8326GB | manager | manager |
| Allied Telesyn | AT Router | root | (brak) |
| Allied Telesyn | AT-8024(GB) | manager | admin |
| Allied Telesyn | AT-8024(GB) | n/a | admin |
| Allied Telesyn | AT-AR130 (U) -10 | Manager | friend |
| Allied Telesyn | AT8016F | manager | friend |
| ALLNET | ALL 130DSL | admin | password |
| Allnet | ALL0275 802.11g AP | none | admin |
| ALLNET | T-DSL Modem | admin | admin |
| Alteon | ACEDirector3 | admin | (brak) |
| Alteon | ACEswitch | admin | admin |
| Alteon | ACEswitch | admin | (brak) |
| Alteon | ACEswitch | admin | linga |
| Alteon | AD4 | admin | admin |
| AMBIT | ADSL | root | (brak) |
| Ambit | Cable Modem | root | root |
| Ambit | Cable Modem 60678eu | root | root |
| Ambit | ntl:home 200 | root | root |
| Amitech | wireless router and access point 802.11g 802.11b | admin | admin |
| Andover Controls | Infinity | acc | acc |
| AOC | zenworks 4.0 | n/a | admin |
| Apache | Tomcat Web Server Administration Tool | admin | (brak) |
| APC | 9606 Smart Slot | n/a | backdoor |
| APC | Smart UPS | apc | apc |
| apc | Smartups 3000 | apc | apc |
| APC | UPSes (Web/SNMP Mgmt Card) | device | device |
| APC | USV Network Management Card | n/a | TENmanUFactOryPOWER |
| Apple | Airport Base Station (Dual Ethernet) | n/a | password |
| Apple | AirPort Base Station (Graphite) | (brak) | public |
| Apple | Airport Extreme Base Station | n/a | admin |
| apple | airport5 | root | admin |
| Applied Innovations | AIscout | scout | scout |
| Areca | RAID controllers | admin | 0 |
| Areca | RAID controllers | admin | 0 |
| Arescom | modem/router | n/a | atc123 |
| ARtem | ComPoint – CPD-XT-b | (brak) | admin |
| Asante | FM2008 | admin | asante |
| Asante | FM2008 | superuser | (brak) |
| Asante | IntraStack | IntraStack | Asante |
| Asante | IntraSwitch | IntraSwitch | Asante |
| Ascend | Router | n/a | ascend |
| Ascend | Sahara | root | ascend |
| Ascend | Yurie | readonly | lucenttech2 |
| Ascom | Ascotel PBX | (brak) | 3ascotel |
| asmack | router | admin | epicrouter |
| Asmax | Ar-804u | admin | epicrouter |
| ASMAX | AR701u / ASMAX AR6024 | admin | epicrouter |
| ASMAX | AR800C2 | admin | epicrouter |
| ASMAX | AR800C2 | admin | epicrouter |
| Aspect | ACD | customer | none |
| Aspect | ACD | DTA | TJM |
| Aspect | ACD | DTA | TJM |
| Aspect | ACD | DTA | TJM |
| ASUS | ASUS SMTA Router | admin | admin |
| ASUS | ASUS WL-330 Pocket Wireless Access Point | admin | admin |
| Asus | P5P800 | n/a | admin |
| ASUS | WL-500G | admin | admin |
| Asus | wl300 | admin | admin |
| Asus | wl500 | admin | admin |
| asus | WL500g | admin | admin |
| Asus | WL500g Deluxe | admin | admin |
| Asus | wl503g | admin | admin |
| ATL | P1000 | operator | 1234 |
| ATL | P1000 | Service | 5678 |
| Atlantis | A02-RA141 | admin | atlantis |
| Atlantis | I-Storm Lan Router ADSL | admin | atlantis |
| Avaya | Cajun | diag | danger |
| Avaya | Cajun | manuf | xxyyzz |
| AVAYA | Cajun P33x | n/a | admin |
| Avaya | Cajun Pxxx | root | root |
| Avaya | CMS Supervisor | root | cms500 |
| Avaya | Definity | craft | (brak) |
| Avaya | definity | craft | crftpw |
| Avaya | Definity | dadmin | dadmin01 |
| AVAYA | g3R | root | ROOT500 |
| AVAYA | P333 | Administrator | ggdaseuaimhrke |
| AVAYA | P333 | root | ggdaseuaimhrke |
| Avaya | Pxxx | diag | danger |
| Avaya | Pxxx | manuf | xxyyzz |
| AVM | Fritz!Box | n/a | 0 |
| AVM | Fritz!Box Fon | n/a | n/a |
| Avocent | Cyclade | root | tslinux |
| axis | 2100 | n/a | (brak) |
| Axis | 540/542 Print Server | root | pass |
| Axis | All Axis Printserver | root | pass |
| Axis | NETCAM | root | pass |
| Axis | NETCAM | root | pass |
| Axis | Webcams | root | pass |
| AXUS | AXUS YOTTA | n/a | 0 |
| aztech | DSL-600E | admin | admin |
| Aztecj | DSL 600EU | isp | isp |
| Aztecj | DSL 600EU | root | admin |
| Bausch Datacom | Proxima PRI ADSL PSTN Router4 Wireless | admin | epicrouter |
| Bay Networks | Router | Manager | (brak) |
| Bay Networks | Router | User | (brak) |
| Bay Networks | Router | User | (brak) |
| Bay Networks | SuperStack II | security | security |
| Bay Networks | SuperStack II | security | security |
| Bay Networks | Switch | n/a | NetICs |
| Bay Networks | Switch | n/a | NetICs |
| BBR-4MG and BBR-4HG | BUFFALO | root | n/a |
| Beetel | ADSL Modem | admin | password |
| Belkin | F5D6130 | (brak) | MiniAP |
| Belkin | F5D7150 | n/a | admin |
| Benq | awl 700 wireless router | admin | admin |
| Billion | Bipac 5100 | admin | admin |
| Billion | BIPAC-640 AC | (brak) | (brak) |
| BinTec | Bianca/Brick | n/a | snmp-Trap |
| Bintec | Bianka Routers | admin | bintec |
| BinTec | x1200 | admin | bintec |
| BinTec | x2300i | admin | bintec |
| BinTec | x3200 | admin | bintec |
| Blue Coat Systems | ProxySG | admin | articon |
| Bluecoat | ProxySG (all model) | admin | admin |
| BMC | Patrol | patrol | patrol |
| BMC Software | Patrol | Administrator | the same all over |
| Bosch | NWC-0455 Dinion IP Cameras | live | live |
| Bosch | NWC-0455 Dinion IP Cameras | service | service |
| Bosch | NWC-0455 Dinion IP Cameras | user | user |
| Breezecom | Breezecom Adapters | n/a | Master |
| Breezecom | Breezecom Adapters | n/a | laflaf |
| Breezecom | Breezecom Adapters | n/a | Helpdesk |
| Breezecom | Breezecom Adapters | n/a | Super |
| Breezecom | Breezecom Adapters | n/a | Master |
| Breezecom | Breezecom Adapters | n/a | laflaf |
| Broadlogic | XLT router | admin | admin |
| Broadlogic | XLT router | installer | installer |
| Broadlogic | XLT router | webadmin | webadmin |
| Brocade | Fabric OS | admin | password |
| Brocade | Fabric OS | root | fivranne |
| Brocade | Fabric OS | user | password |
| Brocade | Silkworm | admin | password |
| Brother | HL-1270n | n/a | access |
| Brother | HL5270DN | admin | access |
| Brother | MFC-420CN | n/a | access |
| Brother | MFC-7225 | admin | access |
| Brother | NC-2100p | (brak) | access |
| Brother | NC-3100h | (brak) | access |
| Brother | NC-4100h | (brak) | access |
| Buffalo | WHR-G300N | root | |
| Buffalo | Wireless Broadband Base Station-g | root | (brak) |
| BUFFALO | WLAR-L11-L / WLAR-L11G-L | root | (brak) |
| Buffalo Technology | TeraStation | admin | password |
| Cable And Wireless | ADSL Modem/Router | admin | 1234 |
| Cabletron | Netgear modem/router and SSR | netman | (brak) |
| canyon | router | Administrator | admin |
| Cayman | Cayman DSL | n/a | (brak) |
| Celerity | Mediator | mediator | mediator |
| Celerity | Mediator | root | Mau’dib |
| Cellit | CCPro | cellit | cellit |
| Cerberus | ADSL Wifi 802.11g | Admin | Admin |
| Checkpoint | SecurePlatform | admin | admin |
| CipherTrust | IronMail | admin | password |
| cisco | 2600 | Administrator | admin |
| cisco | 3600 | Administrator | admin |
| cisco | 2600 router | cisco | (brak) |
| Cisco | Aironet | (brak) | _Cisco |
| Cisco | Aironet | Cisco | Cisco |
| Cisco | Aironet 1200 | root | Cisco |
| Cisco | AP1200 | Cisco | Cisco |
| Cisco | BBSD MSDE Client | bbsd-client | NULL |
| Cisco | BBSM | bbsd-client | changeme2 |
| Cisco | BBSM Administrator | Administrator | changeme |
| Cisco | BBSM MSDE Administrator | sa | (brak) |
| CISCO | Cache Engine | admin | diamond |
| Cisco | CallManager | admin | admin |
| Cisco | Catalyst 4000/5000/6000 | (brak) | public/private/secret |
| Cisco | Cisco Wireless Location Appliance | root | password |
| Cisco | CiscoWorks 2000 | admin | cisco |
| Cisco | CiscoWorks 2000 | guest | (brak) |
| Cisco | Ciso Aironet 1100 series | (brak) | Cisco |
| Cisco | CNR | admin | changeme |
| Cisco | ConfigMaker | cmaker | cmaker |
| Cisco | ConfigMaker | cmaker | cmaker |
| Cisco | Content Engine | admin | default |
| cisco | cva 122 | admin | admin |
| cisco | GSR | admin | admin |
| Cisco | HSE | hsa | hsadb |
| Cisco | HSE | root | blender |
| Cisco | MeetingPlace | technician | 2 + last 4 of Audio Server chasis Serial case-sensitive + 561384 |
| Cisco | Netranger/secure IDS | netrangr | attack |
| Cisco | Netranger/secure IDS | root | attack |
| Cisco | ONS | CISCO15 | otbu+1 |
| Cisco | PIX | enable | (brak) |
| Cisco | PIX firewall | (brak) | cisco |
| Cisco | VPN Concentrator 3000 series | admin | admin |
| Cisco | WLSE | enable | (brak) |
| Cisco | WLSE | root | blender |
| Cisco | WLSE | wlse | wlsedb |
| Cisco | WSLE | wlseuser | wlsepassword |
| Cisco-Arrowpoint | Arrowpoint | admin | system |
| Citel | Handset Gateway | (brak) | citel |
| Citel | Handset Gateway | citel | password |
| CNET | CNET 4PORT ADSL MODEM | admin | epicrouter |
| CNET | CSH-2400W | admin | 1234 |
| CNet | CWR- 500 Wireless-B Router | Admin | admin |
| Colubris | MSC | admin | admin |
| COM3 | OLe | admin | admin |
| Comcast Home Networking | Comcast Home Networking | comcast | (brak) |
| Compaq | Insight Manager | administrator | administrator |
| Compaq | Insight Manager | anonymous | (brak) |
| Compaq | Insight Manager | operator | operator |
| Compaq | Insight Manager | PFCUser | 240653C9467E45 |
| Compaq | Insight Manager | user | user |
| Compaq | Insight Manager | user | public |
| Comtrend | ct-536+ | admin | admin |
| Comtrend | ct-536+ | admin | 1234 |
| comtrend | ct536+ | admin | (brak) |
| Conceptronic | C54BRS4 | admin | 1234 |
| conexant | ACCESS RUNNER ADSL CONSOLE PORT 3.27 | Administrator | admin |
| Conexant | Router | n/a | epicrouter |
| Conexant | Router | n/a | admin |
| corecess | 3113 | admin | (brak) |
| Corecess | 6808 APC | corecess | corecess |
| Corecess | Corecess 3112 | Administrator | admin |
| creative | 2015U | n/a | (brak) |
| Crossbeam | COS / XOS | (brak) | x40rocks |
| CTC Union | ATU-R130 | root | root |
| cuproplus | bus | n/a | (brak) |
| cyberguard | all firewalls | cgadmin | cgadmin |
| Cyclades | PR 1000 | super | surt |
| Cyclades | TS800 | root | tslinux |
| d-link | 504g adsl router | admin | admin |
| d-link | ads500g | admin | admin |
| D-Link | D-704P | admin | (brak) |
| D-Link | D-704P | admin | admin |
| D-Link | DI-514 | user | (brak) |
| D-Link | DI-524 | admin | (brak) |
| d-link | di-524 | admin | (brak) |
| D-Link | DI-524 | Alphanetworks | wrgg15_di524 |
| D-Link | DI-524 | user | (brak) |
| D-Link | DI-604 | admin | (brak) |
| D-Link | DI-604 | admin | (brak) |
| D-Link | DI-604 | admin | admin |
| D-Link | DI-614+ | admin | (brak) |
| D-Link | DI-614+ | admin | admin |
| D-Link | DI-614+ | user | (brak) |
| D-Link | DI-624 | admin | (brak) |
| D-Link | DI-624 | User | (brak) |
| D-Link | DI-624+ | admin | admin |
| D-Link | DI-634M | admin | (brak) |
| D-Link | DI-704 | (brak) | admin |
| D-Link | DI-704 | n/a | admin |
| D-link | Di-707p router | admin | (brak) |
| D-Link | DI-804 | admin | (brak) |
| D-Link | Dsl-300g+ | (brak) | private |
| D-Link | DSL-300g+ | admin | admin |
| D-Link | DSL-302G | admin | admin |
| D-link | DSL-504T | admin | admin |
| D-link | DSL-G604T | admin | admin |
| D-LINK | DSL-G664T | admin | admin |
| D-link | DSL500G | admin | admin |
| D-Link | DWL 1000 | admin | (brak) |
| D-Link | DWL 2100AP | admin | (brak) |
| D-Link | DWL 900AP | (brak) | public |
| D-Link | DWL-2000AP+ | admin | (brak) |
| D-Link | DWL-614+ | admin | (brak) |
| D-Link | DWL-614+ | admin | (brak) |
| D-Link | DWL-900+ | admin | (brak) |
| D-link | DWL-900AP+ | admin | (brak) |
| D-Link | DWL-G730AP | admin | (brak) |
| D-Link | firewall | admin | admin |
| D-Link | G624T | admin | admin |
| D-Link | hubs/switches | D-Link | D-Link |
| D-Link | WBR-1310 | admin | (brak) |
| D9287ar | Pavilion6640c | Clarissa | |
| Dallas Semiconductors | TINI embedded JAVA Module | root | tini |
| Datacom | BSASX/101 | n/a | letmein |
| Datawizard.net | FTPXQ server | anonymous | any@ |
| Davolink | DV2020 | user | user |
| Davox | Unison | admin | admin |
| Davox | Unison | davox | davox |
| Davox | Unison | root | davox |
| Davox | Unison | sa | (brak) |
| Deerfield | MDaemon | MDaemon | MServer |
| Dell | 2161DS Console Switch | Admin | (brak) |
| Dell | Laser Printer 3000cn / 3100cn | admin | password |
| Dell | PowerConnect 2724 | admin | (brak) |
| Dell | Remote Access Card | root | calvin |
| Dell | WRTA-108GD | admin | admin |
| Demarc | Network Monitor | admin | my_DEMARC |
| Deutsch Telekomm | T-Sinus 130 DSL | (brak) | 0 |
| Deutsche Telekom | T-Sinus 1054 DSL | (brak) | 0 |
| Deutsche Telekom | T-Sinus 154 DSL | (brak) | 0 |
| Deutsche Telekom | T-Sinus DSL 130 | admin | (brak) |
| Develcon | Orbitor Default Console | n/a | BRIDGE |
| Develcon | Orbitor Default Console | n/a | password |
| DI624 | D-LINK | admin | password |
| Dictaphone | ProLog | NETOP | (brak) |
| Dictaphone | ProLog | NETWORK | NETWORK |
| Dictaphone | ProLog | PBX | PBX |
| Digicom | Michelangelo | admin | michelangelo |
| Digicom | Michelangelo | user | password |
| DIGICOM | Michelangelo Wave108 | root | admin |
| digicom | Wavegate 54C | Admin | (brak) |
| Digicorp | Router | n/a | BRIDGE |
| Digicorp | Router | n/a | password |
| Digicorp | Viper | n/a | BRIDGE |
| Digicorp | Viper | n/a | password |
| DLINK | 604 | n/a | admin |
| dlink | adsl | admin | admin |
| Dlink | DSL-500 | admin | admin |
| Draytek | Vigor | admin | admin |
| Draytek | Vigor 2600 | admin | (brak) |
| Draytek | Vigor 2900+ | admin | admin |
| draytek | Vigor3300 series | draytek | 1234 |
| Dynalink | RTA230 | admin | admin |
| E-Con | Econ DSL Router | admin | epicrouter |
| E-Tech | ADSL Ethernet Router | admin | epicrouter |
| E-Tech | Router | (brak) | admin |
| E-Tech | Wireless 11Mbps Router Model:WLRT03 | (brak) | admin |
| Edimax | Broadband Router | admin | 1234 |
| Edimax | Edimax Fast Ethernet Switch | admin | password |
| Edimax | ES-5224RXM | admin | 123 |
| Edimax | EW-7205APL | guest | (brak) |
| Edimax | EW-7206APG | admin | 1234 |
| Edimax | PS-1203/PS-1205Um/PS-3103 | admin | (brak) OR su@psir |
| Edimax | PS-1208MFG | edimax | software01 |
| edimax | wireless adsl router | admin | epicrouter |
| Efficient | 5851 | login | password |
| Efficient | 5871 DSL Router | login | admin |
| Efficient | Speedstream DSL | n/a | admin |
| Efficient | Speedstream DSL | n/a | admin |
| Efficient Networks | 5851 SDSL Router | (brak) | hs7mwxkk |
| Efficient Networks | EN 5861 | login | admin |
| Efficient Networks | Speedstream 5711 | n/a | 4getme2 |
| Elsa | LANCom Office ISDN Router | n/a | cisco |
| EMC | DS-4100B | admin | (brak) |
| Enterasys | ANG-1105 | (brak) | netadmin |
| Enterasys | ANG-1105 | admin | netadmin |
| Enterasys | Vertical Horizon | admin | (brak) |
| Enterasys | Vertical Horizon | tiger | tiger123 |
| Entrust | getAccess | websecadm | changeme |
| Ericsson | BP250 | admin | default |
| ericsson | ericsson acc | n/a | (brak) |
| Ericsson | Ericsson Acc | netman | netman |
| Ericsson | Ericsson Acc | netman | netman |
| Ericsson | MD110 | MD110 | help |
| ericsson | md110 pabx | (brak) | help |
| Ericsson | SBG | expert | expert |
| Ericsson ACC | Tigris Platform | public | (brak) |
| EverFocus | PowerPlex | admin | admin |
| EverFocus | PowerPlex | operator | operator |
| EverFocus | PowerPlex | supervisor | supervisor |
| Exabyte | Magnum20 | anonymous | Exabyte |
| Extended Systems | Print Servers | admin | extendnet |
| Extreme Networks | All Switches | admin | (brak) |
| F5 | Bigip 540 | root | default |
| F5-Networks | BIGIP | n/a | (brak) |
| Flowpoint | 100 IDSN | admin | admin |
| Flowpoint | 2200 SDSL | admin | admin |
| Flowpoint | 40 IDSL | admin | admin |
| Flowpoint | DSL | n/a | password |
| Flowpoint | Flowpoint DSL | admin | admin |
| fon | La fonera | admin | admin |
| Fortinet | Fortigate | admin | (brak) |
| Fortinet | Fortigate | maintainer | bcpb+serial# |
| Fortinet | Fortigate | maintainer | admin |
| Foundry Networks | IronView Network Manager | admin | admin |
| Freetech | BIOS | n/a | Posterie |
| Freetech | PC BIOS | n/a | Posterie |
| Fujitsu Siemens | Fibre Channel SAN storage FX 60 | manage | !manage |
| Fujitsu Siemens | Fibre Channel SAN storage FX 60 | manage | !manage |
| Fujitsu Siemens | Routers | (brak) | connect |
| Funk Software | Steel Belted Radius | admin | radius |
| Gericom | Phoenix | Administrator | (brak) |
| giga | 8ippro1000 | Administrator | admin |
| Grandstream | GXP-2000 | admin | 1234 |
| greatspeed | DSL | netadmin | nimdaten |
| Guru | Wireless ADSL2 | admin | admin |
| GVC | e800/rb4 | Administrator | admin |
| Hewlett Packard | Power Manager | admin | admin |
| Hewlett-Packard | HP 2000/3000 MPE/xx | ADVMAIL | HPOFFICE DATA |
| Hewlett-Packard | HP 2000/3000 MPE/xx | ADVMAIL | HP |
| Hewlett-Packard | HP 2000/3000 MPE/xx | FIELD | SUPPORT |
| Hewlett-Packard | HP 2000/3000 MPE/xx | FIELD | MGR |
| Hewlett-Packard | HP 2000/3000 MPE/xx | FIELD | SERVICE |
| Hewlett-Packard | HP 2000/3000 MPE/xx | FIELD | MANAGER |
| Hewlett-Packard | HP 2000/3000 MPE/xx | FIELD | HPP187 SYS |
| Hewlett-Packard | HP 2000/3000 MPE/xx | FIELD | LOTUS |
| Hewlett-Packard | HP 2000/3000 MPE/xx | FIELD | HPWORD PUB |
| Hewlett-Packard | HP 2000/3000 MPE/xx | FIELD | HPONLY |
| Hewlett-Packard | HP 2000/3000 MPE/xx | HELLO | MANAGER.SYS |
| Hewlett-Packard | HP 2000/3000 MPE/xx | HELLO | MGR.SYS |
| Hewlett-Packard | HP 2000/3000 MPE/xx | HELLO | FIELD.SUPPORT |
| Hewlett-Packard | HP 2000/3000 MPE/xx | HELLO | OP.OPERATOR |
| Hewlett-Packard | HP 2000/3000 MPE/xx | ||
| Hewlett-Packard | HP 2000/3000 MPE/xx | REMOTE | |
| Hewlett-Packard | HP 2000/3000 MPE/xx | TELESUP | |
| Hewlett-Packard | HP 2000/3000 MPE/xx | HPOFFICE | |
| Hewlett-Packard | HP 2000/3000 MPE/xx | MPE | |
| Hewlett-Packard | HP 2000/3000 MPE/xx | MANAGER | TCH |
| Hewlett-Packard | HP 2000/3000 MPE/xx | MANAGER | SYS |
| Hewlett-Packard | HP 2000/3000 MPE/xx | MANAGER | SECURITY |
| Hewlett-Packard | HP 2000/3000 MPE/xx | MANAGER | ITF3000 |
| Hewlett-Packard | HP 2000/3000 MPE/xx | MANAGER | HPOFFICE |
| Hewlett-Packard | HP 2000/3000 MPE/xx | MANAGER | COGNOS |
| Hewlett-Packard | HP 2000/3000 MPE/xx | MANAGER | TELESUP |
| Hewlett-Packard | HP 2000/3000 MPE/xx | MGR | HPP187 |
| Hewlett-Packard | HP 2000/3000 MPE/xx | MGR | HPP189 |
| Hewlett-Packard | HP 2000/3000 MPE/xx | MGR | HPP196 |
| Hewlett-Packard | HP 2000/3000 MPE/xx | MGR | INTX3 |
| Hewlett-Packard | HP 2000/3000 MPE/xx | MGR | ITF3000 |
| Hewlett-Packard | HP 2000/3000 MPE/xx | MGR | NETBASE |
| Hewlett-Packard | HP 2000/3000 MPE/xx | MGR | REGO |
| Hewlett-Packard | HP 2000/3000 MPE/xx | MGR | RJE |
| Hewlett-Packard | HP 2000/3000 MPE/xx | MGR | CONV |
| Hewlett-Packard | HP 2000/3000 MPE/xx | MGR | SYS |
| Hewlett-Packard | HP 2000/3000 MPE/xx | MGR | CAROLIAN |
| Hewlett-Packard | HP 2000/3000 MPE/xx | MGR | VESOFT |
| Hewlett-Packard | HP 2000/3000 MPE/xx | MGR | XLSERVER |
| Hewlett-Packard | HP 2000/3000 MPE/xx | MGR | SECURITY |
| Hewlett-Packard | HP 2000/3000 MPE/xx | MGR | TELESUP |
| Hewlett-Packard | HP 2000/3000 MPE/xx | MGR | HPDESK |
| Hewlett-Packard | HP 2000/3000 MPE/xx | MGR | CCC |
| Hewlett-Packard | HP 2000/3000 MPE/xx | MGR | CNAS |
| Hewlett-Packard | HP 2000/3000 MPE/xx | MGR | WORD |
| Hewlett-Packard | HP 2000/3000 MPE/xx | MGR | COGNOS |
| Hewlett-Packard | HP 2000/3000 MPE/xx | MGR | ROBELLE |
| Hewlett-Packard | HP 2000/3000 MPE/xx | MGR | HPOFFICE |
| Hewlett-Packard | HP 2000/3000 MPE/xx | MGR | HPONLY |
| Hewlett-Packard | HP 2000/3000 MPE/xx | OPERATOR | SYS |
| Hewlett-Packard | HP 2000/3000 MPE/xx | OPERATOR | DISC |
| Hewlett-Packard | HP 2000/3000 MPE/xx | OPERATOR | SYSTEM |
| Hewlett-Packard | HP 2000/3000 MPE/xx | OPERATOR | SUPPORT |
| Hewlett-Packard | HP 2000/3000 MPE/xx | OPERATOR | COGNOS |
| Hewlett-Packard | HP 2000/3000 MPE/xx | PCUSER | SYS |
| Hewlett-Packard | HP 2000/3000 MPE/xx | RSBCMON | SYS |
| Hewlett-Packard | HP 2000/3000 MPE/xx | SPOOLMAN | HPOFFICE |
| Hewlett-Packard | HP 2000/3000 MPE/xx | WP | HPOFFICE |
| Hewlett-Packard | LaserJet Net Printers | (brak) | (brak) |
| Hewlett-Packard | LaserJet Net Printers | (brak) | (brak) |
| Hewlett-Packard | LaserJet Net Printers | (brak) | (brak) |
| Hewlett-Packard | LaserJet Net Printers | Anonymous | (brak) |
| Hewlett-Packard | webmin | admin | hp.com |
| hp | 2300 | admin | admin |
| HP | E1200 | root | password |
| HP | ISEE | admin | isee |
| HP | MSL Series Libraries | Factory | 56789 |
| hp | sa7200 | admin | admin |
| hp | sa7200 | admin | (brak) |
| HP | t5000 Thin Client series | Administrator | admin |
| Huawei | E960 | admin | admin |
| Huawei | mt820 | admin | admin |
| Huawei | MT880 | admin | admin |
| Huawei | MT880r | TMAR#HWMT8007079 | (brak) |
| huawei incorporate | k3765 | admin | admin |
| iblitzz | BWA711/All Models | admin | admin |
| IBM | 3534 F08 Fibre Switch | admin | password |
| IBM | 3583 Tape Library | admin | secure |
| IBM | 390e | n/a | admin |
| IBM | 8224 HUB | vt100 | public |
| IBM | 8239 Token Ring HUB | n/a | R1QTPS |
| ibm | a20m | n/a | admin |
| IBM | A21m | n/a | (brak) |
| IBM | Ascend OEM Routers | n/a | ascend |
| IBM | BladeCenter Mgmt Console | USERID | PASSW0RD |
| IBM | Directory – Web Administration Tool | superadmin | secret |
| IBM | Hardware Management Console | hscroot | abc123 |
| IBM | IBM | n/a | (brak) |
| IBM | Infoprint 6700 | root | (brak) |
| IBM | Remote Supervisor Adapter (RSA) | USERID | PASSW0RD |
| IBM | switch | admin | (brak) |
| IBM | T20 | n/a | admin |
| IBM | T42 | Administrator | admin |
| IBM | TotalStorage Enterprise Server | storwatch | specialist |
| iDirect | iNFINITY series | admin | P@55w0rd! |
| iDirect | iNFINITY series | root | iDirect |
| ihoi | oihoh | Administrator | pilou |
| IMAI | Traffic Shaper | n/a | (brak) |
| inchon | inchon | admin | admin |
| infacta | group mail | Administrator | (brak) |
| Infoblox | INFOBLOX Appliance | admin | (brak) |
| Infosmart | SOHO router | admin | 0 |
| INOVA | ONT4BKP (IP clock) | iclock | timely |
| Integral Technologies | RemoteView | Administrator | letmein |
| Intel | Express 520T Switch | setup | setup |
| Intel | Express 9520 Router | NICONEX | NICONEX |
| intel | netstructure | admin | (brak) |
| Intel | Shiva | Guest | (brak) |
| Intel | Shiva | root | (brak) |
| Intel | Shiva | root | (brak) |
| Intel | Wireless AP 2011 | (brak) | Intel |
| Intel | Wireless Gateway | intel | intel |
| Intel/Shiva | Access Port | admin | hello |
| Intel/Shiva | Mezza ISDN Router | admin | hello |
| Interbase | Interbase Database Server | SYSDBA | masterkey |
| Intermec | Mobile LAN | intermec | intermec |
| Intershop | Intershop | operator | $chwarzepumpe |
| Intersystems | Cache Post-RDMS | system | sys |
| intex | organizer | n/a | (brak) |
| Intracom | jetSpeed | admin | admin |
| Inventel | Livebox | admin | admin |
| ion | nelu | Administrator | admin |
| ion | nelu | n/a | admin |
| iPSTAR | iPSTAR Network Box | admin | operator |
| iPSTAR | iPSTAR Satellite Router/Radio | admin | operator |
| Irongate | NetSurvibox 266 | admin | NetSurvibox |
| IronPort | Messaging Gateway Appliance | admin | ironport |
| JAHT | adsl router | admin | epicrouter |
| JD Edwards | WorldVision/OneWorld | JDE | JDE |
| JDE | WorldVision/OneWorld | PRODDTA | PRODDTA |
| JDS Microprocessing | Hydra 3000 | hydrasna | (brak) |
| Juniper | ISG2000 | netscreen | netscreen |
| Juniper | Netscreen | serial# | serial# |
| Kalatel | Calibur DSR-2000e | n/a | 3477 |
| Kalatel | Calibur DSR-2000e | n/a | 8111 |
| KASDA | KD318-MUI | admin | adslroot |
| Konica Minolta | magicolor 1690MF | (non) | sysAdmin |
| Konica Minolta | magicolor 1690MF | (non) | sysAdmin |
| Konica Minolta | magicolor 2300 DL | (brak) | 1234 |
| Konica Minolta | magicolor 2430DL | (brak) | (brak) |
| Konica Minolta | magicolor 5430 DL | admin | administrator |
| Konica/ Minolta | Di 2010f | n/a | 0 |
| KTI | KS-2260 | superuser | 123456 |
| KTI | KS2260 | admin | 123 |
| KTI | KS2600 | admin | 123456 |
| Kyocera | EcoLink | n/a | PASSWORD |
| Kyocera | FS-2020D | – | admin00 |
| Kyocera | Intermate LAN FS Pro 10/100 | admin | admin |
| Kyocera | Printer | (brak) | admin00 |
| Kyocera | Telnet Server IB-20/21 | root | root |
| Kyocera Printers | 2020D | n/a | admin00 |
| LANCOM | IL11 | n/a | (brak) |
| Lanier | Digital Imager | admin | (brak) |
| Lanier | LD335 | supervisor | (brak) |
| Lantronics | Lantronics Terminal Server | n/a | access |
| Lantronics | Lantronics Terminal Server | n/a | system |
| Lantronix | ETS16P | n/a | (brak) |
| Lantronix | ETS32PR | n/a | (brak) |
| Lantronix | ETS422PR | n/a | (brak) |
| Lantronix | ETS4P | n/a | (brak) |
| Lantronix | Lantronix Terminal | n/a | lantronix |
| Lantronix | SCS100 | n/a | access |
| Lantronix | SCS1620 | sysadmin | PASS |
| Lantronix | SCS200 | n/a | admin |
| Lantronix | SCS3200 | login | access |
| Lantronix | SCS400 | n/a | admin |
| latis network | border guard | n/a | (brak) |
| LAXO | IS-194G | admin | admin |
| Leviton | 47611-GT5 | admin | leviton |
| LG | Aria iPECS | (brak) | jannie |
| LG | LAM200E / LAM200R | admin | epicrouter |
| Linksys | ADSLME3 | root | orion99 |
| Linksys | AG 241 – ADSL2 Gateway with 4-Port Switch | admin | admin |
| linksys | ap 1120 | n/a | (brak) |
| Linksys | BEFSR41 | (brak) | admin |
| linksys | BEFW11S4 | (brak) | admin |
| Linksys | BEFW11S4 | admin | (brak) |
| Linksys | Comcast | comcast | 1234 |
| Linksys | DSL | n/a | admin |
| Linksys | EtherFast Cable/DSL ROuter | Administrator | admin |
| Linksys | Linksys DSL | n/a | admin |
| Linksys | Linksys Router DSL/Cable | (brak) | admin |
| Linksys | model WRT54GC compact wireless-G broadband router | (brak) | admin |
| Linksys | rv082 | admin | (brak) |
| Linksys | WAG354G | admin | admin |
| linksys | wag354g | admin | admin |
| Linksys | WAG54G | admin | admin |
| Linksys | WAG54GS | admin | admin |
| Linksys | WAP11 | n/a | (brak) |
| Linksys | WAP54G | (brak) | admin |
| Linksys | WRT54G | (brak) | admin |
| Linksys | WRT54G | admin | admin |
| linksys | wrt54g | admin | admin |
| Linksys | WRT54GS | admin | admin |
| Linksys/ Cisco | RTP300 w/2 phone ports | admin | admin |
| Linksys/ Cisco | RTP300 w/2 phone ports | user | tivonpw |
| Livingston | IRX Router | !root | (brak) |
| Livingston | Livingston Portmaster 3 | !root | (brak) |
| Livingston | Officerouter | !root | (brak) |
| Livingstone | Portmaster 2R | root | (brak) |
| Lockdown Networks | All Lockdown Products | setup | changeme(exclamation) |
| LogiLink | WL0026 | admin | 1234 |
| Logitech | Logitech Mobile Headset | (brak) | 0 |
| longshine | isscfg | admin | 0 |
| Lucent | Anymedia | LUCENT01 | UI-PSWD-01 |
| Lucent | Anymedia | LUCENT02 | UI-PSWD-02 |
| Lucent | B-STDX9000 | (any 3 characters) | cascade |
| Lucent | B-STDX9000 | n/a | cascade |
| Lucent | B-STDX9000 | n/a | cascade |
| Lucent | CBX 500 | (any 3 characters) | cascade |
| Lucent | CBX 500 | n/a | cascade |
| Lucent | Cellpipe | n/a | admin |
| Lucent | Cellpipe 22A-BX-AR USB D | admin | AitbISP4eCiG |
| Lucent | GX 550 | n/a | cascade |
| LUCENT | M770 | super | super |
| Lucent | MAX-TNT | admin | Ascend |
| Lucent | PacketStar | Administrator | (brak) |
| Lucent | PSAX 1200 and below | root | ascend |
| Lucent | PSAX 1250 and above | readonly | lucenttech2 |
| Lucent | PSAX 1250 and above | readwrite | lucenttech1 |
| Lucent | System 75 | bciim | bciimpw |
| Lucent | System 75 | bcim | bcimpw |
| Lucent | System 75 | bcms | bcmspw |
| Lucent | System 75 | bcnas | bcnaspw |
| Lucent | System 75 | blue | bluepw |
| Lucent | System 75 | browse | browsepw |
| Lucent | System 75 | browse | looker |
| Lucent | System 75 | craft | craft |
| Lucent | System 75 | craft | craftpw |
| Lucent | System 75 | cust | custpw |
| Lucent | System 75 | enquiry | enquirypw |
| Lucent | System 75 | field | support |
| Lucent | System 75 | inads | indspw |
| Lucent | System 75 | inads | inads |
| Lucent | System 75 | init | initpw |
| Lucent | System 75 | locate | locatepw |
| Lucent | System 75 | maint | maintpw |
| Lucent | System 75 | maint | rwmaint |
| Lucent | System 75 | nms | nmspw |
| Lucent | System 75 | rcust | rcustpw |
| Lucent | System 75 | support | supportpw |
| Lucent | System 75 | tech | field |
| m0n0wall | m0n0wall | admin | mono |
| m0n0wall | m0n0wall | admin | mono |
| Marconi | Fore ATM Switches | ami | (brak) |
| maxdata | 7000x | n/a | (brak) |
| maxdata | ms2137 | n/a | (brak) |
| McAfee | SCM 3100 | scmadmin | scmchangeme |
| McData | FC Switches/Directors | Administrator | password |
| McData | i10k Switch | McdataSE | redips |
| Mediatrix | MDD 2400/2600 | administrator | (brak) |
| mediatrix 2102 | mediatrix 2102 | admin | 1234 |
| medion | Routers | n/a | medion |
| Megastar | BIOS | n/a | star |
| Mentec | Micro/RSX | MICRO | RSX |
| Mentec | Micro/RSX | MICRO | RSX |
| MERCURY | 234234 | Administrator | admin |
| MERCURY | KT133A/686B | Administrator | admin |
| Meridian | PBX | service | smile |
| Micronet | 3351 / 3354 | admin | epicrouter |
| Micronet | Access Point | root | default |
| Micronet | Micronet SP5002 | mac | (brak) |
| Microplex | Print Server | root | root |
| microRouter | 900i | n/a | letmein |
| Mikrotik | Mikrotik | admin | (brak) |
| Mikrotik | Router OS | admin | (brak) |
| Mikrotik | Router OS | admin | (brak) |
| Milan | mil-sm801p | root | root |
| Minolta PagrPro | QMS 4100GN PagePro | n/a | sysadm |
| Minolta QMS | Magicolor 3100 | admin | (brak) |
| Minolta QMS | Magicolor 3100 | operator | (brak) |
| Mintel | Mintel PBX | n/a | SYSTEM |
| Mintel | Mintel PBX | n/a | SYSTEM |
| Mitel | 3300 ICP | system | password |
| Mitel | SX2000 | n/a | (brak) |
| Motorola | Cablerouter | cablecom | router |
| Motorola | Motorola Cablerouter | cablecom | router |
| Motorola | SBG900 | admin | motorola |
| motorola | sgb900 | admin | motorola |
| Motorola | SURFboard | admin | motorola |
| motorola | vanguard | n/a | (brak) |
| Motorola | Wireless Router | admin | motorola |
| Motorola | WR850G | admin | motorola |
| mro software | maximo | SYSADM | sysadm |
| Mutare Software | EVM Admin | (brak) | admin |
| NAI | Entercept | GlobalAdmin | GlobalAdmin |
| NAI | Intrushield IPS | admin | admin123 |
| NEC | WARPSTAR-BaseStation | n/a | (brak) |
| Netcomm | NB1300 | admin | password |
| Netgea | FR314 | admin | password |
| Netgear | ADSL Modem DG632 | admin | password |
| Netgear | CG814CCR | cusadmin | highspeed |
| NetGear | Comcast | comcast | 1234 |
| netgear | dg834 | n/a | admin |
| Netgear | dg834g | admin | password |
| NETGEAR | DG834G | admin | password |
| netgear | DG834GT | admin | Password |
| Netgear | DM602 | admin | password |
| netgear | FM114P | n/a | (brak) |
| Netgear | FR114P | admin | password |
| Netgear | FSM7326P 24+2 L3 mANAGED PoE Switch | admin | (brak) |
| Netgear | FVS114 | admin | password |
| Netgear | FVS318 | admin | password |
| Netgear | FWG114P | n/a | admin |
| Netgear | GS724t | n/a | password |
| Netgear | GSM7224 | admin | (brak) |
| Netgear | ME102 | (brak) | private |
| Netgear | MR-314 | admin | 1234 |
| Netgear | MR314 | admin | 1234 |
| Netgear | MR814 | admin | password |
| Netgear | MR814 | admin | password |
| Netgear | ReadyNas Duo | admin | netgear1 |
| Netgear | ReadyNas Duo | admin | infrant1 |
| NetGear | RM356 | (brak) | 1234 |
| Netgear | RO318 | admin | 1234 |
| Netgear | Router/Modem | admin | password |
| Netgear | RP114 | (brak) | 1234 |
| Netgear | RP114 | admin | 1234 |
| Netgear | RP614 | admin | password |
| Netgear | RT314 | admin | admin |
| netgear | sc101 | admin | password |
| Netgear | WG602 | admin | password |
| Netgear | WG602 | super | 5777364 |
| Netgear | WG602 | super | 5777364 |
| Netgear | WG602 | superman | 21241036 |
| Netgear | WGR614 | admin | password |
| Netgear | WGR614 | admin | draadloos |
| Netgear | WGR614 | admin | password |
| NetGear | WGT624 | admin | password |
| Netgear | WGT624 | Gearguy | Geardog |
| Netgear | WGT634U | admin | password |
| Netgear | Wifi Router | admin | password |
| NetGenesis | NetAnalysis Web Reporting | naadmin | naadmin |
| Netopia | 3351 | n/a | (brak) |
| Netopia | 4542 | admin | noway |
| Netopia | Netopia 7100 | (brak) | (brak) |
| Netopia | Netopia 9500 | netopia | netopia |
| Netopia | Netopia 9500 | netopia | netopia |
| Netopia | R910 | admin | (brak) |
| Netport | Express 10/100 | setup | setup |
| netscreen | firewall | admin | (brak) |
| netscreen | firewall | Administrator | (brak) |
| netscreen | firewall | Administrator | (brak) |
| Netscreen | Firewall | netscreen | netscreen |
| netscreen | firewall | operator | (brak) |
| Netstar | Netpilot | admin | password |
| Network Appliance | NetCache | admin | NetCache |
| Network Associates | WebShield Security Appliance e250 | e250 | e250changeme |
| Network Associates | WebShield Security Appliance e500 | e500 | e500changeme |
| Network Everywhere | NWR11B | (brak) | admin |
| NGSec | NGSecureWeb | admin | (brak) |
| NGSec | NGSecureWeb | admin | asd |
| Niksun | NetDetector | vcr | NetVCR |
| Nimble | BIOS | n/a | xdfk9874t3 |
| Nimble | PC BIOS | n/a | xdfk9874t3 |
| NOKIA | 7360 | (brak) | 9999 |
| Nokia | ADSL router M1921 | (brak) | nokia |
| Nokia | DSL Router M1122 | m1122 | m1122 |
| Nokia | M1122 | (brak) | Telecom |
| Nokia | M1921 | (brak) | nokai |
| Nokia | MW1122 | telecom | telecom |
| NOMADIX | AG5000 | admin | (brak) |
| Nortel | Accelar (Passport) 1000 series routing switches | l2 | l2 |
| Nortel | Accelar (Passport) 1000 series routing switches | l3 | l3 |
| Nortel | Accelar (Passport) 1000 series routing switches | ro | ro |
| Nortel | Accelar (Passport) 1000 series routing switches | rw | rw |
| Nortel | Accelar (Passport) 1000 series routing switches | rwa | rwa |
| Nortel | Baystack 350-24T | n/a | secure |
| Nortel | Business Communications Manager | supervisor | PlsChgMe |
| Nortel | Contivity | admin | setup |
| nortel | dms | n/a | (brak) |
| Nortel | Extranet Switches | admin | setup |
| Nortel | Matra 6501 PBX | (brak) | 0 |
| Nortel | Meridian | n/a | (brak) |
| Nortel | Meridian CCR | ccrusr | ccrusr |
| Nortel | Meridian CCR | disttech | 4tas |
| Nortel | Meridian CCR | maint | maint |
| Nortel | Meridian CCR | service | smile |
| Nortel | Meridian Link | disttech | 4tas |
| Nortel | Meridian Link | maint | maint |
| Nortel | Meridian Link | mlusr | mlusr |
| Nortel | Meridian Link | service | smile |
| Nortel | Meridian MAX | maint | ntacdmax |
| Nortel | Meridian MAX | root | 3ep5w2u |
| Nortel | Meridian MAX | service | smile |
| Nortel | Meridian PBX | login | 0 |
| Nortel | Meridian PBX | login | 1111 |
| Nortel | Meridian PBX | login | 8429 |
| Nortel | Meridian PBX | spcl | 0 |
| Nortel | Norstar | 266344 | 266344 |
| nortel | p8600 | n/a | (brak) |
| Nortel | Passport 2430 | Manager | (brak) |
| Nortel | Phone System | n/a | 266344 |
| Nortel | Remote Office 9150 | admin | root |
| Nortel | VPN Gateway | admin | admin |
| NRG or RICOH | DSc338 Printer | (brak) | password |
| Nullsoft | Shoutcast | admin | changeme |
| OKI | 6120e and 421n | admin | OkiLAN |
| OKI | C5700 | root | the 6 last digit of the MAC adress |
| olitec | sx 200 adsl modem router | admin | adslolitec |
| olitec (Trendchip) | sx 202 adsl modem router | admin | admin |
| Omnitronix | Data-Link | (brak) | SUPER |
| Omnitronix | Data-Link | (brak) | SMDR |
| OMRON | MR104FH | n/a | (brak) |
| OPEN Networks | 812L | root | 0P3N |
| OpenConnect | OC://WebConnect Pro | admin | OCS |
| OpenConnect | OC://WebConnect Pro | adminstat | OCS |
| OpenConnect | OC://WebConnect Pro | adminuser | OCS |
| OpenConnect | OC://WebConnect Pro | adminview | OCS |
| OpenConnect | OC://WebConnect Pro | adminview | OCS |
| OpenConnect | OC://WebConnect Pro | helpdesk | OCS |
| Openwave | MSP | cac_admin | cacadmin |
| Openwave | WAP Gateway | sys | uplink |
| Oracle | Oracle RDBMS | system/manager | sys/change_on_install |
| Osicom | JETXPrint | sysadm | sysadm |
| Osicom | JETXPrint | sysadm | sysadm |
| Osicom | JETXPrint | sysadm | sysadm |
| Osicom | JETXPrint | sysadm | sysadm |
| Osicom | NETCommuter | d.e.b.u.g | User |
| Osicom | NETCommuter | echo | User |
| Osicom | NETCommuter | guest | User |
| Osicom | NETCommuter | Manager | Admin |
| Osicom | NETCommuter | sysadm | Admin |
| Osicom | NETCommuter Remote Access Server | sysadm | sysadm |
| Osicom | NETPrint | 1500 | and 2000 Series |
| Osicom | NETPrint | Manager | Manager |
| Osicom | NETPrint and JETX Print | sysadm | sysadm |
| Osicom | Osicom Plus T1/PLUS 56k | write | private |
| Osicom | Osicom Plus T1/PLUS 56k | write | private |
| Overland | NEO Series Libraries | Factory | 56789 |
| ovislink | WL-1120AP | root | (brak) |
| Pacific Micro Data | MAST 9500 Universal Disk Array | pmd | (brak) |
| panasonic | cf 27 | n/a | (brak) |
| Panasonic | CF-28 | n/a | (brak) |
| Panasonic | CF-45 | n/a | (brak) |
| Panasonic | PBX TDA 100/200/400 | (brak) | 1234 |
| Pansonic | KXTD1232 | admin | 1234 |
| penril datability | vcp300 terminal server | n/a | system |
| Pentagram | Cerberus ADSL modem + router | admin | password |
| Pentagram | Cerberus ADSL | admin | password |
| Pentagram | Cerberus P 6331-42 | admin | admin |
| Pentagram | Cerberus P 6381-2 | admin | admin |
| Pentagram | other | admin | 1234 |
| Pentagram | other | root | 1234 |
| Pentagram | other | admin | epicrouter |
| Pentaoffice | Sat Router | (brak) | pento |
| PentaSafe | VigilEnt Security Manager | PSEAdmin | $secure$ |
| Perle | CS9000 | admin | superuser |
| pfSense | pfSense Firewall | admin | pfsense |
| Phoenix v1.14 | Phoenix v1.14 | Administrator | admin |
| Pirelli | AGE ADSL Router | admin | microbusiness |
| Pirelli | AGE ADSL Router | user | password |
| Pirelli | DRG A125G | admin | admin |
| Pirelli | Pirelli AGE-SB | admin | smallbusiness |
| Pirelli | Pirelli Router | admin | mu |
| Pirelli | Pirelli Router | admin | microbusiness |
| Pirelli | Pirelli Router | user | password |
| Planet | ADE-4000 | admin | epicrouter |
| Planet | ADE-4110 | admin | epicrouter |
| planet | Akcess Point | admin | admin |
| planet | akcess point | admin | admin |
| Planet | WAP 4000 | admin | admin |
| Planet | WAP-1900/1950/2000 | (brak) | default |
| Planet | XRT-401D | admin | 1234 |
| Planex | BRL-04UR | admin | 0 |
| Polycom | iPower 9000 | (brak) | (brak) |
| Polycom | SoundPoint IP Phones | Polycom | 456 |
| Polycom | Soundpoint VoIP phones | Polycom | SpIp |
| Polycom | ViewStation 4000 | (brak) | admin |
| Prestigio | Nobile | n/a | (brak) |
| Prolink | H9000 Series | admin | password |
| Promise | NS4300N NAS | engmode | hawk201 |
| Proxim | Orinoco 600/2000 | (brak) | (brak) |
| Psion Teklogix | 9150 | support | h179350 |
| Psionteklogix | 9160 | admin | admin |
| Psionteklogix | 9160 | admin | admin |
| ptcl | zxdsl831cii | admin | admin |
| Pyramid Computer | BenHur | admin | admin |
| QLogic | SANbox 5602 Fibre Channel Switch | admin | password |
| QLogic | SANbox 5602 Fibre Channel Switch | images | images |
| Quintum Technologies Inc. | Tenor Series | admin | admin |
| Radware | AppDirect | radware | radware |
| Radware | AppXcel | radware | radware |
| Radware | Linkproof | lp | lp |
| Radware | Linkproof | radware | radware |
| Raidzone | raid arrays | n/a | raidzone |
| Ramp Networks | WebRamp | wradmin | trancell |
| Ramp Networks | WebRamp | wradmin | trancell |
| RedHat | Redhat 6.2 | piranha | q |
| RedHat | Redhat 6.2 | piranha | piranha |
| Research | BIOS | n/a | Col2ogro2 |
| Research | PC BIOS | n/a | Col2ogro2 |
| Ricoh | Aficio | (brak) | password |
| Ricoh | Aficio | sysadmin | password |
| Ricoh | Aficio 1013F | n/a | sysadm |
| Ricoh | Aficio 1018d | n/a | sysadm |
| Ricoh | Aficio 2020D | admin | password |
| Ricoh | Aficio 2228c | sysadmin | password |
| Ricoh | Aficio 2232C | n/a | password |
| Ricoh | Aficio 551 | (brak) | sysadm |
| Ricoh | Aficio AP3800C | (brak) | password |
| Ricoh | Aficio MP 161L | ( none – Not required ) | sysadm |
| Ricoh | AP410N | admin | (brak) |
| Ricoh | Ricoh | admin | (brak) |
| RM | RM Connect | admin | rmnetlm |
| RM | RM Connect | admin2 | changeme |
| RM | RM Connect | adminstrator | changeme |
| RM | RM Connect | deskalt | password |
| RM | RM Connect | deskman | changeme |
| RM | RM Connect | desknorm | password |
| RM | RM Connect | deskres | password |
| RM | RM Connect | guest | (brak) |
| RM | RM Connect | replicator | replicator |
| RM | RM Connect | RMUser1 | password |
| RM | RM Connect | setup | changeme |
| RM | RM Connect | teacher | password |
| RM | RM Connect | temp1 | password |
| RM | RM Connect | topicalt | password |
| RM | RM Connect | topicnorm | password |
| RM | RM Connect | topicres | password |
| RoamAbout | RoamAbout R2 Wireless Access Platform | admin | password |
| SAF Tehnika | CFQ series modems | administrator | d1scovery |
| SAF Tehnika | CFQ series modems | integrator | p1nacate |
| SAF Tehnika | CFQ series modems | monitor | monitor |
| SAF Tehnika | CFQ series modems | operator | col1ma |
| Sagem | F@st 1200 (Fast 1200) | root | 1234 |
| SAGEM | FAST 1400 | admin | epicrouter |
| sagem | fast 1400w | root | 1234 |
| Sagem | Fast 3504 v2 | Menara | Menara |
| Sagem | Livebox | admin | admin |
| Samsung | MagicLAN SWL-3500RG | public | public |
| samsung | modem/router | admin | password |
| samsung | n620 | n/a | (brak) |
| Scientific Atlanta | DPX2100 | admin | w2402 |
| Secure Computing | Webwasher | admin | (brak) |
| Sempre | 54M Wireless Router | admin | admin |
| Senao | 2611CB3+D (802.11b Wireless AP) | admin | (brak) |
| seninleyimben | @skan | admin | admin |
| Sercom | IP806GA | admin | admin |
| Sercom | IP806GB | admin | admin |
| Server Technology | Sentry Remote Power Manager | ADMN | admn |
| Server Technology | Sentry Remote Power Manager | GEN1 | gen1 |
| Server Technology | Sentry Remote Power Manager | GEN2 | gen2 |
| Sharp | AL-1655CS | admin | Sharp |
| sharp | AR-407/S402 | n/a | (brak) |
| Sharp | AR-M155 | admin | Sharp |
| Sharp | AR-M237 | admin | Sharp |
| Sharp | AR-M237 | admin | Sharp |
| Sharp | AR-M355N | admin | Sharp |
| Sharp | MX-3501n | Administrator | admin |
| Sharp | MX-5500 | admin | admin |
| Shoretel | ALL | admin | changeme |
| siemen | speedstream 5400 | admin | (brak) |
| Siemens | 5940 T1E1 Router | superuser | admin |
| Siemens | Gigaset | (brak) | 0 |
| Siemens | Hipath | 31994 | 31994 |
| siemens | hipath | n/a | (brak) |
| Siemens | PhoneMail | poll | tech |
| Siemens | PhoneMail | poll | tech |
| Siemens | PhoneMail | sysadmin | sysadmin |
| Siemens | PhoneMail | sysadmin | sysadmin |
| Siemens | PhoneMail | tech | tech |
| Siemens | PhoneMail | tech | tech |
| Siemens | ROLM PBX | admin | pwp |
| Siemens | ROLM PBX | admin | pwp |
| Siemens | ROLM PBX | eng | engineer |
| Siemens | ROLM PBX | eng | engineer |
| Siemens | ROLM PBX | op | op |
| Siemens | ROLM PBX | op | operator |
| Siemens | ROLM PBX | op | op |
| Siemens | ROLM PBX | op | operator |
| Siemens | ROLM PBX | su | super |
| Siemens | ROLM PBX | su | super |
| SIEMENS | SE515 | admin | n/a |
| Siemens | SE560dsl | admin | admin |
| Siemens | SpeedStream 4100 | admin | hagpolm1 |
| Siemens | Speedstream SS2614 | n/a | admin |
| Siemens Nixdorf | BIOS | n/a | SKY_FOX |
| Siemens Nixdorf | PC BIOS | n/a | SKY_FOX |
| Siemens Pro C5 | Siemens | n/a | (brak) |
| Sigma | Sigmacoma IPshare | admin | admin |
| Signamax | 065-7726S | admin | admin |
| Siips | Trojan | Administrator | ganteng |
| silex technology | PRICOM (Printserver) | root | (brak) |
| Silvercrest | WR-6640Sg | admin | admin |
| sitara | qosworks | root | (brak) |
| Sitecom | All WiFi routers | (brak) | sitecom |
| Sitecom | WL-0xx up to WL-17x | admin | admin |
| SmartSwitch | Router 250 ssr2500 | admin | (brak) |
| SMC | 2804wr | (brak) | smcadmin |
| SMC | 7204BRA | smc | smcadmin |
| SMC | 7401BRA | admin | barricade |
| SMC | 7401BRA | smc | smcadmin |
| SMC | Barricade 7004 AWBR | admin | (brak) |
| SMC | Barricade7204BRB | admin | smcadmin |
| SMC | Modem/Router | cusadmin | highspeed |
| SMC | Router | admin | admin |
| SMC | Router/Modem | admin | barricade |
| SMC | SMB2804WBR | Administrator | smcadmin |
| smc | smc 7904BRA | (brak) | smcadmin |
| SMC | SMC broadband router | admin | admin |
| SMC | SMC2804WBR | (brak) | smcadmin |
| SMC | SMC7004VBR | n/a | smcadmin |
| SMC | smc7904wbrb | (brak) | smcadmin |
| SMC | SMC8013WG-CCR | mso | w0rkplac3rul3s |
| SMC | SMCWBR14-G | (brak) | smcadmin |
| SMC | SMCWBR14-G | (brak) | smcadmin |
| SMC | SMCWBR14-G | n/a | smcadmin |
| SMC | WiFi Router | n/a | smcadmin |
| Snapgear | Pro | 1.79 | Multi |
| Solution 6 | Viztopia Accounts | aaa | often blank |
| Sonic-X | SonicAnime | root | admin |
| SonicWALL | ALL | admin | password |
| SOPHIA (Schweiz) AG | Protector | admin | Protector |
| SOPHIA (Schweiz) AG | Protector | root | root |
| Sorenson | SR-200 | (brak) | admin |
| Sparklan | Wx-6215 D and G | admin | admin |
| Spectra Logic | 64000 Gator | administrator | (brak) |
| Spectra Logic | 64000 Gator | operator | (brak) |
| SpeedStream | 5660 | n/a | adminttd |
| Speedstream | 5667 | (brak) | admin |
| Speedstream | 5861 SMT Router | admin | admin |
| Speedstream | 5871 IDSL Router | admin | admin |
| Speedstream | DSL | admin | admin |
| Speedstream | Router 250 ssr250 | admin | admin |
| SpeedStream 5200-Serie | SpeedStream | Administrator | admin |
| SpeedXess | HASE-120 | (brak) | speedxess |
| Sphairon | (Versatel WLAN-Router) | admin | passwort |
| Spike | CPE | enable | (brak) |
| SSA | BPCS | SSA | SSA |
| stratacom | all | stratacom | stratauser |
| Sun | Cobalt | admin | admin |
| Sun | JavaWebServer | admin | admin |
| Sun Microsystems | ILOM of X4100 | root | changeme |
| SWEEX | sweex | mysweex | |
| Swissvoice | IP 10S | target | password |
| Syabas Technology | Popcorn Hour A-110 | ftpuser | 1234 |
| Syabas Technology | Popcorn Hour A-110 | nmt | 1234 |
| Syabas Technology | Popcorn Hour C-200 | nmt | 1234 |
| Sybase | EAServer | jagadmin | (brak) |
| Symbol | AP-2412 | n/a | Symbol |
| Symbol | AP-3020 | n/a | Symbol |
| Symbol | AP-4111 | n/a | Symbol |
| Symbol | AP-4121 | n/a | Symbol |
| Symbol | AP-4131 | n/a | Symbol |
| Symbol | CB3000 | admin | symbol |
| Symbol | Spectrum | n/a | Symbol |
| Symmetricom | NTS-200 | guest | truetime |
| Symmetricom | NTS-200 | operator | mercury |
| SysMaster | M10 | admin | 12345 |
| System/32 | VOS | install | secret |
| T com | sinus | veda | 12871 |
| T-Com | Speedport | n/a | 0 |
| T-Com | Speedport 503V | 123456 | |
| T-Com | Speedport Router Family | (brak) | 0 |
| T-Com | Speedport W701V | n/a | 0 |
| T-Com | Speedport W900V | n/a | 0 |
| T-Comfort | Routers | Administrator | (brak) |
| Tandberg | 6000MXP | Admin | (brak) |
| TANDBERG | TANDBERG | (brak) | TANDBERG |
| Tandberg Data | DLT8000 Autoloader 10x | n/a | 10023 |
| Tandem | TACL | super.super | (brak) |
| Tandem | TACL | super.super | master |
| Team Xodus | XeniumOS | xbox | xbox |
| Teklogix | Accesspoint | Administrator | (brak) |
| Telco Systems | Edge Link 100 | telco | telco |
| telecom | home hauwei | operator | (brak) |
| Teledat | Routers | admin | 1234 |
| Teletronics | WL-CPE-Router | admin | 1234 |
| Telewell | TW-EA200 | admin | password |
| Telewell | TW-EA501 | admin | admin |
| Telindus | 1124 | n/a | (brak) |
| Telindus | SHDSL1421 | admin | admin |
| telindus | telindus | admin | admin |
| Tellabs | 7120 | root | admin_1 |
| Tellabs | Titan 5500 | tellabs | tellabs#1 |
| Terayon | Unknown | (brak) | (brak) |
| Terayon | Unknown | (brak) | (brak) |
| thomson | speedtouch 585 v7 | admin | password |
| Thomson | SpeedTouch AP | n/a | admin |
| Thomson | TCW-710 | (brak) | admin |
| Thomson | Wireless Cable Gateway | (brak) | admin |
| Tiara | 1400 | tiara | tiaranet |
| Topcom | Skyr@cer Pro AP 554 | admin | admin |
| Topcom | Wireless Webr@cer 1154+ PSTN (Annex A) | admin | admin |
| Topcom | Wireless Webr@cer 1154+ PSTN (Annex A) | admin | admin |
| Topcom | Wireless Webr@cer 1154+ PSTN (Annex A) | admin | admin |
| topsec | firewall | superman | talent |
| Toshiba | E-Studio 3511c | Admin | 123456 |
| Toshiba | E-Studio 4511c | admin | 123456 |
| Toshiba | Most e-Studio copiers | admin | 123456 |
| TrendMicro | InterScan 7.0 | admin | imss7.0 |
| TrendNET | TEW-435BRM | admin | password |
| Troy | ExtendNet 100zx | admin | extendnet |
| TVT System | Expresse G5 | craft | (brak) |
| TVT System | Expresse G5 DS1 Module | (brak) | enter |
| U.S. Robotics | SureConnect 9003 ADSL Ethernet/USB Router | root | 12345 |
| U.S. Robotics | SureConnect 9105 ADSL 4-Port Router | admin | admin |
| UNEX | Routers | n/a | password |
| Unisys | ClearPath MCP | ADMINISTRATOR | ADMINISTRATOR |
| Unisys | ClearPath MCP | HTTP | HTTP |
| Unisys | ClearPath MCP | NAU | NAU |
| us robotic | adsl gateway wireless router | support | support |
| US ROBOTICS | ADSL Ethernet Modem | (brak) | 12345 |
| US Robotics | SureConnect ADSL | support | support |
| US Robotics | USR5462 | n/a | admin |
| US Robotics | USR8000 | root | admin |
| US Robotics | USR8550 | Any | 12345 |
| US Robotics | USR9106 | admin | admin |
| US Robotics | USR9110 | admin | (brak) |
| us21100060 | hp omibook 6100 | n/a | (brak) |
| Various | DD-WRT | root | admin |
| VASCO | VACMAN Middleware | admin | (brak) |
| Verifone | Verifone Junior | (brak) | 166816 |
| Verilink | NE6100-4 NetEngine | (brak) | (brak) |
| Visual Networks | Visual Uptime T1 CSU/DSU | admin | visual |
| VxWorks | misc | admin | admin |
| VxWorks | misc | guest | guest |
| Wanadoo | Livebox | admin | admin |
| Wang | Wang | CSG | SESAME |
| Watch guard | firebox 1000 | admin | (brak) |
| Watchguard | Firebox | (blank) | wg |
| Watchguard | SOHO and SOHO6 | user | pass |
| Weidmüeller | IE-SW16-M | admin | detmond |
| westell | 2200 | admin | password |
| Westell | Ultraline Series3 A90-9100EM15-10 | admin | password1 |
| Westell | Versalink 327 | admin | (brak) |
| Westell | Wang | CSG | SESAME |
| Westell | Wirespeed | admin | password |
| Westell | Wirespeed wireless router | admin | sysAdmin |
| WLAN_3D | Router | Administrator | admin |
| wline | w3000g | admin | 1234 |
| Wyse | rapport | rapport | r@p8p0r+ |
| Wyse | Winterm | (brak) | Fireport |
| Wyse | Winterm | root | wyse |
| Wyse | winterm | root | (brak) |
| Wyse | Winterm | VNC | winterm |
| Wyse | Winterm 3150 | n/a | password |
| X-Micro | WLAN 11b Access Point | super | super |
| X-Micro | X-Micro WLAN 11b Broadband Router | 1502 | 1502 |
| X-Micro | X-Micro WLAN 11b Broadband Router | super | super |
| XAMPP | XAMPP Filezilla FTP Server | newuser | wampp |
| Xavi | 7001 | n/a | (brak) |
| Xavi | 7000-ABA-ST1 | n/a | (brak) |
| xd | xdd | xd | xd |
| Xerox | 6204 | n/a | 0 |
| Xerox | 240a | admin | x-admin |
| Xerox | DocuCentre 425 | admin | 22222 |
| Xerox | Document Centre 405 | admin | admin |
| Xerox | Document Centre 425 | admin | (brak) |
| Xerox | DocumentCenter 186 | admin | x-admin |
| Xerox | Multi Function Equipment | admin | 2222 |
| xerox | work centre pro 35 | admin | 1111 |
| Xerox | WorkCenter Pro 428 | admin | admin |
| Xerox | WorkCentre 7132 | 11111 | x-admin |
| xerox | xerox | admin | admin |
| xerox | xerox | n/a | admin |
| Xylan | Omniswitch | admin | switch |
| Xylan | omniswitch | admin | switch |
| Xylan | Omniswitch | diag | switch |
| Xyplex | Routers | n/a | system |
| Xyplex | Routers | n/a | access |
| Xyplex | Routers | n/a | access |
| xyplex | switch | n/a | (brak) |
| Xyplex | Terminal Server | n/a | access |
| Xyplex | Terminal Server | n/a | system |
| Xyplex | Terminal Server | n/a | access |
| Xyplex | Terminal Server | n/a | system |
| Yakumo | Routers | admin | admin |
| Zcom | Wireless | root | admin |
| Zebra | 10/100 Print Server | admin | 1234 |
| ZOOM | ZOOM ADSL Modem | admin | zoomadsl |
| ZTE | ZXDSL 831 | ADSL | expert03 |
| ZyXeL | 660HW | admin | (brak) |
| Zyxel | adsl routers | admin | 1234 |
| Zyxel | ES-2108 | admin | 1234 |
| zyxel | g-570s | n/a | admin |
| Zyxel | G570S | 1234 | |
| Zyxel | NWA1100 | 1234 | |
| ZyXEL | Prestige | (brak) | 1234 |
| ZyXEL | Prestige | n/a | 1234 |
| ZyXEL | Prestige | root | 1234 |
| ZyXEL | Prestige 100IH | n/a | 1234 |
| ZyXEL | Prestige 643 | (brak) | 1234 |
| ZyXEL | Prestige 645 | admin | 1234 |
| ZyXEL | Prestige 650 | 1234 | 1234 |
| Zyxel | Prestige 650HW31 | 192.168.1.1 60020 | @dsl_xilno |
| ZyXEL | Prestige 652HW-31 ADSL Router | admin | 1234 |
| Zyxel | Prestige 660HW | admin | admin |
| ZyXEL | Prestige 900 | webadmin | 1234 |
| ZyXel | Prestige P660HW | admin | 1234 |
| Zyxel | Router | (brak) | 1234 |
| Zyxel | ZyWall 2 | n/a | (brak) |
| ZyXel Based (Generic) | Broadband SOHO Router | admin | 0 |
| ZyXEL ZyWALL Series | Prestige 660R-61C | n/a | admin |
http://idroot.net/linux/install-webmin-ubuntu-16-04/
First, we need to add the Webmin repository so that we can easily install and update Webmin using our package manager. We do this by adding the repository to the /etc/apt/sources.list file.
Open the file in your editor:
Then add this line to the bottom of the file to add the new repository:
 . . .
deb http://download.webmin.com/download/repository sarge contrib
Save the file and exit the editor.
Next, add the Webmin PGP key so that your system will trust the new repository:
Next, update the list of packages to include the Webmin repository:
Then install Webmin:
Once the installation finishes, you’ll be presented with the following output:
Webmin install complete. You can now login to
https://your_server_ip:10000 as root with your
root password, or as any user who can use `sudo`.
Now, let’s secure access to Webmin by putting it behind the Apache web server and adding a valid TLS/SSL certificate.
sudo passwd
http://tech-online.pl/ubuntu-server-instalacja-gui/
pełen opis znajduje się pod tym adresem
For this post, we have make some assumptions.
A standard installation for us means that we will be using the xrdp package available within the Ubuntu repository. To install the xrdp software from Ubuntu repository, you will need to issue the following command in a terminal.
sudo apt-get install xrdp
Because of the sudo command, you will be prompted for a password. After entering your password, you will be asked to confirm your action by pressing Y (see screenshot below)

Click on picture for better resolution
xrdp and Unity desktop (or Gnome 3) are not working well together. If you do not install another desktop environment, when you will try to connect to your Ubuntu machine, you will see only a gray screen. The workaround to this situation is to install an alternate desktop that can work with xrdp software solution.
Our preferred desktop alternative is Mate-Desktop. This post will show you how to install the Mate-Desktop and have it working with the xrdp software solution.
To install the Mate-desktop, issue the following command from the Terminal Session
sudo apt-get update
sudo apt-get install mate-core mate-desktop-environment mate-notification-daemon
Note :
Desktop interface such as xfce, LXDE,LXQT, KDE are all potential candidates. Check the following links for more information and installation and configuration procedures
At this stage, we need to configure our system in order to tell xrdp that an alternate desktop needs to be used. In our case, we have to tell xrdp that we want to use Mate-Desktop as alternate desktop. With the previous version of Ubuntu, you would need to create the ~/.xsession file. In Ubuntu 16.04, it seems that this approach is not working anymore. We need to configure the system differently when working with Ubuntu 16.04
Important Note :
In our scenario, we have installed mate-desktop, If you have installed another Desktop alternative, you will have to adapt the configuration of the startwm.sh file to reflect your settings.
If you use the ~/.xsession file approach, you will experience the same symptoms as before i.e. grey screen. We will need to configure the system in a different way. To have xRDP working in Ubuntu 16.04, you will need to update the /etc/xrdp/startwm.sh file. To configure this, issue the following command in your Terminal console
sudo sed -i.bak '/fi/a #xrdp multiple users configuration \n mate-session \n' /etc/xrdp/startwm.sh

Click on picture for better resolution
Note :
Remember that the command above is to be used when you have installed the Mate-Desktop. If you have installed a different desktop environment, you will need to adapt the command accordingly. Please check the following links
By default, the xRDP login screen will use an en-us keyboard layout. You remote session will also be using the en-us keyboard layout. If you are using a different keyboard layout than the english one, you need to perform the following actions in order to update the configuration of the xrdp software.
In my case, I’m using a Belgian French keyboard, so I had to tell xrdp to use the belgian french keyboard as well. To do that, you need to perform the following actions :
Step 1 : You go to the /etc/xrdp directory
Step 2 : you issue the command setxkbmap -layout <%your layout%> to define which keyboard map/layout to use

Click on Picutre for better Resolution
Step 3 : create a copy of the km-0409.ini file into the same directory. It seems that this is the default file used by xrdp to define the keyboard layout. You will need to use sudo in order to be able to write into the directory
Step 4 : Check that you have a backup of your file by typing the dir or ls command
Step 5 : update the file by issuing the following command sudo xrdp-genkeymap km-0409.ini

Click on Picutre for better Resolution
Since Ubuntu 14.10, a new xrdp package has been made available in the Ubuntu repository. This package fixes a long time issue related to the fact that users could not reconnect to the same session. If you are using the package xrdp 0.6.1-1, you do not need to perform any customization, you will reconnect automatically to the same session.
należy wykonać następujące kroki: F8 -> CTRL+O -> Tak
na dole pierwszej formatki w pozycji
'Zakres danych pobieranych podczas aktualizacji kartotek ubezpieczonych’ zmienić zakres z
'Pełny zakres’ na 'Bez aktualizacji kartotek’.
| Name in AD | LDAP Name (header in CSV file) |
| First Name | givenName |
| Middle Name / Initials | initials |
| Last Name | sn |
| Logon Name | userPrincipalName |
| Logon Name (Pre Windows 2000) | sAMAccountName |
| Display Name | displayName |
| Full Name | name/cn |
| Description | description |
| Office | physicalDeliveryOfficeName |
| Telephone Number | telephoneNumber |
| Web Page | wWWHomePage |
| Password | password |
| Street | streetAddress |
| PO Box | postOfficeBox |
| City | l |
| State/Province | st |
| Zip/Postal Code | postalCode |
| Country | co |
| Country 2 Digit Code – eg. US | c |
| Country code -eg. for US country code is 840 | countryCode |
| Group | memberOf |
| Account Expires (use same date format as server) | accountExpires |
| User Account Control | userAccountControl |
| Profile Path | profilePath |
| Login Script | scriptPath |
| Home Folder | homeDirectory |
| Home Drive | homeDrive |
| Log on to | userWorkstations |
| Home | homePhone |
| Pager | pager |
| Mobile | mobile |
| Fax | facsimileTelephoneNumber |
| IP Phone | ipPhone |
| Notes | info |
| Title | title |
| Department | department |
| Company | company |
| Manager | manager |
| Mail Alias | mailNickName |
| Simple Display Name | displayNamePrintable |
| Hide from Exchange address lists | msExchHideFromAddressLists |
| Sending Message Size (KB) | submissionContLength |
| Receiving Message Size (KB) | delivContLength |
| Accept messages from Authenticated Users only | msExchRequireAuthToSendTo |
| Reject Messages From | unauthOrig |
| Accept Messages From | authOrig |
| Send on Behalf | publicDelegates |
| Forward To | altRecipient |
| Deliver and Redirect | deliverAndRedirect |
| Reciepient Limits | msExchRecipLimit |
| Use mailbox store defaults | mDBuseDefaults |
| Issue Warning at (KB) | mDBStorageQuota |
| Prohibit Send at (KB) | mDBOverQuotaLimit |
| Prohibit Send and receive at (KB) | mDBOverHardQuotaLimit |
| Do not permanaently delete messages until the store has been backed up | deletedItemFlags |
| keep deleted items for (days) | garbageCollPeriod |
| Outlook Mobile Access | msExchOmaAdminWirelessEnable |
| Outlook Web Access | protocolSettings |
| Allow Terminal Server Logon | tsAllowLogon |
| Terminal Services Profile Path | tsProfilePath |
| Terminal Services Home Directory | tsHomeDir |
| Terminal Services Home Drive | tsHomeDirDrive |
| Start the following program at logon | tsInheritInitialProgram |
| Starting Program file name | tsIntialProgram |
| Start in | tsWorkingDir |
| Connect client drive at logon | tsDeviceClientDrives |
| Connect client printer at logon | tsDeviceClientPrinters |
| Default to main client printer | tsDeviceClientDefaultPrinter |
| End disconnected session | tsTimeOutSettingsDisConnections |
| Active Session limit | tsTimeOutSettingsConnections |
| Idle session limit | tsTimeOutSettingsIdle |
| When session limit reached or connection broken | tsBrokenTimeOutSettings |
| Allow reconnection | tsReConnectSettings |
| Remote Control | tsShadowSettings |
VBA Character Codes and Character Constants
Code Character
Chr(9) Tab
Chr(10) Line-feed
Chr(11) Soft return (Shift+Enter)
Chr(12) Page break
Chr(13) Carriage return
Chr(13) + Chr(10) Carriage return/line-feed combination
Chr(14) Column break
Chr(34) Double straight quotation marks (”)
Chr(39) Single straight quote mark/apostrophe (’)
Chr(145) Opening single smart quotation mark (’)
Chr(146) Closing single smart quotation mark/ apostrophe (’)
Chr(147) Opening double smart quotation mark („)
Chr(148) Closing double smart quotation mark („)
Chr(149) Bullet
Chr(150) En dash
Chr(151) Em dash
Można ustawić własne zmienne systemowe np.:
set zmienna=tekst
aby wyświetlić zmienną można użyć polecenia echo
echo %zmienna%
albo set
set zmienna
zmienna=tekst
| zmienna systemowa |
| %ALLUSERSPROFILE% |
| %APPDATA% |
| %COMPUTERNAME% |
| %COMMONPROGRAMFILES% |
| %COMMONPROGRAMFILES(x86)% |
| %COMSPEC% |
| %HOMEDRIVE% |
| %HOMEPATH% |
| %PATH% |
| %PATHEXT% |
| %PROGRAMFILES% |
| %PROGRAMFILES(X86)% |
| %PROMPT% |
| %SYSTEMDRIVE% |
| %SystemRoot% |
| %TEMP% i %TMP% |
| %USERNAME% |
| %USERPROFILE% |
| %WINDIR% |
| %PUBLIC% |
Poza tymi wymienionymi występują również:
%DATE% – podaje datę w formacie polecenia date
%TIME% – podaje czas w formacie polecenia time
%CD% – podaje ścieżkę do bieżącego katalogu
%ERRORLEVEL% – podaje kod zwrócony przez ostatnie polecenie
'userinfo.vbs
' Usage:
'       cscript //Nologo userinfo.vbs
' List User properties as displayed in ADUC
On Error Resume Next
Dim objSysInfo, objUser
Set objSysInfo = CreateObject("ADSystemInfo")
' Currently logged in User
'Set objUser = GetObject("LDAP://" & objSysInfo.UserName)
 ' or specific user:
 Set objUser = GetObject("LDAP://CN=johndoe,OU=Users,DC=ss64,DC=com")
WScript.Echo "DN: " & objUser.distinguishedName
WScript.Echo ""
WScript.Echo "GENERAL"
WScript.Echo "First name: " & objUser.givenName
'WScript.Echo "First name: " & objUser.FirstName
WScript.Echo "Initials: " & objUser.initials
WScript.Echo "Last name: " & objUser.sn
'WScript.Echo "Last name: " & objUser.LastName
WScript.Echo "Display name: " & objUser.displayName
'WScript.Echo "Display name: " & objUser.FullName
WScript.Echo "Description: " & objUser.description
WScript.Echo "Office: " & objUser.physicalDeliveryOfficeName
WScript.Echo "Telephone number: " & objUser.telephoneNumber
WScript.Echo "Other Telephone numbers: " & objUser.otherTelephone
WScript.Echo "Email: " & objUser.mail
' WScript.Echo "Email: " & objUser.EmailAddress
WScript.Echo "Web page: " & objUser.wWWHomePage
WScript.Echo "Other Web pages: " & objUser.url
WScript.Echo ""
WScript.Echo "ADDRESS"
WScript.Echo "Street: " & objUser.streetAddress
WScript.Echo "P.O. Box: " & objUser.postOfficeBox
WScript.Echo "City: " & objUser.l
WScript.Echo "State/province: " & objUser.st
WScript.Echo "Zip/Postal Code: " & objUser.postalCode
WScript.Echo "Country/region: " & objUser.countryCode
'WScript.Echo "Country/region: " & objUser.c    '(ISO 4217)
WScript.Echo ""
WScript.Echo "ACCOUNT"
WScript.Echo "User logon name: " & objUser.userPrincipalName
WScript.Echo "pre-Windows 2000 logon name: " & objUser.sAMAccountName
WScript.Echo "AccountDisabled: " & objUser.AccountDisabled
' WScript.Echo "Account Control #: " & objUser.userAccountControl
WScript.Echo "Logon Hours: " & objUser.logonHours
WScript.Echo "Logon On To (Logon Workstations): " & objUser.userWorkstations
' WScript.Echo "User must change password at next logon: " & objUser.pwdLastSet
WScript.Echo "User cannot change password: " & objUser.userAccountControl
WScript.Echo "Password never expires: " & objUser.userAccountControl
WScript.Echo "Store password using reversible encryption: " & objUser.userAccountControl
' WScript.Echo "Account expires end of (date): " & objUser.accountExpires
WScript.Echo ""
WScript.Echo "PROFILE"
WScript.Echo "Profile path: " & objUser.profilePath
' WScript.Echo "Profile path: " & objUser.Profile
WScript.Echo "Logon script: " & objUser.scriptPath
WScript.Echo "Home folder, local path: " & objUser.homeDirectory
WScript.Echo "Home folder, Connect, Drive: " & objUser.homeDrive
WScript.Echo "Home folder, Connect, To:: " & objUser.homeDirectory
WScript.Echo ""
WScript.Echo "TELEPHONE"
WScript.Echo "Home: " & objUser.homePhone
WScript.Echo "Other Home phone numbers: " & objUser.otherHomePhone
WScript.Echo "Pager: " & objUser.pager
WScript.Echo "Other Pager numbers: " & objUser.otherPager
WScript.Echo "Mobile: " & objUser.mobile
WScript.Echo "Other Mobile numbers: " & objUser.otherMobile
WScript.Echo "Fax: " & objUser.facsimileTelephoneNumber
WScript.Echo "Other Fax numbers: " & objUser.otherFacsimileTelephoneNumber
WScript.Echo "IP phone: " & objUser.ipPhone
WScript.Echo "Other IP phone numbers: " & objUser.otherIpPhone
WScript.Echo "Notes: " & objUser.info
WScript.Echo ""
WScript.Echo "ORGANISATION"
WScript.Echo "Title: " & objUser.title
WScript.Echo "Department: " & objUser.department
WScript.Echo "Company: " & objUser.company
WScript.Echo "Manager: " & objUser.manager
netsh firewall set service fileandprint
| Old command | New command |
|---|---|
| netsh firewall add allowedprogram C:\MyApp\MyApp.exe „My Application” ENABLE | netsh advfirewall firewall add rule name=”My Application” dir=in action=allow program=”C:\MyApp\MyApp.exe” enable=yes |
| netsh firewall add allowedprogram program=C:\MyApp\MyApp.exe name=”My Application” mode=ENABLE scope=CUSTOM addresses=157.60.0.1,172.16.0.0/16,LocalSubnet profile=Domain | netsh advfirewall firewall add rule name=”My Application” dir=in action=allow program=„C:\MyApp\MyApp.exe„ enable=yes remoteip=157.60.0.1,172.16.0.0/16,LocalSubnet profile=domain |
| netsh firewall add allowedprogram program=C:\MyApp\MyApp.exe name=”My Application” mode=ENABLE scope=CUSTOM addresses=157.60.0.1,172.16.0.0/16,LocalSubnet profile=ALL | Run the following commands:
netsh advfirewall firewall add rule name=„My Application„ dir=in action=allow program=„C:\MyApp\MyApp.exe„ enable=yes remoteip=157.60.0.1,172.16.0.0/16,LocalSubnet profile=domain netsh advfirewall firewall add rule name=„My Application„ dir=in action=allow program=„C:\MyApp\MyApp.exe„ enable=yes remoteip=157.60.0.1,172.16.0.0/16,LocalSubnet profile=private |
For more information about how to add firewall rules, run the following command:
| Old command | New command |
|---|---|
| netsh firewall add portopening TCP 80 „Open Port 80„ | netsh advfirewall firewall add rule name=„Open Port 80„ dir=in action=allow protocol=TCP localport=80 |
For more information about how to add firewall rules, run the following command:
| Old command | New command |
|---|---|
| netsh firewall delete allowedprogram C:\MyApp\MyApp.exe | netsh advfirewall firewall delete rule name=rule name program=„C:\MyApp\MyApp.exe„ |
| delete portopening protocol=UDP port=500 | netsh advfirewall firewall delete rule name=rule name protocol=udp localport=500 |
For more information about how to delete firewall rules, run the following command:
| Old command | New command |
|---|---|
| netsh firewall set icmpsetting 8 | netsh advfirewall firewall add rule name=„ICMP Allow incoming V4 echo request„ protocol=icmpv4:8,any dir=in action=allow |
| netsh firewall set icmpsetting type=ALL mode=enable | netsh advfirewall firewall add rule name=„All ICMP V4„ protocol=icmpv4:any,any dir=in action=allow |
| netsh firewall set icmpsetting 13 disable all | netsh advfirewall firewall add rule name=„Block Type 13 ICMP V4„ protocol=icmpv4:13,any dir=in action=block |
For more information about how to configure ICMP settings, run the following command:
| Old command | New command |
|---|---|
| netsh firewall set logging %systemroot%\system32\LogFiles\Firewall\pfirewall.log 4096 ENABLE ENABLE | Run the following commands:
netsh advfirewall set currentprofile logging filename %systemroot%\system32\LogFiles\Firewall\pfirewall.log netsh advfirewall set currentprofile logging maxfilesize 4096 netsh advfirewall set currentprofile logging allowedconnections enable |
For more information, run the following command:
If you want to set logging for a particular profile, use one of the following options instead of the „currentprofile” option:
| Old command | New command |
|---|---|
| netsh firewall set opmode ENABLE | netsh advfirewall set currentprofile state on |
| netsh firewall set opmode mode=ENABLE exceptions=enable | Run the following commands:
Netsh advfirewall set currentprofile state on netsh advfirewall set currentprofile firewallpolicy blockinboundalways,allowoutbound |
| netsh firewall set opmode mode=enable exceptions=disable profile=domain | Run the following commands:
Netsh advfirewall set domainprofile state on netsh advfirewall set domainprofile firewallpolicy blockinbound,allowoutbound |
| netsh firewall set opmode mode=enable profile=ALL | Run the following commands:
netsh advfirewall set domainprofile state on netsh advfirewall set privateprofile state on |
For more information, run the following command:
If you want to set the firewall state for a particular profile, use one of the following options instead of the „currentprofile” option:
| Old command | New command |
|---|---|
| netsh firewall reset | netsh advfirewall reset |
For more information, run the following command:
| Old command | New command |
|---|---|
| netsh firewall set service FileAndPrint | netsh advfirewall firewall set rule group=„File and Printer Sharing„ new enable=Yes |
| netsh firewall set service RemoteDesktop enable | netsh advfirewall firewall set rule group=”remote desktop” new enable=Yes |
| netsh firewall set service RemoteDesktop enable profile=ALL | Run the following commands:
netsh advfirewall firewall set rule group=”remote desktop” new enable=Yes profile=domain netsh advfirewall firewall set rule group=”remote desktop” new enable=Yes profile=private |
znakowi & odpowiada ciąg &
Rozwiązanie tego problemu opisane jest np. w artykule:
http://support.microsoft.com/kb/2222370
poniżej treść tego artykułu

 Przyczyna
Jak wykonywać kopię zapasową rejestru i przywracać go w systemach Windows XP i Windows Vista
Aby automatycznie rozwiązać ten problem, należy kliknąć przycisk lub łącze Rozwiąż ten problem. Następnie należy kliknąć przycisk Uruchom w oknie dialogowym Pobieranie pliku i wykonać kroki kreatora rozwiązywania problemu.
Uwaga Ten kreator może być dostępny tylko w języku angielskim. Jednak ta poprawka automatyczna działa również w innych wersjach językowych systemu Windows.
Aby samodzielnie zmodyfikować domyślny limit rozmiaru załączników dotyczący internetowego konta e-mail w programie Outlook 2010, wykonaj następujące czynności:
Uwaga Jeśli ta ścieżka rejestru nie istnieje, należy ją utworzyć ręcznie.
Uwagi
W przypadku korzystania z konta programu Exchange Server w programie Outlook 2010 nie jest stosowany nowy limit o wartości 20 MB, który dotyczy internetowych kont e-mail. Zamiast tego program Outlook stosuje limit skonfigurowany na serwerze programu Exchange. Aby zmodyfikować ustawienie służące do sterowania rozmiarem wiadomości wysyłanych za pośrednictwem konta programu Exchange Server, wykonaj poniższe czynności.
Uwagi

Uwaga W związku z tym, że serwer programu Exchange ma pamięć podręczną dla różnych ustawień, ta zmiana nie zostanie uwzględniona natychmiast. Zanim program Outlook rozpozna tę zmianę, może upłynąć kilka godzin.
Informacje na ten temat znajdują się między innymi w artykule
http://technet.microsoft.com/en-us/library/aa998863(v=exchg.80).aspx
poniżej jego treść:
——————————————————————————————————————————————-
This topic explains how you can use the Exchange Server Database Utilities (Eseutil.exe) defragmentation command to defragment and compact an Exchange database offline. For more information about using the Eseutil /D command, see Eseutil /D Defragmentation Mode.
Before you perform the following procedure on an Exchange server that has a Mailbox server role, a Hub Transport server role, or an Edge Transport server role installed, note the following:
| You only need as much extra logical drive disk space as the final size of the files after defragmentation. To get an approximate estimate of the database (mailbox or public folder database) file size after defragmentation, look at application event ID 1221. This will tell you how much free space is in the database file. From the current database size, subtract the amount of free space specified in event ID 1221 to determine the approximate end size of the database after defragmentation. Although it is impossible to precisely predict how much disk space will be reclaimed, you should leave a recommended 110 percent of free disk drive space. Similar to how the mailbox or public folder database generates event 1221 to report logical free space after an online defragmentation, the Microsoft Exchange Server 2007 Edge Transport or Hub Transport server Queue database files also generate an event ID 7007 that reports logical free space after an online defragmentation. In addition, Queue databases on the Exchange 2007 Edge Transport or Hub Transport servers generate event ID 7006 to report logical free space before the online defragmentation. The source for these events is MSExchangeTransport. |
| <Exchange install folder> is the folder where you installed Exchange. The default location is \Program Files\Microsoft\Exchange Server. |
C:\program files\microsoft\exchange server\bin Eseutil /d c:\program files\exchange server\mailbox\<storage_group_name>\<database_name>.edb
| The default storage group name is First Storage Group, and the default database name is Mailbox Database, so the default path is C:\Program Files\Microsoft\Exchange Server\Mailbox\First Storage Group\Mailbox Database.edb. |
Use the following database switch to run Eseutil defragmentation on a specific database:
Eseutil /d <database_name> [options]
eseutil /d <database_path_and_file_name> /p
| This command can be valuable because it leaves the original database in place and does not write over it. This option increases the amount of available disk space required for defragmentation. This is because you will need space for two additional copies of the Exchange database. |
eseutil /d <database_path_and_file_name> /t <temp_database_path_and_file_name>
| If the logical drive is accessible over a network connection, this can affect the amount of time that it will take defragment the database. |
| <Exchange install folder> is the folder where you installed Exchange. The default location is \Program Files\Microsoft\Exchange Server. |
Eseutil /d c:\program files\exchange server\TransportRoles\data\queue\mail.que
| The default name of the Queue database is mail.que. |
You can see the complete command-line reference and syntax by typing Eseutil ./? at the command prompt and by selecting D for defragmentation.
For more information about Eseutil, see the following Eseutil topics:
To ensure that you are reading the most up-to-date information and to find additional Exchange Server 2007 documentation, visit the Exchange Server TechCenter.
Z poziomu Pulpitu Zdalnego (RDP) podłączonego do maszyny z Windows 8 nie ma dostępu w funkcji zamykania systemu do standardowych opcji Zasilania (Uśpij, Zamknij , Uruchom Ponownie) można jedynie wybrać polecenie – Rozłącz.
Metoda 1
Aby wyłączyć maszynę należy w wierszu poleceń wpisać:
shutdown -s
Aby zresetować komputer:
shutdown -r
Metoda 2
Z poziomu pulpitu użyć skrótu Alt+F4. Pojawi się menu służące do zamykania systemu
Procedura:
* OS5.0 i niższe: opcje > opcje bezpieczeństwa > ustawienia ogólne > menu > „wyczyść pamięć urządzenia” > kontynuuj > wpisujemy blackberry
* OS6.0/7.0: opcje > zabezpieczenia > bezpieczne czyszczenie > zaznaczyć ptaszkami co czyścimy, wpisać blackberry i kliknąć wyczyść
informacje na ten temat znajdują się np. na stronie
http://blogs.msdn.com/b/virtual_pc_guy/archive/2012/03/07/installing-android-2-2-on-hyper-v.aspx
Poniżej informacje z tego artykułu
Instalacja Androida 2.2 na Hyper-V.
Standardowo Android jest przeznaczony dla smartfonów
Android 2.2 jest starszą wersją Androida – ale tą wersję najłatwiej uaktywnić w środowisku Hyper-V.
Aby rozpocząć potrzebna w pierwszym kroku zdobyć pakiet instalacyjny – 32 bitowe (x86) media instalacyjne dla systemu Android 2.2. można go pobrać stąd:
http://code.google.com/p/android-x86/downloads/detail?name=android-x86-2.2-generic.iso
następnie trzeba przygotować maszynę wirtualną:
i podłączyć plik ISO do DVD-ROM w środowisku virtual machine a następnie uruchomić proces bootowania.
po chwili zobaczymy Installation – Install Android-x86 to harddisk:

(You can use the Live CD options – but I prefer to have a real install).
At this point you will get dumped into text mode to do some partitioning. First select to Create / Modify partitions


Here you will need to:
Now you will have a new partition that you can select for the installation:


MODI nie jest już częścią pakietu Office 2013.
Funkcjonalność OCR rozpoznawanie pisma z plików graficznych została przeniesiona do programu OneNote (oczywiście OCR musi być zainstalowany – opcja instalacji OCR zaznaczona w procesie instalacji pakietu, włączenie tej opcji jest konieczne, aby OCR był dostępny w OneNote)
Po wklejeniu zdjęcia do programu OneNote, należy kliknąć prawym przyciskiem myszy na grafikę i wybrać polecenie „Kopiuj tekst z obrazu ” do schowka.
Następnie można wkleić go ze schowka do innych aplikacji.
W programie Word 2013 umożliwiono wczytywanie plików PDF i konwertowanie ich do formatu plików otwartych do edycji .
Aby pobrać i zainstalować konwertera plików MDI na TIFF, odwiedź następującą witrynę firmy Microsoft w sieci Web:
Program SharePoint Designer 2007 jest dostępny do bezpłatnego pobrania w Centrum pobierania Microsoft. Aby pobrać program SharePoint Designer 2007, ale w instalacji uwzględnić tylko program MODI, wykonaj następujące czynności:
Zrzut ekranu z lokalizacją programu MODI w trakcie instalacji programu SharePoint Designer 2007:

Aby uruchomić program Microsoft Office Document Imaging, wykonaj następujące czynności:
Aby korzystać z programu MODI w pakiecie Office System 2007 z pakietem Office 2010, wykonaj następujące czynności:
Zrzut ekranu z lokalizacją programu MODI w trakcie instalacji pakietu Office System 2007:

Aby uruchomić program Microsoft Office Document Imaging, wykonaj następujące czynności:
Uwaga Instalacje 32- i 64-bitowych wersji pakietu Office istniejące obok siebie nie są obsługiwane. Więcej informacji na temat 64-bitowych wersji pakietu Office 2010 można znaleźć w następującej witrynie firmy Microsoft w sieci Web:
Pakiet Office 2010 w wersjach 64-bitowych
Składnik Microsoft Office Document Scanning programu MODI służy do skanowania dokumentów i udostępniania ich na komputerze przy użyciu zainstalowanego skanera. W celu skanowania dokumentów należy używać usługi Faksowanie i skanowanie w systemie Windows. Więcej informacji na temat usługi Faksowanie i skanowanie w systemie Windows można znaleźć w następujących witrynach firmy Microsoft w sieci Web:
Uwaga Aby uzyskać więcej informacji w przypadku używania oprogramowania do skanowania innej firmy lub oprogramowania dołączonego do skanera bądź drukarki, należy skontaktować się z producentem tego urządzenia.
Sterownik drukarki programu Microsoft Office Document Image Writer jest dołączony do programu MODI. Ten sterownik umożliwia zapisywanie dowolnych dokumentów pakietu Microsoft Office w formatach tiff i mdi. Zalecamy korzystanie ze sterownika drukarki modułu zapisywania dokumentów XPS firmy Microsoft lub sterownika drukarki usługi faksowania systemu Windows. Więcej informacji na temat modułu zapisywania dokumentów XPS firmy Microsoft można znaleźć w następujących witrynach firmy Microsoft w sieci Web:
Do wyświetlania plików w formatach tiff można używać jednej z następujących aplikacji:
Obecnie firma Microsoft nie udostępnia żadnej przeglądarki umożliwiającej wyświetlanie plików mdi w pakiecie Office 2010. Aby otworzyć plik mdi, należy użyć konwertera innej firmy lub przekonwertować ten plik na format tiff, a następnie wyświetlić plik w programie MODI z pakietu Office 2003 bądź pakietu Office System 2007.
Program MODI umożliwia też przeprowadzanie optycznego rozpoznawania znaków (OCR, Optical Character Recognition). Optyczne rozpoznawanie znaków pozwala kopiować tekst z zeskanowanego obrazu lub faksu do innej lokalizacji. Aby zastosować tę funkcję, należy użyć programu Microsoft OneNote 2010. W tym celu wykonaj następujące czynności:
Na potrzeby drukowania do programu OneNote 2010 używany jest sterownik drukarki modułu zapisywania dokumentów XPS.
Następujący plik jest dostępny do pobrania w Centrum pobierania Microsoft:

Aby uzyskać więcej informacji dotyczących sposobów pobierania plików pomocy technicznej firmy Microsoft, kliknij następujący numer artykułu w celu wyświetlenia tego artykułu z bazy wiedzy Microsoft Knowledge Base:
Jak uzyskać pliki pomocy technicznej firmy Microsoft w usługach online
Firma Microsoft przeskanowała ten plik w poszukiwaniu wirusów. Firma Microsoft użyła najnowszego oprogramowania do wykrywania wirusów dostępnego w dniu opublikowania pliku. Plik jest przechowywany na serwerach o podwyższonym poziomie zabezpieczeń, które utrudniają wprowadzanie nieautoryzowanych zmian w pliku.
Wcześniej usługa Microsoft Live Meeting używała programu MODI do przekazywania dokumentów programu Microsoft Word do spotkań. Teraz usługa Live Meeting instaluje odpowiednią wersję sterownika drukarki programu MODI. Aby uzyskać więcej informacji, kliknij następujący numer artykułu w celu wyświetlenia tego artykułu z bazy wiedzy Microsoft Knowledge Base:
Po zainstalowaniu klienta Live Meeting 2007 dla systemu Windows nie można importować dokumentów na spotkania (strona może być w języku angielskim)
Podczas logowania się na komputerze z systemem Windows 7 lub Windows Vista przy użyciu profilu tymczasowego jest wyświetlany następujący komunikat o błędzie:
Rozwiązanie tego problemu opisane jest np.: w artykule KB Microsoft http://support.microsoft.com/kb/947215/pl
Aby naprawić profil konta użytkownika, wykonaj następujące czynności:
W tej sekcji, metodzie lub w tym zadaniu podano informacje dotyczące modyfikowania rejestru. Niepoprawne zmodyfikowanie rejestru może jednak być przyczyną poważnych problemów. Dlatego należy uważnie wykonywać podane kroki. Aby zapewnić dodatkową ochronę, przed zmodyfikowaniem rejestru należy wykonać jego kopię zapasową. Dzięki temu będzie można przywrócić rejestr w wypadku wystąpienia problemu. Aby uzyskać więcej informacji dotyczących wykonywania kopii zapasowej i przywracania rejestru, kliknij następujący numer artykułu w celu wyświetlenia tego artykułu z bazy wiedzy Microsoft Knowledge Base:
Jak wykonać kopię zapasową rejestru i przywrócić go w systemie Windows
Aby automatycznie rozwiązać ten problem, należy kliknąć łącze Rozwiąż ten problem. Następnie należy kliknąć przycisk Uruchom w oknie dialogowym Pobieranie plikui wykonać kroki kreatora.
Uwagi
W tej sekcji, metodzie lub w tym zadaniu podano informacje dotyczące modyfikowania rejestru. Niepoprawne zmodyfikowanie rejestru może jednak być przyczyną poważnych problemów. Dlatego należy uważnie wykonywać podane czynności. Aby zapewnić dodatkową ochronę, przed zmodyfikowaniem rejestru należy wykonać jego kopię zapasową. Dzięki temu w przypadku wystąpienia problemu będzie można przywrócić rejestr. Aby uzyskać więcej informacji dotyczących tworzenia kopii zapasowej i przywracania rejestru, kliknij następujący numer artykułu w celu wyświetlenia tego artykułu z bazy wiedzy Microsoft Knowledge Base:
Jak wykonać kopię zapasową rejestru i przywrócić rejestr z kopii zapasowej w systemie Windows
Aby samodzielnie rozwiązać ten problem, wykonaj następujące czynności:
.\install-AntispamAgents.ps1
Restart-Service MSExchangeTransport
cały opis znajduje się między innymi na stronie
http://technet.microsoft.com/en-us/library/bb201691.aspx
poniżej zawartość tego artykułu
Applies to: Exchange Server 2010 SP2
Topic Last Modified: 2012-07-23
In some small organizations, it may make sense to run Microsoft Exchange Server 2010 anti-spam features on Hub Transport servers. For example, some organizations may not have enough e-mail volume to justify the cost of installing and maintaining a full perimeter network together with an Edge Transport server. You can enable Exchange anti-spam functionality on Hub Transport servers.
.gif") Important: Important: |
|---|
| It isn’t a best practice to run anti-spam functionality on the Hub Transport server. We recommend that you run anti-spam features on the Edge Transport server at the perimeter of your organization. Only run anti-spam features on the Hub Transport server if you haven’t deployed an Edge Transport server. |
To install and enable the anti-spam features on a Hub Transport server, you must run the Install-AntispamAgents.ps1 script. This script is installed when you run Exchange Setup. After you run the script, you must restart the Microsoft Exchange Transport service to finish the installation of the following anti-spam features:
Notice that attachment filtering is an antivirus feature that isn’t enabled or installed. Attachment filtering only runs on the Edge Transport server. However, the file filtering functionality that’s provided by Microsoft Forefront Protection for Exchange Server includes advanced features that are unavailable in the default Attachment Filter agent that’s included with Microsoft Exchange Server 2010 Standard Edition. Forefront Protection for Exchange Server is fully supported on the Hub Transport server role.
| Important: |
|---|
| Most Exchange 2010 documentation doesn’t refer to the anti-spam features in the context of the Hub Transport server. Therefore, as you read documentation about how to configure, manage, and maintain anti-spam features, remember that all functionality that’s documented in the context of the Edge Transport server is also available on the Hub Transport server, unless specifically noted otherwise. |
Looking for other management tasks related to managing anti-spam and antivirus features? Check out Managing Anti-Spam and Antivirus Features.
After you run the Install-AntispamAgents.ps1 script, restart the Microsoft Exchange Transport service, and set the InternalSMTPServers parameter.
You need to be assigned permissions before you can perform this procedure. To see what permissions you need, see the „Hub Transport server” entry in the Transport Permissions topic.
You need to be assigned permissions before you can perform this procedure. To see what permissions you need, see the „Transport configuration” entry in the Transport Permissions topic.
You must specify all internal SMTP servers on the transport configuration object in Active Directory forest before you run connection filtering. Specify the internal SMTP servers by using the InternalSMTPServers parameter on the Set-TransportConfig cmdlet.
| Important: |
|---|
| For all anti-spam features to work correctly, you must have at least one IP address of an internal SMTP server set on the InternalSMTPServers parameter on the Set-TransportConfig cmdlet. If the Hub Transport server on which you’re running the anti-spam features is the only SMTP server in your organization, enter the IP address of that computer. |
This example adds the internal SMTP server addresses 10.0.1.10 and 10.0.1.11 to the transport configuration of your organization.
For detailed syntax and parameter information, see Set-TransportConfig.
serwer nie pełni ról serwera AD
Przygotowania: na skruty ->
– dodanie: Funkcji środowiska .NET Framework 3.5.1
– dodanie ról:
– uruchomienie setup.com /PrepareAD /OrganizationName:…
– zainstalowanie filtra FilterPack64bit
– ustawienie automatycznego włączania Usługi udostępniania portów NET.Tcp
– włączenie Funkcji Środowisko pulpitu
Uruchomienie instalacji serwera
Problem:
po zainstalowaniu BlackBerry Desktop w wersji 7 występują porblemy z synchronizacją kontaktów do urządzenia BlackBerry – wczytuje ok 700 pozycji , po czym zawiesza się
Obejście problemu:
– 0dinstalowanie BlackBerry Desktop w wersji 7
– zainstalowanie wcześniejszej wersji 6 (dostępna np. na stronie : http://members.a1.net/updateservice/…ager_6.0.1.exe)
problem nie występuje przy pracy z wcześniejszą 6 wersją oprogramowania BlackBerry Desktop
informacje na ten temat znajdują się np na stronie http://support.microsoft.com/kb/816042/pl
poniżej zawartość tego artykułu
W tej hierarchii wzorzec operacji podstawowego kontrolera domeny w katalogu głównym lasu staje się autorytatywnym serwerem czasu dla organizacji. Zdecydowanie zalecane jest skonfigurowanie autorytatywnego serwera czasu do pobierania czasu ze Źródła sprzętowego. W przypadku skonfigurowania autorytatywnego serwera czasu do synchronizacji ze Źródłem czasu w Internecie uwierzytelnianie nie jest przeprowadzane. Zalecane jest również obniżenie ustawień związanych z korektą czasu dla serwerów i klientów autonomicznych. Te zalecenia zapewniają większą dokładność i wyższy poziom zabezpieczeń w domenie.
Aby automatycznie skonfigurować usługę Czas systemu Windows do korzystania z wewnętrznego zegara sprzętowego, przejdź do sekcji Automatyczne rozwiązywanie problemu. Aby samodzielnie rozwiązać ten problem, przejdź do sekcji Samodzielne rozwiązywanie problemu.
Aby automatycznie rozwiązać ten problem, należy kliknąć przycisk lub łącze Fix it. Następnie należy kliknąć przycisk Uruchom w oknie dialogowym Pobieranie pliku i wykonać kroki kreatora rozwiązywania problemu.
Uwagi
Ważne: W tej sekcji, metodzie lub w tym zadaniu podano informacje dotyczące modyfikowania rejestru. Niepoprawne zmodyfikowanie rejestru może jednak być przyczyną poważnych problemów. Dlatego należy uważnie wykonywać podane kroki. Aby zapewnić dodatkową ochronę, przed zmodyfikowaniem rejestru należy wykonać jego kopię zapasową. Dzięki temu będzie można przywrócić rejestr w wypadku wystąpienia problemu. Aby uzyskać więcej informacji dotyczących wykonywania kopii zapasowej i przywracania rejestru, kliknij następujący numer artykułu w celu wyświetlenia tego artykułu z bazy wiedzy Microsoft Knowledge Base:
Aby skonfigurować wzorzec podstawowego kontrolera domeny bez korzystania z zewnętrznego Źródła czasu, należy zmienić flagę anonsowania na wzorcu podstawowego kontrolera domeny. Wzorzec podstawowego kontrolera domeny jest serwerem odgrywającym rolę wzorca podstawowego kontrolera domeny w katalogu głównym lasu dla domeny. Ta konfiguracja zmusza wzorzec podstawowego kontrolera domeny do anonsowania siebie jako Źródła prawidłowego czasu, wykorzystującego wbudowany zegar CMOS (Complementary Metal Oxide Semiconductor). Aby skonfigurować wzorzec podstawowego kontrolera domeny przy użyciu wewnętrznego zegara sprzętowego, wykonaj następujące kroki:
Uwaga: Nie wolno konfigurować wzorca podstawowego kontrolera domeny do synchronizacji z samym sobą. Aby uzyskać więcej informacji dotyczących przyczyn, dla których nie należy konfigurować wzorca podstawowego kontrolera domeny tak, aby synchronizował się sam ze sobą, odwiedź następującą witrynę sieci Web w celu wyświetlenia dokumentu RFC (Request For Comment) 1305:
Typ zdarzenia: Ostrzeżenie Źródło zdarzenia: W32Time Kategoria zdarzenia: Brak Identyfikator zdarzenia: 47 Komputer: NazwaKomputera Opis: Dostawca czasu NtpClient: Nie odebrano prawidłowej odpowiedzi od ręcznie skonfigurowanej końcówki Adres_IP_serwera_NTP po 8 próbach kontaktu. Końcówka zostanie odrzucona jako źródło czasu i dostawca czasu NtpClient podejmie próbę wykrycia nowej końcówki z tą nazwą DNS. Aby uzyskać więcej informacji, skorzystaj z Centrum pomocy i obsługi technicznej w witrynie http://support.microsoft.com.
Typ zdarzenia: Błąd Źródło zdarzenia: W32Time Kategoria zdarzenia: Brak Identyfikator zdarzenia: 29 Komputer: NazwaKomputera Opis: Dostawca czasu NtpClient jest skonfigurowany, tak aby pobierać czas z jednego lub kilku Źródeł czasu, jednak żadne ze Źródeł nie jest dostępne. Przez 15 min nie nastąpi próba kontaktu ze Źródłem. NtpClient nie ma Źródła dokładnego czasu. Aby uzyskać więcej informacji, skorzystaj z Centrum pomocy i obsługi technicznej w witrynie http://support.microsoft.com.
Jeżeli wzorzec podstawowego kontrolera domeny jest uruchomiony bez korzystania z zewnętrznego Źródła czasu, w dzienniku aplikacji rejestrowane jest następujące zdarzenie:Typ zdarzenia: Błąd Źródło zdarzenia: W32Time Kategoria zdarzenia: Brak Identyfikator zdarzenia: 12 Opis: Dostawca czasu NtpClient: Ten komputer został skonfigurowany do używania hierarchii domen w celu określenia Źródła czasu, ale jest to emulator podstawowego kontrolera domeny dla domeny w katalogu głównym lasu, więc nie ma nad nim żadnego komputera w hierarchii domeny, który mógłby być używany jako źródło czasu. Zalecane jest skonfigurowanie usługi zegara rzeczywistego w domenie głównej lub ręczne skonfigurowanie podstawowego kontrolera domeny w celu zsynchronizowania z zewnętrznym Źródłem czasu. W przeciwnym wypadku ten komputer będzie działał jako autorytatywne źródło czasu w hierarchii domen. Jeśli dla tego komputera nie jest skonfigurowane lub nie jest używane zewnętrzne źródło czasu, możesz wybrać wyłączenie klienta NtpClient.
Ten tekst przypomina o korzystaniu z zewnętrznego Źródła czasu i można go zignorować.
Aby automatycznie skonfigurować wewnętrzny serwer czasu do synchronizacji z zewnętrznym źródłem czasu, przejdź do sekcji Automatyczne rozwiązywanie problemu. Aby samodzielnie rozwiązać ten problem, przejdź do sekcji Samodzielne rozwiązywanie problemu.
Aby automatycznie rozwiązać ten problem, należy kliknąć przycisk lub łącze Fix it. Następnie należy kliknąć przycisk Uruchom w oknie dialogowym Pobieranie pliku i wykonać kroki kreatora rozwiązywania problemu.
Uwagi
Aby samodzielnie skonfigurować wewnętrzny serwer czasu w celu synchronizacji z zewnętrznym źródłem czasu, wykonaj następujące czynności:
na wartość 5. Aby to zrobić, wykonaj następujące kroki:
UWAGA Listę dostępnych serwerów czasu można znaleźć w artykule z bazy wiedzy Microsoft KB: 262680 (http://support.microsoft.com/default.aspx?scid=kb;EN-US;262680)
— „Lista serwerów czasu SNTP (Simple Network Time Protocol) dostępnych w Internecie”
Aby zapewnić poprawne działanie usługi Czas systemu Windows, infrastruktura sieciowa musi funkcjonować poprawnie. Najczęściej występują następujące problemy wpływające na usługę zegara systemu Windows:
Firma Microsoft zaleca rozwiązywanie problemów sieciowych przy użyciu narzędzia Netdiag.exe. Narzędzie Netdiag.exe jest częścią pakietu narzędzi obsługi systemu Windows Server 2003. W Pomocy narzędzi obsługi zamieszczono pełną listę parametrów wiersza polecenia, których można używać z narzędziem Netdiag.exe. Jeżeli problem nie zostanie rozwiązany, można włączyć dziennik debugowania usługi zegara systemu Windows. Dziennik debugowania może zawierać szczegółowe informacje, dlatego firma Microsoft zaleca skontaktowanie się z Pomocą techniczną firmy Microsoft w przypadku włączenia dziennika logowania usługi zegara systemu Windows.
Aby uzyskać pełną listę numerów telefonów pomocy technicznej firmy Microsoft oraz informacje o kosztach związanych ze świadczeniem pomocy, odwiedź następującą witrynę firmy Microsoft w sieci Web:
http://support.microsoft.com/default.aspx?scid=fh;[LN];CNTACTMS
Protokół NTP obsługuje kilka różnych typów pakietów. Zazwyczaj klienci protokołu NTP oraz protokołu SNTP (Simple Network Time Protocol) wysyłają do serwera NTP pakiety żądań w trybie klienta. Serwer NTP odpowiada pakietem w trybie serwera. W celu skonfigurowania usługi W32time w taki sposób, aby wysyłała do serwera NTP pakiety w trybie symetrycznym aktywnym zamiast pakietów w trybie klienta, należy wpisać następujące polecenie w wierszu polecenia:
UwagaAby wymusić wysyłanie przez usługę W32time normalnych żądań klienta zamiast pakietów w trybie symetrycznym aktywnym, należy użyć flagi 0x8. Serwer NTP odpowiada w normalny sposób na te zwykłe żądania klienta.
Komputer skonfigurowany jako niezawodne źródło czasu jest rozpoznawany jako rdzeń usługi Czas systemu Windows. Rdzeń usługi zegara jest serwerem autorytatywnym dla domeny i zazwyczaj jest skonfigurowany do pobierania czasu z zewnętrznego serwera NTP lub jakiegoś urządzenia sprzętowego. Serwer czasu można skonfigurować jako źródło prawidłowego czasu, aby zoptymalizować sposób przesyłania czasu przez hierarchię domen. Jeśli jako źródło prawidłowego czasu jest skonfigurowany kontroler domeny, usługa Net Logon ogłasza, że dany kontroler domeny jest źródłem prawidłowego czasu, gdy loguje się on do sieci. Gdy inne kontrolery domeny szukają źródła czasu do zsynchronizowania się z nim, w pierwszej kolejności wybierają źródło prawidłowego czasu, jeśli jest ono dostępne.
W przypadku synchronizacji określonej ręcznie można wyznaczyć jedną końcówkę lub listę końcówek, z których komputer uzyskuje czas. Jeśli komputer nie jest członkiem domeny, musi on być ręcznie skonfigurowany do synchronizacji z określonym źródłem czasu. Komputer, który jest członkiem domeny, jest domyślnie skonfigurowany do synchronizacji z hierarchii domen. Synchronizacja określona ręcznie jest najbardziej użyteczna w przypadku katalogu głównego lasu dla domeny lub w przypadku komputerów, które nie są dołączone do domeny. Ręczne określenie zewnętrznego serwera NTP do synchronizacji z komputerem autorytatywnym dla domeny zapewnia prawidłowy czas. Aby zapewnić wysoki poziom dokładności i zabezpieczeń w domenie, zaleca się jednak skonfigurowanie komputera autorytatywnego dla domeny do synchronizacji z zegarem sprzętowym.
Jeśli żadne sprzętowe źródło czasu nie jest dostępne, usługa W32time jest konfigurowana jako usługa typu NTP. Należy ponownie skonfigurować wpisy rejestru MaxPosPhaseCorrection i MaxNegPhaseCorrection. Zalecane jest skonfigurowanie wartości 15 minut, a nawet niższej, zależnie od Źródła czasu, stanu sieci i wymogów zabezpieczeń. Odnosi się to również do dowolnego Źródła prawidłowego czasu skonfigurowanego jako źródło czasu katalogu głównego lasu w podsieci synchronizacji czasu. Aby uzyskać więcej informacji dotyczących tych wpisów rejestru, zobacz sekcję „Wpisy rejestru związane z usługą zegara systemu Windows” w tym artykule.
Uwaga: Ręcznie określone Źródła czasu nie są uwierzytelniane, o ile nie jest dla nich napisany określony dostawca czasu, więc są narażone na ataki. Ponadto, jeśli komputer jest synchronizowany z ręcznie określonym Źródłem czasu, a nie z jego uwierzytelniającym kontrolerem domeny, może się zdarzyć, że te dwa komputery nie będą zsynchronizowane. W tym scenariuszu próba uwierzytelniania Kerberos zakończy się niepowodzeniem i może być również przyczyną niepowodzenia innych działań wymagających uwierzytelnienia, takich jak drukowanie czy udostępnianie plików. Jeśli do synchronizacji ze Źródłem zewnętrznym jest skonfigurowany tylko katalog główny lasu, wszystkie inne komputery w lesie pozostają zsynchronizowane ze sobą. Ta konfiguracja utrudnia włamania.
Opcja wszystkich dostępnych mechanizmów synchronizacji jest najcenniejszą metodą synchronizacji dla użytkowników sieci. Ta metoda umożliwia synchronizację z hierarchią domen i może również zapewnić alternatywne źródło czasu, jeśli hierarchia domen jest niedostępna, zależnie od konfiguracji. Jeśli klient nie może zsynchronizować zegara z hierarchią domen, automatycznie używane jest źródło czasu określone przez ustawienie NtpServer. Ta metoda synchronizacji jest najlepszą metodą zapewnienia dokładnego czasu klientom.
Następujące wpisy rejestru znajdują się w kluczu:
| Wpis rejestru | MaxPosPhaseCorrection |
| Ścieżka |
HKEY_LOCAL_MACHINE\SYSTEM\CurrentControlSet\Services\W32Time\Config
|
| Uwaga: | Ten klucz określa największą dodatnią korektę czasu w sekundach, wprowadzaną przez tę usługę. Jeżeli usługa ustali, że konieczne jest wprowadzenie większej zmiany, rejestruje odpowiednie zdarzenie w dzienniku. W szczególnym wypadku (0xFFFFFFFF) korekta czasu jest zawsze wprowadzana. Wartość domyślna dla członków domeny jest równa 0xFFFFFFFF. Wartość domyślna dla klientów i serwerów autonomicznych jest równa 54 000 (15 godzin). |
| Wpis rejestru | MaxNegPhaseCorrection |
| Ścieżka |
HKEY_LOCAL_MACHINE\SYSTEM\CurrentControlSet\Services\W32Time\Config
|
| Uwaga: | Ten klucz określa największą ujemną korektę czasu w sekundach, wprowadzaną przez tę usługę. Jeżeli usługa ustali, że konieczne jest wprowadzenie większej zmiany, rejestruje odpowiednie zdarzenie w dzienniku. W szczególnym wypadku (-1) korekta czasu jest zawsze wprowadzana. Wartość domyślna dla członków domeny jest równa 0xFFFFFFFF. Wartość domyślna dla klientów i serwerów autonomicznych jest równa 54 000 (15 godzin). |
| Wpis rejestru | MaxPollInterval |
| Ścieżka |
HKEY_LOCAL_MACHINE\SYSTEM\CurrentControlSet\Services\W32Time\Config
|
| Uwaga: | Ten wpis określa największy dopuszczalny systemowy interwał sondowania (w sekundach). Należy zauważyć, że system musi sondować zgodnie z zaplanowanym interwałem, jednak dostawca może odmówić utworzenia żądanych próbek. Wartość domyślna dla członków domeny jest równa 10. Wartość domyślna dla klientów i serwerów autonomicznych jest równa 15. |
| Wpis rejestru | SpecialPollInterval |
| Ścieżka |
HKEY_LOCAL_MACHINE\SYSTEM\CurrentControlSet\Services\W32Time\TimeProviders\NtpClient
|
| Uwaga | Ten wpis określa specjalny interwał sondowania w sekundach dla końcówek konfigurowanych ręcznie. Po włączeniu flagi SpecialInterval 0x1 usługa W32Time używa tego interwału sondowania zamiast interwału sondowania określonego przez system operacyjny. Wartość domyślna dla członków domeny jest równa 3600. Wartość domyślna dla klientów i serwerów autonomicznych jest równa 604 800. |
| Wpis rejestru | MaxAllowedPhaseOffset |
| Ścieżka |
HKEY_LOCAL_MACHINE\SYSTEM\CurrentControlSet\Services\W32Time\Config
|
| Uwaga: | Ten wpis określa maksymalne przesunięcie (w sekundach), dla którego usługa W32Time usiłuje dostosować zegar komputera, modyfikując częstotliwość. W przypadku większego przesunięcia usługa W32Time konfiguruje zegar komputera bezpośrednio. Wartość domyślna dla członków domeny jest równa 300. Wartość domyślna dla klientów i serwerów autonomicznych jest równa 1. |
Aby uzyskać więcej informacji o usłudze Czas systemu Windows, kliknij następujące numery artykułów w celu wyświetlenia tych artykułów z bazy wiedzy Microsoft Knowledge Base:
816043 (http://support.microsoft.com/kb/816043/ )
Jak włączyć rejestrowanie debugowania w usłudze Czas systemu Windows (strona może być w języku angielskim)
884776 (http://support.microsoft.com/kb/884776/pl/ )
Konfigurowanie usługi Czas systemu Windows w celu eliminacji dużych przesunięć czasowych
321708 (http://support.microsoft.com/kb/321708/pl/ )
JAK: Korzystanie z narzędzia do diagnostyki sieci (Netdiag.exe) w systemie Windows 2000
314054 (http://support.microsoft.com/kb/314054/pl/ )
Jak skonfigurować autorytatywny serwer czasu w systemie Windows XP
216734 (http://support.microsoft.com/kb/216734/pl/ )
Jak skonfigurować autorytatywny serwer czasu w systemie Windows 2000
Aby uzyskać więcej informacji na temat usługi Czas systemu Windows w lesie opartym na systemie Windows Server 2003, odwiedź następującą witrynę firmy Microsoft w sieci Web:
Słowa kluczowe: |
kbfixme kbmsifixme kbsecurity kbhowto KB816042 |
This document outlines supported and unsupported upgrade paths for editions of the Windows Server® 2008 R2 operating system.
| From Windows Server 2003 (SP2, R2) | Upgrade to Windows Server 2008 R2 |
|---|---|
| Datacenter | Datacenter |
| Enterprise | Enterprise, Datacenter |
| Standard | Standard, Enterprise |
| From Windows Server 2008 (RTM-SP1, SP2) | Upgrade to Windows Server 2008 R2 |
|---|---|
| Datacenter | Datacenter |
| Datacenter Core | Datacenter Core |
| Enterprise | Enterprise, Datacenter |
| Enterprise Core | Enterprise Core, Datacenter Core |
| Foundation (SP2 only) | Standard |
| Standard | Standard, Enterprise |
| Standard Core | Standard Core, Enterprise Core |
| Web | Standard, Web |
| Web Core | Standard Core, Web Core |
 Note Note |
|---|
| Windows Server 2008 RTM is marked as „RTM-SP1” because a user sees „Windows Server 2008 Service Pack 1” in the system information. |
| From Windows Server 2008 (RC, IDS, RTM) | Upgrade to Windows Server 2008 R2 |
|---|---|
| Datacenter | Datacenter |
| Datacenter Core | Datacenter Core |
| Enterprise | Enterprise, Datacenter |
| Enterprise Core | Enterprise Core, Datacenter Core |
| Foundation | Standard, Foundation |
| Standard | Standard, Enterprise |
| Standard Core | Standard Core, Enterprise Core |
| Web | Standard, Web |
| Web Core | Standard Core, Web Core |
dotyczy windows 7 , wodows
Do podniesienia wersji Windows 7 lub Windows 2008 wystarczy użyć komendy DISM.exe i klucza wyższej wersji produktu.
Upgrade można zrobić w ramach Wspieranych ścieżek uaktualnień
przykład składni komendy
Dism /Image:C:\test\offline /Set-ProductKey:12345-67890-12345-67890-
(Uwaga! : Serwer nie może mieć roli DC co w przypadku Windows 2008 Fondatin może stanowić dodatkowe utrudnienie w migracji systemu do wyższej wersji.)
dokładniejsze informacje znajdują się w artykule dd744380 z Microsoft Technet
poniżej jego kopia
You can use the Windows® edition-servicing commands to change one edition of Windows® 7 to a higher edition within the same edition family. The edition packages for each potential target edition are staged within a Windows 7 image. This is referred to as an edition-family image. Because the target editions are staged, you can service a single image, and the updates will be applied appropriately to each edition in the image. This can help reduce the number of images you have to manage, but it might increase the factory time or end-user time spent in the specialize configuration pass.
Offline changes do not require a product key. If you change to a higher edition using offline servicing, you can add the product key using one of the following methods:
The base syntax fImage:<path_to_ image_directory> | /Online} [dism_options] {servicing_commandor servicing a Windows image using DISM is:
DISM.exe {/} [<servicing_argument>]
You can use the following edition-servicing options on an offline image to list editions or to change a Windows image to a higher edition:
DISM.exe /Image:<path_to_ image_directory> [/Get-CurrentEdition | /Get-TargetEditions |/Set-Edition | /Set-ProductKey]
The following edition-servicing options are available for a running Windows operating system:
DISM.exe /Online [/Get-CurrentEdition | /Get-TargetEditions]
The following table provides a description for how each edition-servicing option can be used. These options are not case sensitive.
| Option | Description | ||
|---|---|---|---|
| /Get-Help/? | When used immediately after an edition-servicing command-line option, information about the option and the arguments is displayed. Additional Help topics might become available when an image is specified.Examples: | ||
| /Get-CurrentEdition | Displays the edition of the specified image.Examples: | ||
| /Get-TargetEditions | Displays a list of Windows editions that an image can be changed to.Examples: | ||
| /Set-Edition:<target_edition_ID> {/ProductKey:<product_key>} | Use the /Set-Edition option without the /ProductKey option to change an offline Windows image to a higher edition. Use /Get-TargetEditionsto find the edition ID.Use the /Set-Edition option with the /ProductKeyoption only to change a running Windows Server® 2008 R2 operating system to a higher edition.
Example: On a running Windows Server operating system only: |
||
| /Set-ProductKey:<productKey> | The /Set-ProductKey option can only be used to enter the product key for the current edition in an offline Windows image after you change an offline Windows image to a higher edition using the /Set-Editionoption.Example: |
A European regulatory edition of Windows will be identified with an N appended to the edition name and can be changed to a higher edition only within this family.
A Korean regulatory edition of Windows, with the Korean Language Pack, will be identified with a KN appended to the edition name and can be changed to a higher edition only within this family.
Volume Licensed
The Windows Edition Servicing commands are not applicable to Volume Licensed editions of Windows. You can only upgrade to a higher edition of Windows if it is in the Consumer and Retail family.
| Uwaga |
| Jeśli wybrana zostanie opcja Wymagaj uwierzytelniania na poziomie sieci: w momencie ukazania się na rynku systemu Windows Server 2008 RC0, z serwerem terminali mogą łączyć się tylko komputery klienckie z systemem Windows Server 2008 lub Windows Vista z programem RDC 6.0 lub z nowszą wersją klienta RDC. |
Zaleca się, aby programy instalować na serwerze terminali po zainstalowaniu usługi roli serwera terminali. Jeśli instalacja wykonywana jest instalacja z pakietu instalatora Windows, program ten automatycznie zainstaluje się w trybie instalacji serwera terminali. W wypadku instalacji z innego rodzaju pakietu instalacyjnego, należy skorzystać z jednej z metod przedstawionych poniżej w celu przełączenia serwera na tryb instalacji:
Jeśli używane są programy powiązane ze sobą lub wzajemnie od siebie zależne, zaleca się zainstalowanie ich na tym samym serwerze terminali. Zaleca się na przykład zainstalowanie oprogramowania Microsoft Office jako pakietu, zamiast instalowania poszczególnych programów Office na różnych serwerach terminali.
Umieszczenie indywidualnych programów na różnych serwerach należy rozważyć w następujących przypadkach:
Po zainstalowania usługi roli serwera terminali, połączenia zdalne są domyślnie włączone. Aby dodać użytkowników i grupy, którzy łączą się z serwerem terminali oraz aby sprawdzić lub zmienić ustawienia zdalnego połączenia, można wykonać następującą procedurę.
Sprawdzanie ustawień zdalnego podłączania
Aby uzyskać więcej informacji na temat powyższych opcji, w karcie Zdalne kliknij łącze Pomóż mi wybrać.
| Uwaga |
| Członkowie grupy lokalnych administratorów mogą podłączyć się nawet, jeśli nie są na liście. |
Po przygotowaniu serwera terminali do obsługi programów trybu RemoteApp, można skorzystać z menedżera funkcji RemoteApp usług terminalowych w celu:
W menedżerze funkcji RemoteApp usług terminalowych można również usuwać, modyfikować oraz importować programy trybu RemoteApp i ustawienia z innego serwera terminali, a także eksportować programy trybu RemoteApp i ustawienia na inny serwer terminali.
Aby udostępnić użytkownikom program trybu RemoteApp przy użyciu dowolnego mechanizmu dystrybucyjnego, należy dodać dany program do listy Programy trybu RemoteApp. Programy dodawane do listy są domyślnie konfigurowane tak, aby były udostępnione przez dostęp w sieci Web do usług terminalowych.
Dodawanie programów do listy programów trybu RemoteApp
| Uwaga |
| Programy pokazane na stronie Wybierz programy, które zostaną dodane do listy programów trybu RemoteApp to programy, które są dostępne w menu Start wszystkich użytkowników na serwerze terminali. Jeśli program, który ma zostać dodany do listy Programów trybu RemoteApp nie znajduje się na tej liście, kliknij przycisk Przeglądaj, a następnie określ lokalizację pliku .exe danego programu. |
| Uwaga |
| W nazwie ścieżki można użyć zmiennych środowiska systemowego. Na przykład, jawną ścieżkę folderu systemu Windows (taką jak C:\Windows) zastąpić można ścieżką %windir%.Nie można stosować zmiennych środowiska dla poszczególnych użytkowników. |
Możliwe jest skonfigurowanie globalnych ustawień wdrażania, które stosuje się we wszystkich programach trybu RemoteApp z listy Programów trybu RemoteApp. Ustawienia te stosuje się w każdym programie trybu RemoteApp dostępnych przy użyciu programu Dostęp w sieci Web do usług terminalowych. Ponadto ustawienia te zostaną użyte jako domyślne przy tworzeniu plików .rdp, lub pakietów instalatora systemu z dowolnych programów trybu RemoteApp znajdujących się na liście.
| Uwaga |
| Dowolne zmiany ustawień wdrażania wprowadzane podczas korzystania z Menedżera funkcji RemoteApp usług terminalowych w celu utworzenia plików .rdp lub pakietów instalatora systemu Windows nadpiszą ustawienia globalne. |
Do globalnych ustawień zaliczają się:
Aby określić, w jaki sposób użytkownicy podłączają się do serwera terminali (lub do farmy serwerów terminali) w celu uzyskania dostępu do programów trybu RemoteApp, należy skonfigurować ustawienia wdrożeniowe serwera terminali.
Konfiguracja ustawień serwera terminali
| Uwaga |
Jeśli pole wyboru Wymagaj uwierzytelnienia serwerazostanie zaznaczone, należy wziąć pod uwagę następujące sytuacje:
|
| Uwaga |
| Ustawienie to nie zapobiega zdalnemu uruchamianiu programów spoza listy przez użytkowników po połączeniu się z serwerem terminali przy użyciu programu trybu RemoteApp. Jeśli, na przykład, program Microsoft Word znajduje się na liście Programów trybu RemoteApp, a program Microsoft Internet Explorer nie, to w sytuacji, gdy użytkownicy zdalnie uruchamiają sesję programu Word, a następnie klikają hiperłącze w dokumencie Word, mogą uruchomić przeglądarkę Internet Explorer. |
| Uwaga |
| Jeśli wybrana zostanie powyższa opcja, użytkownicy mogą uruchamiać dowolne programy zdalnie z pliku .rdp podczas połączenia początkowego, a nie tylko programy z listy Programów trybu RemoteApp. Zalecamy, aby nie wybierać powyższego ustawienia, aby wspomóc ochronę przed złośliwymi użytkownikami lub użytkownikami, którzy w trakcie połączenia początkowego nieświadomie uruchamiają program z pliku .rdp. |
Konfigurowanie ustawień bramy usług terminalowych
| Uwaga |
| Więcej informacji o ustawieniach klienta zasad grupy znajduje się w temacie Pomocy „Wykorzystanie zasad grupy do zarządzania połączeniami klienta przy użyciu bramy usług terminalowych”. (Aby otworzyć pomoc dotyczącą bramy usług terminalowych na serwerze opartym na systemie Windows Server 2008, kliknij przycisk Start, kliknij polecenie Uruchom, wpisz: hh ts_gateway.chm, a następnie kliknij przycisk OK.) |
Jeśli wybrana zostanie opcja Użyj tych ustawień serwera bramy usług terminalowych, wykonaj następujące działania:
| Uwaga |
| Nazwa serwera musi być zgodna z informacjami zawartymi w certyfikacie protokołu SSL dla serwera bramy usług terminalowych. |
Pakiet Office potrzebuje odpowiedniego klucza licencji grupowej.
Dodanie takiego klucza dla licencji MSDN lub Technet opisane jest np w artykule NB Microsoft
Jak umożliwić działanie pakietu Office Professional Plus 2010 na serwerze terminali
Aby zainstalować dodatkowy klucz produktu w celu włączenia usług terminalowych, należy zastosować jedną z poniższych metod.
Jeśli korzystasz z subskrypcji TechNet, odwiedź stronę dotyczącą kluczy produktów subskrypcji TechNet, klikając następujące łącze:


Jeśli korzystasz z systemu Windows Server 2008 lub Windows Server 2008 R2, wykonaj następujące czynności:
Uwaga W tym poleceniu ciąg <klucz_produktu> odpowiada kluczowi produktu, który ma zostać zainstalowany.
W innych sytuacjach wykonaj następujące czynności:
Po standardowej instalacj serwera Windows 2008 R2 na komputerze z procesorem AMD obsługującym funkcję AVX i uruchomieniu na nim roli Hyper-V nie można uruchomić maszyny wirtualnej.
Płyta główna GA-970A-DS3
Procesor: AMD FX
Pojawiają się błędy :
14098 Hyper-V-VMMS Sterownik „Funkcja hypervisor” wymagany przez usługę zarządzania maszynami wirtualnymi nie jest zainstalowany lub jest wyłączony. Sprawdź ustawienia lub spróbuj ponownie zainstalować rolę Hyper-V.
3112 Hyper-V-Worker Nie można uruchomić maszyny wirtualnej, ponieważ funkcja hypervisor nie jest uruchomiona. W celu rozwiązania problemu można wykonać następujące czynności: 1) Sprawdź, czy procesor komputera fizycznego ma obsługiwaną wersję wirtualizacji wspomaganej sprzętowo. 2) Sprawdź, czy w systemie BIOS komputera fizycznego włączono wirtualizację wspomaganą sprzętowo i sprzętowe zapobieganie wykonywaniu danych. (Jeśli jedno z tych ustawień zostanie zmodyfikowane w systemie BIOS, należy wyłączyć zasilanie komputera fizycznego, a następnie włączyć je ponownie. Zresetowanie komputera fizycznego nie wystarczy). 3) Jeśli zostały wprowadzone zmiany w magazynie danych konfiguracji rozruchu, przejrzyj te zmiany i sprawdź, czy skonfigurowano automatyczne uruchamianie funkcji hypervisor.
3040 Hyper-V-Worker Nie można zainicjować maszyny wirtualnej
12030 Hyper-V-Worker Nie można uruchomić maszyny wirtualnej…….
hotfix: Microsoft udostępnia poprawkę http://support.microsoft.com/hotfix/KBHotfix.aspx?kbnum=2568088&kbln=pl
Dodatkowe informacje : opis problemu znajduje się w NB Microsoft artykuł: 2568088

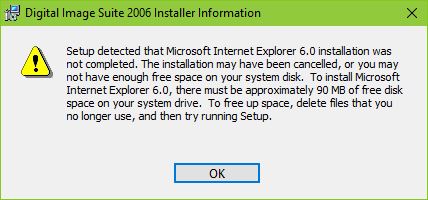

 Powrót na górę